grouper52
Masterpiece
Hi fellow BNuts.
Many people have remarked about the photography I use in my posts here. Years ago I made a tutorial on another site that explained the process, which is really quite simple, and available to most everyone. I have sometimes simply referred people to that tutorial, but it is closed to people without a current account on that site - such as myself. So I decided to simply re-create it for this site here, using a similar but new set of photos, and somewhat tweaked text.
I will use the same tree as before, because it is still one of my trees that is hardest to photograph well. The photographs will be done this time with my good camera. Last time I used a Canon Rebel - a solid camera, affordable to most, but I got it out today and it’s not working. Despite using a camera that is better than most people have, the lessons here will still apply to any decent modern camera, and by using this info well your pictures should improve dramatically.
So here’s an update, spread over several posts.
_______________________________________________________________________________
Bonsai are not intuitively easy to photograph well. And yet, it is easy to learn how to do it well. This tutorial will show you how.
It is also something that can be done much more cheaply than most people think, and fairly quickly.
I do not think of myself as a photographer. I never travel with a camera, and really couldn’t care less about taking photos - unless I want to post a tree online, or illustrate a book. Most of what I have learned about bonsai photography came from Old Mr. Crow's Website http://octavia.zoology.washington.edu/bonsai/photography/. I studied this, and practiced in my driveway on my own trees until I got it right. For those interested I also recommend studying the owners manual for your camera to see what it is capable of. If you would also like to take your overall photographic skills to the next level, especially if you have a SLR camera (rather than a point-&-shoot) and don’t already understand things like F-stops, ISO, depth-of-field, etc, then I recommend Understanding Exposure, by Bryan Peterson.
I will demonstrate the process with a series of photos of the same tree I used when I posted this tutorial elsewhere: a Seiju Chinese elm triple trunk that I have always found challenging to photograph well. Except at the end, I am not using Photoshop or any other such program for the initial photos except to straighten and crop and mildly tweak them.
Either a point-&-shoot or an SLR camera will work well, as long as there is a way to mount it to a tripod. Cheap table top tripods will serve your purpose well, and can be had cheap on Ebay.
The only other item I use is a 3’ x 6’ swath (two square yards) of dark black velvet. This life-long investment can be had at any fabric or hobby store with only modest expense ($12-15/sq. yard when I got mine). The best I’ve found is from Korea, and you’ll be happy in the long run if you splurge a little bit for good stuff here.
Your main consideration will be to photograph the tree in such a way that there is a sharp sense of the tree’s overall shape and its details. For this, the image must be as sharp and clear as possible.
I think the first thing to understand is the enormous impact you can impart to your photo just by paying attention to lighting, and using a proper background.
Direct sunlight provides very harsh contrasts. The highlights in the photo where the sunlight falls directly on the leaves and trunk will often be overexposed and washed out, showing no detail, whereas the shadows will be underexposed and black, showing no detail at all either. Sunlight coming mainly from the back or one side will cause less of this problem than sunlight coming at the tree face on or from the top. But generally, direct sunlight is no good.
More diffuse light is much better, allowing you to capture the details in both the highlights and the shadows. A cloudy day is good, shooting in the shade is good, and twilight is good: any two of these three is great, and all three are ideal. Usually, all my shots typically are done with all three factors in play, but today it is clear, so only the shade and twilight are at play. If you want to mess with White Balance, I set it here to sunlight in the first photo, and then all the rest were set to “shade,” but “cloudy” will generally work just as well (minor corrections in White Balance can be finessed in photoshop later).
[IMHO, indoor lighting is both a hassle and vastly inferior. It is entirely unnecessary to bother with such things unless you simply must for some strange reason.]
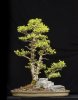
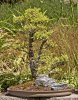
Photo-1
So, let’s look at the first photo. It’s the best photo I could take doing things the way many people would, ie, doing everything wrong. Let’s look at what’s not right here.
First, the light is entirely direct onto the front of the tree. Second, and the main problem, is the background, which is so busy and so full of objects similar to parts of the tree that there is almost no way to see the outlines of the tree itself clearly. You can’t even imagine doing a virt of such a tree.
Third, there are other, more subtle problems as well, but once again, the poor background makes them hard to notice. The photo was taken too close, such that the perspective is distorted. Also, the camera is set to the popular “Portrait” setting/program, which creates a shallow depth of field, such that foliage, for instance, at the front of the tree may be in focus, while that in the back will not. Good for portraits of people, but NOT of bonsai! You want it ALL in focus.
Lastly, the camera is hand held. You can’t see it clearly, mostly due to the background, but when a shot is taken hand held, no matter HOW steady the person thinks they are holding it, and regardless whether you spent the extra money for an Image Stabilization lens such as I use here, there is much less clarity of the tree’s details than when it is mounted on a tripod. I did use a 10 second delay, to minimize movement, which helps somewhat, but only a tripod with a delay or a remote switch can reliably insure the ultimate sharpness to the details. Clarity of the foliage and bark details is paramount in bonsai photos.
The next few photos show the progression of improvement as these problems are overcome.
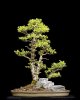
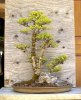
Photo-2
First, we get the tree into the shade to soften the light even further (although it is not cloudy or twilight yet), and we set it against a less distracting background. This takes about ten seconds, costs nothing, and is simple to do. The camera is about 10’ away, set on “Portrait,” the White Balance is set to "Shade" (from "Sunlight"), and the camera is still hand-held with Image Stabilization and a delay.
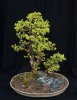
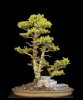
Photo-3
For the next photo, the camera is still at about 10’ hand-held with Image Stailization and a delay, and we bring out the black velvet [not ‘Black Velvet,’ mind you - barley wines or absinthe works much better here than Black Velvet . . . but I digress . . . ] and drape it behind and below the tree. This takes a minute or so.
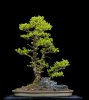
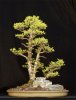
Photo-4
Next, we mount the camera on a tripod at 10’. Now we’re getting somewhere!
Many people have remarked about the photography I use in my posts here. Years ago I made a tutorial on another site that explained the process, which is really quite simple, and available to most everyone. I have sometimes simply referred people to that tutorial, but it is closed to people without a current account on that site - such as myself. So I decided to simply re-create it for this site here, using a similar but new set of photos, and somewhat tweaked text.
I will use the same tree as before, because it is still one of my trees that is hardest to photograph well. The photographs will be done this time with my good camera. Last time I used a Canon Rebel - a solid camera, affordable to most, but I got it out today and it’s not working. Despite using a camera that is better than most people have, the lessons here will still apply to any decent modern camera, and by using this info well your pictures should improve dramatically.
So here’s an update, spread over several posts.
_______________________________________________________________________________
Bonsai are not intuitively easy to photograph well. And yet, it is easy to learn how to do it well. This tutorial will show you how.
It is also something that can be done much more cheaply than most people think, and fairly quickly.
I do not think of myself as a photographer. I never travel with a camera, and really couldn’t care less about taking photos - unless I want to post a tree online, or illustrate a book. Most of what I have learned about bonsai photography came from Old Mr. Crow's Website http://octavia.zoology.washington.edu/bonsai/photography/. I studied this, and practiced in my driveway on my own trees until I got it right. For those interested I also recommend studying the owners manual for your camera to see what it is capable of. If you would also like to take your overall photographic skills to the next level, especially if you have a SLR camera (rather than a point-&-shoot) and don’t already understand things like F-stops, ISO, depth-of-field, etc, then I recommend Understanding Exposure, by Bryan Peterson.
I will demonstrate the process with a series of photos of the same tree I used when I posted this tutorial elsewhere: a Seiju Chinese elm triple trunk that I have always found challenging to photograph well. Except at the end, I am not using Photoshop or any other such program for the initial photos except to straighten and crop and mildly tweak them.
Either a point-&-shoot or an SLR camera will work well, as long as there is a way to mount it to a tripod. Cheap table top tripods will serve your purpose well, and can be had cheap on Ebay.
The only other item I use is a 3’ x 6’ swath (two square yards) of dark black velvet. This life-long investment can be had at any fabric or hobby store with only modest expense ($12-15/sq. yard when I got mine). The best I’ve found is from Korea, and you’ll be happy in the long run if you splurge a little bit for good stuff here.
Your main consideration will be to photograph the tree in such a way that there is a sharp sense of the tree’s overall shape and its details. For this, the image must be as sharp and clear as possible.
I think the first thing to understand is the enormous impact you can impart to your photo just by paying attention to lighting, and using a proper background.
Direct sunlight provides very harsh contrasts. The highlights in the photo where the sunlight falls directly on the leaves and trunk will often be overexposed and washed out, showing no detail, whereas the shadows will be underexposed and black, showing no detail at all either. Sunlight coming mainly from the back or one side will cause less of this problem than sunlight coming at the tree face on or from the top. But generally, direct sunlight is no good.
More diffuse light is much better, allowing you to capture the details in both the highlights and the shadows. A cloudy day is good, shooting in the shade is good, and twilight is good: any two of these three is great, and all three are ideal. Usually, all my shots typically are done with all three factors in play, but today it is clear, so only the shade and twilight are at play. If you want to mess with White Balance, I set it here to sunlight in the first photo, and then all the rest were set to “shade,” but “cloudy” will generally work just as well (minor corrections in White Balance can be finessed in photoshop later).
[IMHO, indoor lighting is both a hassle and vastly inferior. It is entirely unnecessary to bother with such things unless you simply must for some strange reason.]
Photo-1
So, let’s look at the first photo. It’s the best photo I could take doing things the way many people would, ie, doing everything wrong. Let’s look at what’s not right here.
First, the light is entirely direct onto the front of the tree. Second, and the main problem, is the background, which is so busy and so full of objects similar to parts of the tree that there is almost no way to see the outlines of the tree itself clearly. You can’t even imagine doing a virt of such a tree.
Third, there are other, more subtle problems as well, but once again, the poor background makes them hard to notice. The photo was taken too close, such that the perspective is distorted. Also, the camera is set to the popular “Portrait” setting/program, which creates a shallow depth of field, such that foliage, for instance, at the front of the tree may be in focus, while that in the back will not. Good for portraits of people, but NOT of bonsai! You want it ALL in focus.
Lastly, the camera is hand held. You can’t see it clearly, mostly due to the background, but when a shot is taken hand held, no matter HOW steady the person thinks they are holding it, and regardless whether you spent the extra money for an Image Stabilization lens such as I use here, there is much less clarity of the tree’s details than when it is mounted on a tripod. I did use a 10 second delay, to minimize movement, which helps somewhat, but only a tripod with a delay or a remote switch can reliably insure the ultimate sharpness to the details. Clarity of the foliage and bark details is paramount in bonsai photos.
The next few photos show the progression of improvement as these problems are overcome.
Photo-2
First, we get the tree into the shade to soften the light even further (although it is not cloudy or twilight yet), and we set it against a less distracting background. This takes about ten seconds, costs nothing, and is simple to do. The camera is about 10’ away, set on “Portrait,” the White Balance is set to "Shade" (from "Sunlight"), and the camera is still hand-held with Image Stabilization and a delay.
Photo-3
For the next photo, the camera is still at about 10’ hand-held with Image Stailization and a delay, and we bring out the black velvet [not ‘Black Velvet,’ mind you - barley wines or absinthe works much better here than Black Velvet . . . but I digress . . . ] and drape it behind and below the tree. This takes a minute or so.
Photo-4
Next, we mount the camera on a tripod at 10’. Now we’re getting somewhere!
Attachments
Last edited:
")