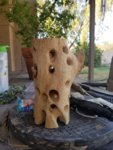
More root stand carving

jeanluc83

Omono
Messages
1,452
Reaction score
1,623
Location
Eastern Connecticut
USDA Zone
6a
I started carving on my second root stand. This one is much bigger. There is about an 80% chance that this is going to become a piece of firewood by the end but it still gives me a chance to get a feel for the tools.

The wood is a chunk of white cedar. For hand carving it is pretty good but not the best for power carving. It tends to splinter and "fuzz". This is especially true when cut across the grain. I may try to get a piece of hard wood to work on next.

I started by drilling holes at random. I may in the future alternate between carving and drilling holes as the carving progresses. Once the holes are there I’m stuck with them even if they don’t really fit with the carving at that point.

From there I’m opening things up and trying to make it into some kind of cohesive design.

IMG_20180730_174657427.jpg

IMG_20180730_182437280_HDR.jpg

IMG_20180731_181754087.jpg
 

AZbonsai

Masterpiece
Messages
2,486
Reaction score
5,329
Location
AZ
USDA Zone
9
Real nice! I like your milk crate and vise set up. Looks like you went with the heavy tools! I am about half way there. Dremel and Border Guard knife. Its a race to firewood. ?
20180731_160500.jpg
 
Messages
1,336
Reaction score
1,917
Location
Brabant, Netherlands
Cool! Good effort! I think you'll like it better if you bring a little more movement into the outside, you know? Vary some 'height' in the outer roots, see if you can carve some funk into it. Next improvement would be rounding those roots out, that helped me a lot anyway. If you like I can post a pic of my latest root stand tomorrow?
 

jeanluc83

Omono
Messages
1,452
Reaction score
1,623
Location
Eastern Connecticut
USDA Zone
6a
Cool! Good effort! I think you'll like it better if you bring a little more movement into the outside, you know? Vary some 'height' in the outer roots, see if you can carve some funk into it. Next improvement would be rounding those roots out, that helped me a lot anyway. If you like I can post a pic of my latest root stand tomorrow?

I would love to see some of your work!

One of the problems I'm facing now is two conflicting design aesthetics. There seems to be two main design styles for root stands. One the roots are interlaced but the roots are separate. In the second the roots are fused together and form more of a latticework. Mine is a combination of the two and I'm not quite sure if it is going to work.

The trick will be getting a similar look for the entire piece. I'll probably give it a couple more sessions to see where it goes. I have about 2 or 3 hours tied up in it so far. I don't want that time to be wasted but I also don't want to spend too much time on a lost cause.

Real nice! I like your milk crate and vise set up.

Not a bad start yourself.

You use what you got:

IMG_20180731_181931004.jpg

Also, that vice is marked down at harbor freight to ~$20. It is really not a bad tool for the price.
 

TN_Jim

Omono
Messages
1,972
Reaction score
2,442
Location
Richmond VA
USDA Zone
7a
This all is very impressive and inspiring. Hope to see continued posts.
Thank you!
 

Starfox

Masterpiece
Messages
2,602
Reaction score
5,316
Location
Costa Blanca, Spain, zone 10b
USDA Zone
10b
Looks like you started something here.

I've sunk some time into this, wrong type of wood, wrong type of bit but good practice for the next one. Still have lots to do so I will take better pics then.
 

Attachments

  • IMG_20180801_102845332.jpg
    IMG_20180801_102845332.jpg
    234.1 KB · Views: 61

Starfox

Masterpiece
Messages
2,602
Reaction score
5,316
Location
Costa Blanca, Spain, zone 10b
USDA Zone
10b
Why do you say this? What type of wood is it?

It's just left over scraps from last seasons firewood, I think it may be a piece of Olive root, it's very lightweight and the wood itself goes from quite dense to really soft and flakey plus where it meets has a tendency to crack. The upside of it though is the shape and colouring but like I said it is good practice anyway and more importantly I am really enjoying it.
When we get closer to winter we get our wood from a wood yard so I can cherry pick pieces of Oak, Pine, Almond and Olive. Can't find Eucalyptus though which I would love to get.
 

AZbonsai

Masterpiece
Messages
2,486
Reaction score
5,329
Location
AZ
USDA Zone
9
more importantly I am really enjoying it.
It is somehow satisfying. Olive wood has some great grain features. I have seen these stands not covered with any type of stain. I wonder if that is frowned upon?
 

jeanluc83

Omono
Messages
1,452
Reaction score
1,623
Location
Eastern Connecticut
USDA Zone
6a
wrong type of wood, wrong type of bit but good practice for the next one

I'm with you on that one. The white cedar I'm using is not exactly the best either. It is really too soft for power carving. It will take a good amount of sanding and prep work to get a good finish.

I would like to get my hands on some olive. It has fantastic color and grain character.

I have seen these stands not covered with any type of stain. I wonder if that is frowned upon?

In general clear coating is more difficult. A dark stain can cover a multitude of sins. A lot of it comes down to personal preference as well.
 

Starfox

Masterpiece
Messages
2,602
Reaction score
5,316
Location
Costa Blanca, Spain, zone 10b
USDA Zone
10b
I decided to stop carving this one as the wood was throwing up too many issues so I have given it its first coat of stain. I need to dig up a smaller brush to get to the interior better but I like the colour.
 

Attachments

  • IMG_20180807_115226911.jpg
    IMG_20180807_115226911.jpg
    218 KB · Views: 42

jeanluc83

Omono
Messages
1,452
Reaction score
1,623
Location
Eastern Connecticut
USDA Zone
6a
I worked on another stand. I’ve put the one I was working on the sidelines. I wasn’t all that happy with the way it was carving. I’m not quite convinced that it was worth spending more time on. I may come back to it at some point though.

For my next attempt I used a chunk of honeysuckle from a bush a friend of mine was removing from his yard. The wood carved really well green and had a good smell. The main problem is the wood is brittle and checks like a mother. I did a little bit of research on the wood and found that this is one of the problems with honeysuckle.

I tried microwave drying it after carving. It actually worked pretty well. I overdid the first cycle and it cracked pretty severely but after that it didn’t really get any worse. I think I ended up with about 8-10 cycles at about 25 seconds a piece, enough to get it just past the point where it was comfortable to hold. I let it cool between cycles. I’m sure I didn’t get it fully dry but it was noticeably lighter when I was done.

I ended up repairing the cracks that occurred from drying with some cyanoacrylate super glue from Harbor Freight. It was only $0.79 with a coupon I had. It was the stuff that is the consistency of water so it penetrated and worked really well. Will it split to hell in the future? Probably but it gave me a chance to try it out.

I was happy with the carving. I would have liked to go thinner on the roots but I was worried that it would just split apart. I probably could have gone farther after the cracks were reinforced with the glue but I was for the most part happy with it. This is still a learning piece so I’m not too concerned.

I gave it a couple of coats of Minwax Polyshade. Since there were some areas saturated with the super glue this wasn’t a bad choice. I think in the future I will try to use a regular stain and then clear coat with poly.

I’m still trying to figure out what the finish on Japanese root stands is. I think it is a lacquer that has a pigment in it but I’m not sure.

Here it is before finishing. I'll try to get some pictures tomorrow after the poly has dried.

IMG_20180821_183833803.jpg

IMG_20180821_183843211.jpg
 
Top Bottom