Chucktownbonsai
Seedling
Hello all,
Since I'm new here and have only asked a ton of questions, I thought I'd give back. It will be many years before I feel informed enough to give bonsai advice, so I thought I'd share something I am good at. I am an instrument maker by trade and, while I have the ability and the tools to make intricate and ornate stands, who has the time? I think we would all rather be working on our trees. So here is a vary fast and cheap pedestal that, I think, looks great. Feel free to add anything you think would make this even better, or ask a question if I leave something out.....but this is really easy.
Ok here we go..........
The materials you will need:
1 treated 6x6- (I used a 10' post so I could cut it in half for two posts and not just have a stump leftover) $32
1 treated 2x4- (may need more than one if making two) $7
1 box of outdoor screws- $9
1 piece of flag stone- $10-20+ depending on size and weight. You can find these at any stone yard that sells pavers and landscape stone.
All above items may be swapped (i.e.: 4x4 in place of 6x6, or lag bolts for screws. It all depends on the look you are going for. I used the 6x6 because I was using 20" stone and didn't want it to look precarious.)
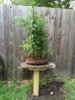
The first picture is the finished product. The second picture was me using scrap wood to rough out the lengths. I'm not going to give you any measurements for the bottom bracing, because you will need to make it custom for your stone. I made sure that I took them as close to the edge as possible, for added stability. I should note that I had the stone sitting on just the 6x6 in the shop, and it was surprisingly stable -- but make the base; you don't want to cut corners with your trees.
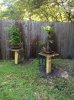
The third photo is the base all screwed in. I assembled it upside down on a flat surface to ensure that it was all level. Don't worry if yours isn't perfect; the stone you buy won't be perfectly flat either. You can adjust a few degrees when you put it in the ground with your level. I did try to get the flattest stones, but I also wanted a little character. I chose to pocket screw the base together, two screws top and bottom of the joint. You can screw them in from the front, but make sure you pre-drill your holes. The wood will crack on its own, no need to add cracks. Then I screwed the base to the 6x6, which you can see in the picture.
I was toying with anchoring the stone to the stand but, with the base and the weight of the stone (98 lbs), I didn't think it was needed. You do not have to cut in the angles. It just allowed me to get the bracing as close to the edge as possible without it being too visible. Also, it makes it look way cooler. I used poor man's cement for the hole in the ground (pea gravel and playground sand mixed), because this is not a permanent spot for the trees.
Well, I think I covered everything it took to make the stands. It will take you less time to make them than it did to read this post. Please let me know if something doesn't make sense and you need me to clarify. I hope some of you find this post helpful.
P.S.: photos two and three are out of order, and I can't seem to get them to upload sequentially. But you get the idea.
Since I'm new here and have only asked a ton of questions, I thought I'd give back. It will be many years before I feel informed enough to give bonsai advice, so I thought I'd share something I am good at. I am an instrument maker by trade and, while I have the ability and the tools to make intricate and ornate stands, who has the time? I think we would all rather be working on our trees. So here is a vary fast and cheap pedestal that, I think, looks great. Feel free to add anything you think would make this even better, or ask a question if I leave something out.....but this is really easy.
Ok here we go..........
The materials you will need:
1 treated 6x6- (I used a 10' post so I could cut it in half for two posts and not just have a stump leftover) $32
1 treated 2x4- (may need more than one if making two) $7
1 box of outdoor screws- $9
1 piece of flag stone- $10-20+ depending on size and weight. You can find these at any stone yard that sells pavers and landscape stone.
All above items may be swapped (i.e.: 4x4 in place of 6x6, or lag bolts for screws. It all depends on the look you are going for. I used the 6x6 because I was using 20" stone and didn't want it to look precarious.)
The first picture is the finished product. The second picture was me using scrap wood to rough out the lengths. I'm not going to give you any measurements for the bottom bracing, because you will need to make it custom for your stone. I made sure that I took them as close to the edge as possible, for added stability. I should note that I had the stone sitting on just the 6x6 in the shop, and it was surprisingly stable -- but make the base; you don't want to cut corners with your trees.
The third photo is the base all screwed in. I assembled it upside down on a flat surface to ensure that it was all level. Don't worry if yours isn't perfect; the stone you buy won't be perfectly flat either. You can adjust a few degrees when you put it in the ground with your level. I did try to get the flattest stones, but I also wanted a little character. I chose to pocket screw the base together, two screws top and bottom of the joint. You can screw them in from the front, but make sure you pre-drill your holes. The wood will crack on its own, no need to add cracks. Then I screwed the base to the 6x6, which you can see in the picture.
I was toying with anchoring the stone to the stand but, with the base and the weight of the stone (98 lbs), I didn't think it was needed. You do not have to cut in the angles. It just allowed me to get the bracing as close to the edge as possible without it being too visible. Also, it makes it look way cooler. I used poor man's cement for the hole in the ground (pea gravel and playground sand mixed), because this is not a permanent spot for the trees.
Well, I think I covered everything it took to make the stands. It will take you less time to make them than it did to read this post. Please let me know if something doesn't make sense and you need me to clarify. I hope some of you find this post helpful.
P.S.: photos two and three are out of order, and I can't seem to get them to upload sequentially. But you get the idea.


") I actually use pieces of wood to lift the pots off the stone and allow a little airflow...it helps a little. I have been working to replace the stone tops wherever possible. Mica pots don't seem to transfer the heat as much. I still have a couple large bald cypress on large stone slabs but they have so much mass between the pots and soil they affected as much.
I actually use pieces of wood to lift the pots off the stone and allow a little airflow...it helps a little. I have been working to replace the stone tops wherever possible. Mica pots don't seem to transfer the heat as much. I still have a couple large bald cypress on large stone slabs but they have so much mass between the pots and soil they affected as much.