aframe
Shohin
A short article for those looking into the repotting of JBP:
Throughout the year there will be updates with relevant content about repotting, bare-rooting (seedlings), removing compacted soil, root pruning and timing specific technique aimed at helping people who are new to JBP.
You may find the timing of repotting to be a point of contention, so I'm just going to share some experiences and successes that I've had in gauging where a JBP is at in it's growth cycle, and then applying this towards repotting. For the purpose of this article I'm just going to focus on JBP however I'll tell you that I've repotted many trees during months that are considered "early" and "late" this year, and I'll get into that later.
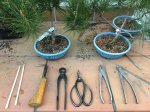
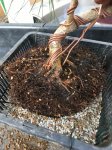
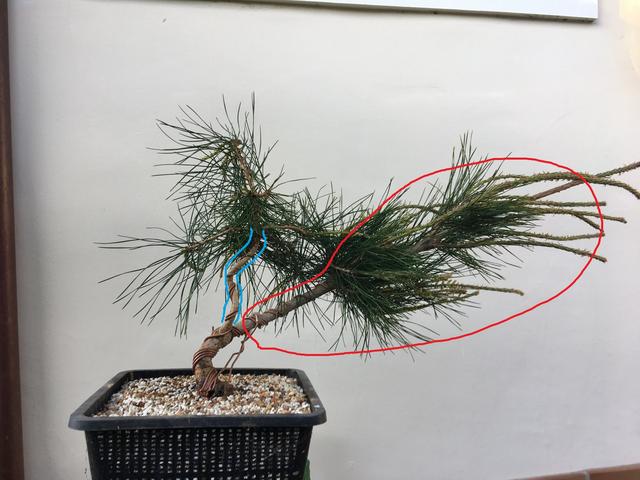
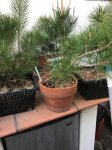
The pines you see here were repotted in the following months: November '16, December '16, January '17, February '17, March '17 and April '17. There are over 50 JBPs on my benches and they are all in different stages of development and seasonal growth, so they required work to be done at different times and for different reasons. If you ask Ryan Neil "when should I repot" he'll ask you "why do we repot?", if you ask him, "when should I apply fertilizer and how much?" he'll ask you, "what are you fertilizing for?"
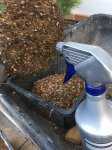
I was able to take advantage of a relatively mild winter coupled with extraordinary rain fall to get it all done, and I was able to spread the work out over 6 months because I let the trees tell me when it was "ok" to repot.
If you have a large garden with specimens from various sellers and climates it's likely you've noticed that trees within the same genus are not on the same seasonal growth schedule, unless you started a batch from seed - which many still show great variation. Some pines will wake up early, some late. Some will go dormant late, some will not go dormant at all. When you can identify, I should say verify, where a tree is at you can then apply whatever technique is appropriate. This is a fundamental bonsai concept that is widely written about, but mostly I see discussion about seasonality rather than a tree's internal clock. Sure, it's safe to say spring, repot in spring and you'll be fine. But in Santa Cruz we have what I consider to be a challenging growing season because it is so long and there are not obvious climatic changes between the seasons. I find my trees get 'confused' and begin growing out of season, which means they've spent energy when they should be sleeping. When this happens, spring may not be the best time to repot and fall becomes a better option.
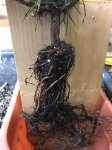
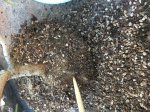
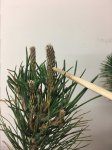
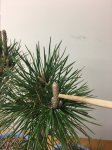
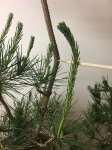
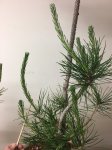
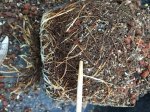
Spring in Santa Cruz can start as early as the beginning of February if we were to consider temperatures and not photo-period. This first image set is taken April 1st: A 3 year old tree with no observable root growth or candle elongation. Notice I said "candle" as opposed to "bud", the distinction between a bud and a candle is important. The buds will set during the previous fall and may grow/swell through the winter and spring. Here I'm concerned with candle elongation, specifically the observable green growth above the node and the protrusion of needles through their protective paper-like covering. Repotting during candle elongation must be done with care...as opposed to repotting a tree at this stage, when the buds are just starting to show signs that elongation is eminent. I want to repot before I see elongation. Repotting this tree in April is "late", but not dangerous. It also indicates to me that their may not substantial root growth yet, which is what I want. If I were to pull off the pot and see many delicate, plump white roots I would risk unduly stressing tree if I worked the soil out with a rake or chopstick. I have done so, but with great care.
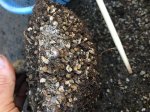
This a close up of a bud that has not elongated yet, but sap is starting to push up through the branch's vascular system to the buds that will become candles in about 2-3 weeks. Can you see the small resin droplets?
Throughout the year there will be updates with relevant content about repotting, bare-rooting (seedlings), removing compacted soil, root pruning and timing specific technique aimed at helping people who are new to JBP.
You may find the timing of repotting to be a point of contention, so I'm just going to share some experiences and successes that I've had in gauging where a JBP is at in it's growth cycle, and then applying this towards repotting. For the purpose of this article I'm just going to focus on JBP however I'll tell you that I've repotted many trees during months that are considered "early" and "late" this year, and I'll get into that later.
The pines you see here were repotted in the following months: November '16, December '16, January '17, February '17, March '17 and April '17. There are over 50 JBPs on my benches and they are all in different stages of development and seasonal growth, so they required work to be done at different times and for different reasons. If you ask Ryan Neil "when should I repot" he'll ask you "why do we repot?", if you ask him, "when should I apply fertilizer and how much?" he'll ask you, "what are you fertilizing for?"
I was able to take advantage of a relatively mild winter coupled with extraordinary rain fall to get it all done, and I was able to spread the work out over 6 months because I let the trees tell me when it was "ok" to repot.
If you have a large garden with specimens from various sellers and climates it's likely you've noticed that trees within the same genus are not on the same seasonal growth schedule, unless you started a batch from seed - which many still show great variation. Some pines will wake up early, some late. Some will go dormant late, some will not go dormant at all. When you can identify, I should say verify, where a tree is at you can then apply whatever technique is appropriate. This is a fundamental bonsai concept that is widely written about, but mostly I see discussion about seasonality rather than a tree's internal clock. Sure, it's safe to say spring, repot in spring and you'll be fine. But in Santa Cruz we have what I consider to be a challenging growing season because it is so long and there are not obvious climatic changes between the seasons. I find my trees get 'confused' and begin growing out of season, which means they've spent energy when they should be sleeping. When this happens, spring may not be the best time to repot and fall becomes a better option.
Spring in Santa Cruz can start as early as the beginning of February if we were to consider temperatures and not photo-period. This first image set is taken April 1st: A 3 year old tree with no observable root growth or candle elongation. Notice I said "candle" as opposed to "bud", the distinction between a bud and a candle is important. The buds will set during the previous fall and may grow/swell through the winter and spring. Here I'm concerned with candle elongation, specifically the observable green growth above the node and the protrusion of needles through their protective paper-like covering. Repotting during candle elongation must be done with care...as opposed to repotting a tree at this stage, when the buds are just starting to show signs that elongation is eminent. I want to repot before I see elongation. Repotting this tree in April is "late", but not dangerous. It also indicates to me that their may not substantial root growth yet, which is what I want. If I were to pull off the pot and see many delicate, plump white roots I would risk unduly stressing tree if I worked the soil out with a rake or chopstick. I have done so, but with great care.
This a close up of a bud that has not elongated yet, but sap is starting to push up through the branch's vascular system to the buds that will become candles in about 2-3 weeks. Can you see the small resin droplets?
Attachments


Last edited: