You are using an out of date browser. It may not display this or other websites correctly.
You should upgrade or use an alternative browser.
You should upgrade or use an alternative browser.
Acer campestre - multi year demo by Dale Cochoy
- Thread starter Graydon
- Start date


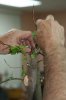


Dale has this cool technique where he paints an area to match the bark to help ease the look and seal the wound a bit. That's Pete mixing colors for Dale. Second try got it. Don't forget the lime sulfur Pete!
Attachments


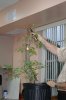
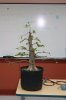
Here's the last of them from the demo. At some point I am sure Dale will post some information on what and why he did what he did. We appreciated Dale's time and everyone had a great time. Looking forward to next year's visit so we can review what we started with, what was done and where this great start will take us in the future.
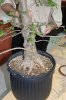
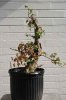
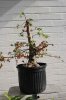
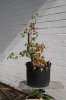
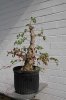
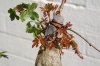
I have photos taken today of the progress of the tree. New buds popping everywhere! Some of the wire had to be removed as it had begun to cut in after a few weeks. I'll post those in a day after I have a chance to look thru them, downscale for posting and select the best ones.
Thanks again Dale, and a big thanks to Brent at Evergreen Gardenworks for the tree, quite a trunk indeed.
Attachments

agraham
Shohin
Well done!Thanks Graydon.
That is quite a piece of stock and it looks like Dale did a great job.
andy
That is quite a piece of stock and it looks like Dale did a great job.
andy


BONSAI_OUTLAW
Banned
Thank you for taking the time to share this with us Graydon.
Chris Johnston
Omono
Graydon, great series of pics of a well-done and well conceived demonstration of good technique. The important thing, as you well know, is the continued care and instruction in proper technique.
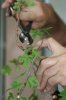
I would encourage you not to be so afraid of the wire cutting in. If you notice the branch with the tiny wire mark on it, there is no movement in the branch. With Japanese maples, wire scars fill in quickly and actually take on the grey aged color of older bark, and so many times, wire is allowed to cut in specifically to age the bark. The important thing, though, is that wire scarring actually helps set the curves in the branches. Trying to use too much branch is a mistake often made by bonsai enthusiasts, when setting good curves in a branch with wire scars, and cutting back to the first curve or two and starting again can produce much more natural and well-formed branches.
I would encourage you not to be so afraid of the wire cutting in. If you notice the branch with the tiny wire mark on it, there is no movement in the branch. With Japanese maples, wire scars fill in quickly and actually take on the grey aged color of older bark, and so many times, wire is allowed to cut in specifically to age the bark. The important thing, though, is that wire scarring actually helps set the curves in the branches. Trying to use too much branch is a mistake often made by bonsai enthusiasts, when setting good curves in a branch with wire scars, and cutting back to the first curve or two and starting again can produce much more natural and well-formed branches.
Dale Cochoy
Shohin
Hi Folks,
I'm back.
Wow Graydon, lots of new buds. I see that some of the longer branches can soon be shortened and hopefully some buds/branches will appear in the middle of the trunk.
First let me make some comments about this very healthy Hedge Maple stock.
The trunk and root buttress were VERY nice and trunk had nice taper the entire length.
A couple problems I see/saw were:
The suckers allowed to grow upwards to increase the trunk/rootbase were, in my opinion, left on too long and had gotten too big. This caused a few problems. One was that so many large branches had to be removed that it made many large cut sites, which will probably heal over just fine in the future, BUT, it looked to me as if the branches height with foliage possibly kept sprouts from happening in the middle of the trunk. Hopefully, this will be rectified now that ot is open to the light and some branches may appear.
Another problem that I didn't like was that the spots where branches had come out were left to produce numerous branches from the same spot. This problem required some large cuts and carving to help reduce the bulges where multiple ( 5 or 6) branches grew from the same spot. We removed all but the best choice in all these spots. Although there were many branches, they came from relatively few spots around the circumference of the tree.
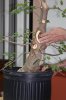
One side of the rootbase was much nicer in flare than the other, which is why I left the long sacrifice branch on the lower left side, to help even out the flare. This branch was wired out and horizontal to allow to grow wild without having foliage rise up to block production of shoots/branches in the middle of the tree.It will be removed later.
We spoke about probably thread grafting some branches to the middle area of the trunk using existing branches allowed to lengthen if buds did not form in the center of the trunk after cut back. It is looking good now however. We'll see about that?
There were 3 choices for a top which I spoke about at great length during the demo and explained my final choice which I believed was best for 1. taper 2. risk to top death 3. minimizing "chop" scare being seen.
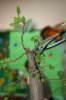
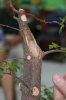
I carved all past taper-producing chop spots smooth and used carver to improve frontal taper look by carving one side of a large scar callous that was on the rear but showed from the front. You can see this carving and improved taper in the pics of the rear and front.
I removed a couple aerial roots which would cause no problem as the tree was WELL rooted. In fact, I think the largest danger to finalizing this tree will be to get it into a bonsai pot. In central Florida I think we can accomplish this in 2 pottings. The tree was solidly rooted into the bulging nursery can and I imagine that very large roots run the length of the can. I expect the potting operations to be much more risky than the styling. As a side note, if I were doing this on a "DALE tree" in Ohio I would have opted to do the worst things first before styling, meaning, I would have reduced the roots and gotten it into a bonsai container or training pot BEFORE I worked several years on final styling. I talked a bit about my feelings on this during the demo and how I always "Do the worst stuff first".
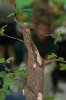
There was little to no twigging on the branches so most were cut to the first few leaves then wired into place. Some were cut to NO foliage. These are to be shortened or removed as foliage appears and new branches appear on the trunk. Hopefully branches will appear and grow in the middle trunk and won't require thread grafts.
I've tried to cover everything and be honest. Please don't think that my finding faults with the stock meant that I did not appreciate this very nice pre-bonsai grown stock which I couldf tell took SEVERAL years of production time.
I'm going to repost the finished demo front pic to help you visualize and pick out some things I mentioned.
Any questions?...please ask.
Regards,
Dale
I'm back.
Wow Graydon, lots of new buds. I see that some of the longer branches can soon be shortened and hopefully some buds/branches will appear in the middle of the trunk.
First let me make some comments about this very healthy Hedge Maple stock.
The trunk and root buttress were VERY nice and trunk had nice taper the entire length.
A couple problems I see/saw were:
The suckers allowed to grow upwards to increase the trunk/rootbase were, in my opinion, left on too long and had gotten too big. This caused a few problems. One was that so many large branches had to be removed that it made many large cut sites, which will probably heal over just fine in the future, BUT, it looked to me as if the branches height with foliage possibly kept sprouts from happening in the middle of the trunk. Hopefully, this will be rectified now that ot is open to the light and some branches may appear.
Another problem that I didn't like was that the spots where branches had come out were left to produce numerous branches from the same spot. This problem required some large cuts and carving to help reduce the bulges where multiple ( 5 or 6) branches grew from the same spot. We removed all but the best choice in all these spots. Although there were many branches, they came from relatively few spots around the circumference of the tree.
One side of the rootbase was much nicer in flare than the other, which is why I left the long sacrifice branch on the lower left side, to help even out the flare. This branch was wired out and horizontal to allow to grow wild without having foliage rise up to block production of shoots/branches in the middle of the tree.It will be removed later.
We spoke about probably thread grafting some branches to the middle area of the trunk using existing branches allowed to lengthen if buds did not form in the center of the trunk after cut back. It is looking good now however. We'll see about that?
There were 3 choices for a top which I spoke about at great length during the demo and explained my final choice which I believed was best for 1. taper 2. risk to top death 3. minimizing "chop" scare being seen.
I carved all past taper-producing chop spots smooth and used carver to improve frontal taper look by carving one side of a large scar callous that was on the rear but showed from the front. You can see this carving and improved taper in the pics of the rear and front.
I removed a couple aerial roots which would cause no problem as the tree was WELL rooted. In fact, I think the largest danger to finalizing this tree will be to get it into a bonsai pot. In central Florida I think we can accomplish this in 2 pottings. The tree was solidly rooted into the bulging nursery can and I imagine that very large roots run the length of the can. I expect the potting operations to be much more risky than the styling. As a side note, if I were doing this on a "DALE tree" in Ohio I would have opted to do the worst things first before styling, meaning, I would have reduced the roots and gotten it into a bonsai container or training pot BEFORE I worked several years on final styling. I talked a bit about my feelings on this during the demo and how I always "Do the worst stuff first".
There was little to no twigging on the branches so most were cut to the first few leaves then wired into place. Some were cut to NO foliage. These are to be shortened or removed as foliage appears and new branches appear on the trunk. Hopefully branches will appear and grow in the middle trunk and won't require thread grafts.
I've tried to cover everything and be honest. Please don't think that my finding faults with the stock meant that I did not appreciate this very nice pre-bonsai grown stock which I couldf tell took SEVERAL years of production time.
I'm going to repost the finished demo front pic to help you visualize and pick out some things I mentioned.
Any questions?...please ask.
Regards,
Dale
Attachments

Last edited:
Dale Cochoy
Shohin
I realized I forgot to comment on something that Graydon touched on,
For quite a few years now I have used a technique of mixing acrylic enamel "toll" or "stencil" paints to achieve a color that matches the bark on trees that I carve and DON'T want to highlight the carving or dead wood. I have used this technique on some photo essays on another talk group in the past.
We are all familiar with using lime sulfur or LS mixed with light paint/inks to protect and bring attention to carved dead wood. But, I don't always want to have attention drawn to carved areas if they are not a point of focus and SHOULD be disquised. A perfect example of where to do this was on this tree where I carved to smooth and increase taper on old tapering chops on the tree, some of which were partially rotted and quite large after carving..
I forgot my box of paints at home on the work bench but luckily there was a hobby shop close by and luckily I found some paints to mix to match. Although I'd never used this type, the Tamiya model camo paints looked good. They were acrylic enamel, water soluble and flat. We got about 6 colors (we used a piece of branch to color shop) and towards the end of the demo one of the observers mixed up some paints to match great. Normally I'd only use on the large tapering cuts to disquise them but since I was demoing the idea to folks I touched up all the cuts/carves on the tree. They blended great, although most would be covered with putty the next day except for the large carves. I don't know how these paints held up since no background with them but the toll paints I use that can be bought at any craft shop like "Michaels" will last many years, and won't wear off. I usually mix a tiny bit of LS with the toll paints as I find it knocks off the tiny bit of shine they have. The paints we used here were flat to begin.
Regards,
Dale
Thanks for summing things up Dale.
We do have concerns about reducing the root mass this dormancy season. George is now in charge of this tree so I am sure it will go well. In the mean while we are discussing building a slightly bigger (than the root mass) wooden grow box and carefully removing the nursery can and potting it up a bit. Our hope would be to get some new root activity around the root ball now during the growing season.
Thanks again!
Dale Cochoy
Shohin
Hi Graydon,
That sounds like a good idea.
This is only speculation since we haven't actually seen the rootball, but....if there are large roots running verticle to the bottom ( as I suspect) you might try this idea in your new box. Scar the roots near the surface of the soil( use some rooting hormones if you like) and let them calous and root around the top of your bigger box and extend horizontally. This might be a good help when the time comes to shorten the root mass!")
It sounds like I won't be coming through in October since Miami show site has not moved from Fairchild.
BTW, I don't remove serious amounts of roots from diciduous trees in dormancy, or late fall, here in Ohio as I fear root root in winter. I do that kind of work on my trees just as they are emerging from dormancy. IF I HAVE THE TIME!! Unfortunately I'm STILL doing it here in Ohio pretty late!
How are those turntable upgrades coming??
Dale
That sounds like a good idea.
This is only speculation since we haven't actually seen the rootball, but....if there are large roots running verticle to the bottom ( as I suspect) you might try this idea in your new box. Scar the roots near the surface of the soil( use some rooting hormones if you like) and let them calous and root around the top of your bigger box and extend horizontally. This might be a good help when the time comes to shorten the root mass!
It sounds like I won't be coming through in October since Miami show site has not moved from Fairchild.
BTW, I don't remove serious amounts of roots from diciduous trees in dormancy, or late fall, here in Ohio as I fear root root in winter. I do that kind of work on my trees just as they are emerging from dormancy. IF I HAVE THE TIME!! Unfortunately I'm STILL doing it here in Ohio pretty late!
How are those turntable upgrades coming??
Dale
Last edited: