TN_Jim
Omono
No doubt..will keep you posted.I would be interested in a hop-hornbeam if you end up with an extra you would like to sell.
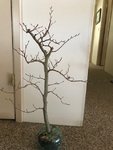
Here is nice one I got to work a couple of weeks ago at our study group.
View attachment 197429
No doubt..will keep you posted.I would be interested in a hop-hornbeam if you end up with an extra you would like to sell.
Here is nice one I got to work a couple of weeks ago at our study group.
View attachment 197429


Buds on both scions (and both sides of the stocks) all survived. The graft orifice on the beech was slightly larger than the hornbeam due to the bud size. This and the minor constriction from the securing string early in the season, could have contributed to the aesthetically jarring girth and cambium reaction of the beech during this first growing season.
Wonderful thread detailing your approach. Have you used the same approach with a different sealant. I have had bad experience with fluid type sealant on grafts. One spring, i decided to try the new green fluid sealant that worked wonders for healing scars on maples. So i used it for several thread grafts and approach grafts with very mixed results. Lower success rate than normal. When i switched back to more traditional methods, cut paste, latex caulk, plumbers putty and grafting wax the results went back to normal success. My theory was that the fluid type seal actually crept between and interfered with the joining.This was based on a visible green sealant layer between the scion and host when the failed grafts were exposed. Just an observation from experience. I found this on what appeared to be a successful approach graft when separating after two growing seasons even though there was significant thickening on the exit side.European beech after one growing season, the graft has grown in well but with significant reactionary wood surrounding the scion branch at the new branch collar (figures 1 & 2).
View attachment 218264
Figure 1: EU beech scion entry wound after one growing season.
View attachment 218265
Figure 2: EU beech scion exit wound after one growing season.
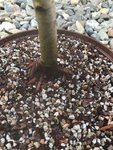
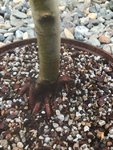
Extensive thickening of the main trunk has occurred at the graft site (figure 3). The string used to secure the graft was removed early in the season when it was found slightly constricting the bark. By this time the attachment was deemed reasonably robust and no further securing devices were installed. Encircling marks on the bark can be seen approximately two inches below the graft point (figure 3).
View attachment 218266
Figure 3: Side view of the EU beech thread graft showing widening of the trunk parallel with the graft wound and encircling marks from bracing string removed mid summer.
European hornbeam after one growing season. Upon visual inspection, this hornbeam generated less reactionary wood across the girth of the graft stock and less cambium at the entry/exit wounds than the above Beech (Figure 4). Graft incorporation is deemed progressive.
View attachment 218268
Figure 4: European Hornbeam thread graft after one growing season.
View attachment 218269
Figure 5: European hornbeam thread graft entry. Both exit and entry graft unions show less reactionary cambium tissue and look more aesthetically pleasing than the beech.
Comparison of the hornbeam thread entry before and after. Some reactionary thickening has no doubt occurred. Stock bark shows surface signs of cell division primarily above the graft wound (Figure 6).
View attachment 218270
Figure 6: European hornbeam thread graft before (left) and after (right) one growing season.
Comparison of the European Beech. Before and after orientations are slightly different (Figure 7) and do not illustrate thickening sufficiently. These angles illustrate the vigor and cambium growth well. For reference, the thickest point in the beech graft stock after the season is pictured above (Figure 3).
View attachment 218271
Figure 7: EU Beech thread graft before (left) and after (right) one growing season.
Current Conclusions:
Visual inspection suggests that this procedure on this EU beech likely produced significantly more reactionary wood and cambium than the EU hornbeam. Both trees were of similar age, girth and location. The beech could be considered to be in full sun, while the hornbeam in full sun/partial shade. Both grafts show good stock to scion incorporation. However, scion branches will not be severed now. Remaining completely untouched, they will be evaluated next growing season. The aesthetics of this hornbeam graft can be considered better than the beech after one season. This may be a reason that the general consensus amongst our community is, threading beech is not a good plan. Furthermore, it is worth noting that based on the visual inspection, this beech has likely put significantly more resources into its healing process by generating more tissue volume than the hornbeam. If both trees were under additional stresses such as bonsai training activities, the increased resource draw exhibited by the beech could translate to a higher risk of graft failure in comparison to the hornbeam. Buds on both scions (and both sides of the stocks) all survived. The graft orifice on the beech was slightly larger than the hornbeam due to the bud size. This and the minor constriction from the securing string early in the season, could have contributed to the aesthetically jarring girth and cambium reaction of the beech during this first growing season.
Ha ha ha, thanks TN_Jim! Tried to be a thorough as possible so people could see what happened and make a decision whether to try this. Also, I learned quite a bit writing this. Doing it this way helps crystalise thought for meInteresting and thorough image, observation and detail. Goodness for sure!
Do you have any idea of any potential means of technique or approach to the beech to optimize this observation going forward -what if anything could possibly be applied to facilitate a more desirable healing and response in first season? ...or is this just the species..?
Too, I especially respect your ideas of partitioning of resources with regard to stress.
Thanks
")
Great plan 0soyoung, I will look into doing this for sure!If you remove buds on the root side of the thread near the threaded stem (say, to 6 inches away) you will know that the phloem has been throttled on the exit (thread branch tip) side by the difference in the thicknesses of the thread on the entrance versus exit side. The entrance side will be poorly fed and won't thicken as much. Usually, but not necessarily a large difference will indicate that the graft has taken.
Growth of xylem/wood on the exit side is necessary for a complete graft - I am unsure how to know other than simply cutting off the thread at the entrance. The time honored procedure is to scrape the bark an cambium off a side of the thread near the entrance. In my experience this will either do nothing or it will cause the thread xylem to be jammed up (via normal damage response), so I just make an educated guess and cut when the thread thicknesses on the two sides are dramatically different. However, if one has attempted air layers on the species, one should be able to 'inform' their guess by the amount of thickening girdled/tourniqueted stems the species tends to exhibit.
Thanks River's Edge! I have never used cut paste or wax, but I can see that this sealant definitely incorporates itself on past chops I have done. I does harden and dissolve away to a thin layer or flake off depending on ambient temp. In the middle east it flakes more often than not. It does not set as hard as epoxy resin though. I would imagine the cambium may crush and crack it, growing around and through it if incorporated. Similar to what happens with incorporated bark as branches fuse together.Wonderful thread detailing your approach. Have you used the same approach with a different sealant. I have had bad experience with fluid type sealant on grafts. One spring, i decided to try the new green fluid sealant that worked wonders for healing scars on maples. So i used it for several thread grafts and approach grafts with very mixed results. Lower success rate than normal. When i switched back to more traditional methods, cut paste, latex caulk, plumbers putty and grafting wax the results went back to normal success. My theory was that the fluid type seal actually crept between and interfered with the joining.This was based on a visible green sealant layer between the scion and host when the failed grafts were exposed. Just an observation from experience. I found this on what appeared to be a successful approach graft when separating after two growing seasons even though there was significant thickening on the exit side.
If there is a question, i would check for that possibility. I agree with those who note that thickening is not a sure fire indicator that a graft has taken.
I've learnt that it's important to seal both sides of a thread graft with a putty type sealer. The success rate was much higher than none or a liquid sealer. If dessication occurs round the hole it will fail so ideally we'd like to see callus forming all round the exit point. Secondly, if anything seeps between the scion and exit hole (water, liquid sealant) it will similarly fail too. It's hard to say from the pictures if it has taken and I agree with your assessment to leave it alone next season for more definite proof of a more noticeable difference in girth between entry & exit points.
Just a final point too. The graft is being performed on a very vigorously growing, ground grown tree. To get sufficient thickening for a successful graft on a tree in a training pot would take far more time.
Very interesting thread, thanks for documenting it. Please update next season
What kind of putty would you apply to the tree (beech) in this case?
Also, when applying putty, are you careful to not let ANY of the material go into the bored hole where contact (in the gap, where cambiums are not touching/first-binding) is also not at first?...only seal it off?...is this what I’m understanding?