rnlabarnes 6yr JBP Contest Thread Entry

PeaceLoveBonsai

Chumono
Messages
892
Reaction score
3,002
Location
Franklin, TN
USDA Zone
7a
Here is a pic of my largest pine. This has always been the largest. It was wired in the late fall and is starting to grow strong. This is one of the few that i only trimmed the tap root on initially from my first batch as i was initially worried that most of my seedling cuttings would die (and basically all made it, even the ones i didnt plant in through in the flower beds).

It does have some root issues that i will either need to be later addressed or use in the design. As of this year, when i looked at the nebari i felt i could use in the design.

Also, i just applied my second set of ferts. Feb - 2 teabags per container, 17MAR - 1 additional teabag. In two weeks, i will add another. I think this pine has 4 (not shown in photot) as it didnt get repotted. I repotted the others all throughout the winter and just protected from cold (we had no freezes this yr!!).

November before wiring.

View attachment 232884

Ugly roots (now that i see this again, i will probably try and remove next year).

View attachment 232885

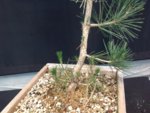
Wired up and current.

View attachment 232886

Jesus.
 

RobertB

Chumono
Messages
736
Reaction score
708
Location
Fairhope AL
USDA Zone
8
I might have mentioned this before but you really can literally see these things growing right now. There like a maple or something. I am probably fertilizing pretty hard right now too. Seems like it but I reallly don't know how much they could actually take.

Anyone know why a few of my candles are going limp?

IMG_4154.JPG

IMG_4155.JPG
 

parhamr

Omono
Messages
1,767
Reaction score
6,216
Location
Portland, OR
USDA Zone
8
Anyone know why a few of my candles are going limp?
I have some doing this, too. My impression is they've been slightly overwatered or the water hasn't been consistent enough. It's like the lower part of the candle extension was built with lesser vascular activity and then the more recent extension at the tip has been very vigorous.
 

markyscott

Imperial Masterpiece
Messages
6,127
Reaction score
21,430
Location
Delaplane VA
USDA Zone
6B
Anyone know why a few of my candles are going limp?


TIP BLIGHT. They are likely goners at this stage. Move them away from the healthy plants immediately and act quickly. When the candle goes limp like that the fungus has invaded the vascular tissue in the stem, cutting off water supply to the candle. The new growth is gone. It won’t grow any more and the new needles won’t extend. It will eventually turn brown and die. If the plant survives it will issue a new candle from last years growth, but I wouldn’t count on it.

In our humid climate combined with damp spring weather, black pine are very susceptible right at this stage as the needles are emerging from the candles. Every spring they should be sprayed with a copper-based fungicide as the candles begin to extend. I lost a couple of good trees to this disease before finally figuring out what was going on. I compiled all I found out about it including prevention and treatment in the resource below.

https://www.bonsainut.com/resources/dormant-season-spraying-part-3-pine-trees.38/
 
Last edited:

RobertB

Chumono
Messages
736
Reaction score
708
Location
Fairhope AL
USDA Zone
8
TIP BLIGHT. They are likely goners at this stage. Move them away from the healthy plants immediately and act quickly. When the candle goes limp like that the fungus has invaded the vascular tissue in the stem, cutting off water supply to the candle. The new growth is gone. It won’t grow any more and the new needles won’t extend. It will eventually turn brown and die. If the plant survives it will issue a new candle from last years growth, but I wouldn’t count on it.

In our humid climate combined with damp spring weather, black pine are very susceptible right at this stage as the needles are emerging from the candles. Every spring they should be sprayed with a copper-based fungicide as the candles begin to extend. I lost a couple of good trees to this disease before finally figuring out what was going on. I compiled all I found out about it including prevention and treatment in the resource below.

https://www.bonsainut.com/resources/dormant-season-spraying-part-3-pine-trees.38/

Wow, thank you for this. I did notice that when I moved to more direct sun they stiffened back up. I had to move my pines to a spot with not as much sun but I'm considering moving them back to where they get more sun again.

When I moved to the more shaded spot I noticed this a few days later.

I have already moved these away from the others, in the middle of my kids outside play bench to get more sun so I will probably just throw out to be sure. I have plenty that are healthy. These are ones I didn't even get around to reporting.
 

thomas22

Chumono
Messages
615
Reaction score
1,744
Location
Southern California
USDA Zone
10
I might have mentioned this before but you really can literally see these things growing right now. There like a maple or something. I am probably fertilizing pretty hard right now too. Seems like it but I reallly don't know how much they could actually take.

Anyone know why a few of my candles are going limp?

View attachment 233120

View attachment 233121

Those are growing really good. I'm curious if your drooping candles ever came back. Mine did the same thing but popped right back up and are doing fine now. I recently read this can be caused by simply a lack of water. I read it here. https://bonsaitonight.com/2019/04/05/watch-out-for-wilting-candles-in-young-pines/
 

RobertB

Chumono
Messages
736
Reaction score
708
Location
Fairhope AL
USDA Zone
8
Time to introduce some movement with the wire, looks like thats what you have in mind.

Yes Frank, I’ve been carefully wiring some. I’m a little scared as I think it’s the wrong time of the year for but mine are thickening quick. I’m concerned that by fall they are going to be 1/2” thick. Some are getting close already.

Anything you recommend for aftercare after wiring right now. I’ve just been putting back out in full sun and they seem fine. It’s just a bitch to wire these right now with all these little bottom buds and needles.
 

River's Edge

Masterpiece
Messages
4,755
Reaction score
12,780
Location
Vancouver Island, British Columbia
USDA Zone
8b
Yes Frank, I’ve been carefully wiring some. I’m a little scared as I think it’s the wrong time of the year for but mine are thickening quick. I’m concerned that by fall they are going to be 1/2” thick. Some are getting close already.

Anything you recommend for aftercare after wiring right now. I’ve just been putting back out in full sun and they seem fine. It’s just a bitch to wire these right now with all these little bottom buds and needles.
I think this is the best time for young trees to get results from wiring. And it is trickier due to their growth stage. I have used the following approach with success. I place the wire in the container when i repot the seedling. I use 2mm aluminum wire. A length of 18 inches is usually enough to anchor to the bottom of the container ( in my case it is a colandar , which i then set in a grow bed) and leave a good amount for wiring. With the wire in place i wait for the plant to grow, wiring the base as it thickens beginning when the trunk is approximately 3/8 inch thick and maturing to a tan color. I then wire up to the new green growth and stop at that point leaving the rest of the wire in place for later use as the trunk matures. ( This means that i need to come back repeatedly during the year to check tightness and progress the wiring) At least every three weeks if feeding heavily and watering regularily.
This is where the aluminum is very beneficial as it can be loosened and rewound repeatedly while still anchored in place. Copper does not retain the same flexibility. I like to have the movement begin within 2 inches of the base and try to vary what i do so there is no specific pattern repeated.
The result appears funny with incomplete wiring all over the grow beds but it is safer and i have less damage than trying to wire new green growth. The other tip i would pass on is to use the wire when bending with finger tips secureing and holding the wire. Always bend with the wire on the outside of the bend. Create movement in the tan area and stop before damaging the new green growth.
Although this is a time consuming method it gets better results than waiting until the trunk is too thick or crushing new growth too soon.
The wire is Used to create movement within the first foot of the tree's trunk and removed when the tree is repotted to a grow box usually at the beginning of year three. I usually do not wire for movement until selecting new apex and primary branches in later years after sufficient runs growth and backbudding has been achieved.
Have fun, the extra time you take now will pay dividends later on. It is really an important stage for pine development.
 

RobertB

Chumono
Messages
736
Reaction score
708
Location
Fairhope AL
USDA Zone
8
I have wired a few all the way into this years growth. About half of maybe 6 trees or seedlings, whatever you want to call them at this stage.

I cannot bend with my hands at all as there are way to many needles and buds. I have to use pliers to wire, while using my chopstick to separate and move needles around to wrap the wire without crushing needels and buds. It literally probably takes 20 min plus a tree. Hard to find time to do that so I’ve been slowley doing them. Just a little worried about doing all of them this time of year. Thank you for your help though! I will work on getting the rest wired over the next month.

The holes in my colanders are not large enough to pass the wire through the bottom on. On my terra-cotta pots im passing the wire through the bottom and making a sharp bend in it to hold to bottom and give me something to help with the resistance need led to making those first couple bends without uprooting the tree. The colander trees are difficult and I have to very steadily hold the base of the wire where the first wrap starts with pliers, gripped really tight while trying to move needles and bend wire with other pliers.

Pines are hard to wire..
 

River's Edge

Masterpiece
Messages
4,755
Reaction score
12,780
Location
Vancouver Island, British Columbia
USDA Zone
8b
T
I have wired a few all the way into this years growth. About half of maybe 6 trees or seedlings, whatever you want to call them at this stage.

I cannot bend with my hands at all as there are way to many needles and buds. I have to use pliers to wire, while using my chopstick to separate and move needles around to wrap the wire without crushing needels and buds. It literally probably takes 20 min plus a tree. Hard to find time to do that so I’ve been slowley doing them. Just a little worried about doing all of them this time of year. Thank you for your help though! I will work on getting the rest wired over the next month.

The holes in my colanders are not large enough to pass the wire through the bottom on. On my terra-cotta pots im passing the wire through the bottom and making a sharp bend in it to hold to bottom and give me something to help with the resistance need led to making those first couple bends without uprooting the tree. The colander trees are difficult and I have to very steadily hold the base of the wire where the first wrap starts with pliers, gripped really tight while trying to move needles and bend wire with other pliers.

Pines are hard to wire..
Right on. They are, but do not be too concerned about needles and buds at this stage. Just concern yourself with not damaging the trunk primarily. Plenty of time for others to be produced in response to the right techniques. And you only need movement in the first foot or so at this stage. Developing taper will involve other apical directions and wiring later on. The first movement is generally the portion below the first primary branch, occasionally the second branch. ( second picture) Here is a picture of one of my five year pines. ( in its fifth season of growth) For perspective the base is approximately 2 inches above the flair, movement is wired in the first foot, overall height is 56 inches. There is lower branching evident for sacrifice and primary selection. The nebari is fairly well developed and basically established.
The first picture will show how a bare portion of the trunk can form adventitious buds with the right techniques later on.
 

Attachments

  • IMG_1391.JPG
    IMG_1391.JPG
    179.5 KB · Views: 78
  • IMG_1395.JPG
    IMG_1395.JPG
    97.9 KB · Views: 79

RobertB

Chumono
Messages
736
Reaction score
708
Location
Fairhope AL
USDA Zone
8
Well, its been a minute since my last update. Things have been very busy this year. My pines did do pretty well though.

I was finally and for the first time able to obtain some lava and pumice from my local bonsai friend MellowMullet. First time i will be using these components in this years repots... Very excited.

I mostly focused on my first batch pines as these grew pretty well the first year and these are the ones i repotted the second year and now third. Still havent done much with the batch 2 which actually might have done better during year one. I have allot i need to give away.

Here is the biggest one that i accidentally left the wire on this year so I'm just rolling with it. I will get pictures of the repot tomorrow as it got dark on me.


IMG_4475.jpg

This thing is literally about to burst growing this year.


IMG_4485.jpg

Here is another decent one from a small clay pot.
IMG_4486.jpg

Hopefully this is the good stuff and not root aphids..


IMG_4488.jpg
IMG_4489.jpg

Another. Will get more pics tomorrow as i hope to get a good bit of them repotted.

IMG_4495.jpg
 

RobertB

Chumono
Messages
736
Reaction score
708
Location
Fairhope AL
USDA Zone
8
Dude, are you serious? That's some of the best mycorrhiza I've seen so far.

Its crazy how much there is in all of them. even the pond baskets.. these are wearing me out trying to repot. i did around 10 today.
 

RobertB

Chumono
Messages
736
Reaction score
708
Location
Fairhope AL
USDA Zone
8
A few more pics after a weekend of work. i repotted a few other trees and thinned out some also. Please contact me if anyone lives in lower Alabama area that is interested in some baby black pines. i have way to many and i dont want to throw away or ship.

IMG_4502.jpg

IMG_4514.jpg


IMG_4503.jpg
 

hemmy

Omono
Messages
1,391
Reaction score
1,722
Location
NE KS (formerly SoCal 10a)
USDA Zone
6a
i repotted

Wow, some nice fleshy white roots on that previous pic. Definitely the right time to repot!

What is the diameter on the black mesh pots and white colanders?

Your growth is great and seems to be showing the benefit of up-potting in the fall.
 

RobertB

Chumono
Messages
736
Reaction score
708
Location
Fairhope AL
USDA Zone
8
Wow, some nice fleshy white roots on that previous pic. Definitely the right time to repot!

What is the diameter on the black mesh pots and white colanders?

Your growth is great and seems to be showing the benefit of up-potting in the fall.

It’s actually on the verg of spring here now. I did fall last year but we had a weak winter and I was trying to get a jump on all the potting work.
 

rollwithak

Chumono
Messages
721
Reaction score
737
Location
Central Valley California
USDA Zone
9b
Did my first culling getting things cleaned up this weekend for winter. Decided to get rid of the box of JBP seedling cuttings. Was really surprised at the root systems. Pretty impressive really. Now I understand the reason for cutting. These roots are completely different than seedlings that did not get cut.

View attachment 214405

View attachment 214406

View attachment 214407

View attachment 214408

View attachment 214409

What is the thought process after you dig up your cuttings and place them into their new containers at this stage? Do you fan the roots out flat and in a radial manner? Put something underneath like styrofoam so they grow outward?
 
Top Bottom