cheap_walmart_art
Omono
This month marks my first full year practicing bonsai as a hobby. I lurk around in the forums and saw in a very popular thread a challenge to put up a tree, show a progression, and self critique. I thought I'd do just that with the very first tree I acquired a year back from the nice old lady in the van by the side of the road. I think this little mallsai is pretty indicative of most people's first experience in the hobby.
August 2017: Here we are. Juniper Precumbans Nana (probably). This is the first day I got it. Its also the first day I spent 3 solid hours on the internet reading about tiny trees...

Critique: Its a mallsai. Plain and simple. It should be put in the ground and allowed to be grown for several more years. Generic whip. 2 years old? Maybe?
October 2017: My first attempt at styling. I was imagining this tree as a cascade or semi cascade in the future.

Critique: You'll notice that I put it in a HUGE pot, because a big pot is just like the ground, right? Used 100% Organic nursery mix. I really wanted this tree to "look like a bonsai" so I carried on that look. The wiring is pretty sloppy, but it was literally my first time doing it (I haven't gotten much better, honestly).
December 2018: First frost!

Critique: I added an obsidian dagger blade to be behind the plant. I still say it looked cool.
June 2018:

Critique: Points for repotting into actual bonsai soil in the spring. I've since learned the terra cotta may be bad for drying out and for cracking in winter time. This tree really should have been put into the ground. Still going for that cascade but the trunk is pencil thin, looking at cascades professionally done with mature material, one really needs a good strong base and nebari to "root" the tree in the eye. This one looks odd as thin as it is.
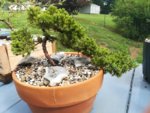
August 2018: I sudied the front and back of the tree again to be sure I wanted to keep the same front before this styling.


Critique: I really don't know which is more desirable, the trunk leaning back and then twisting toward the viewer, or the opposite. I chose to remain with the same front because I like the way that the foliage frames the splits around the first branches and I felt like the other side showed more reverse taper at the split.
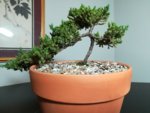
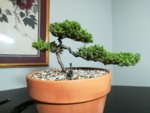
August 2018 - 1 year styling. 1 year learning.

Critique: Basically a cleaned up version of the pics above. I tried to get that basic triangle shape between the left pad, the apex, and the large pad on the right. The wiring still leaves a lot to be desired, It has too many wraps around the split where I didn't plan out my anchoring properly. I should probably put the idea of a cascade out of my mind and style this tree as an informal upright. I kept a lot of that right branch because I still have this cascade or semi cascade idea in mind when it gets bigger. The whole look of the tree is still contrived mallsai - maybe even moreso than before. I was afraid to remove much more foliage than I did as it still hasnt completely filled the pots with roots and I want it to have as much energy moving into dormancy as it can. Oh, and it should really be in the ground.
Hopefully someone gets some enjoyment out of the completely novice progression and critique! I'd love to hear anyone else's opinions on this progression!
August 2017: Here we are. Juniper Precumbans Nana (probably). This is the first day I got it. Its also the first day I spent 3 solid hours on the internet reading about tiny trees...

Critique: Its a mallsai. Plain and simple. It should be put in the ground and allowed to be grown for several more years. Generic whip. 2 years old? Maybe?
October 2017: My first attempt at styling. I was imagining this tree as a cascade or semi cascade in the future.

Critique: You'll notice that I put it in a HUGE pot, because a big pot is just like the ground, right? Used 100% Organic nursery mix. I really wanted this tree to "look like a bonsai" so I carried on that look. The wiring is pretty sloppy, but it was literally my first time doing it (I haven't gotten much better, honestly).
December 2018: First frost!

Critique: I added an obsidian dagger blade to be behind the plant. I still say it looked cool.
June 2018:

Critique: Points for repotting into actual bonsai soil in the spring. I've since learned the terra cotta may be bad for drying out and for cracking in winter time. This tree really should have been put into the ground. Still going for that cascade but the trunk is pencil thin, looking at cascades professionally done with mature material, one really needs a good strong base and nebari to "root" the tree in the eye. This one looks odd as thin as it is.
August 2018: I sudied the front and back of the tree again to be sure I wanted to keep the same front before this styling.


Critique: I really don't know which is more desirable, the trunk leaning back and then twisting toward the viewer, or the opposite. I chose to remain with the same front because I like the way that the foliage frames the splits around the first branches and I felt like the other side showed more reverse taper at the split.
August 2018 - 1 year styling. 1 year learning.

Critique: Basically a cleaned up version of the pics above. I tried to get that basic triangle shape between the left pad, the apex, and the large pad on the right. The wiring still leaves a lot to be desired, It has too many wraps around the split where I didn't plan out my anchoring properly. I should probably put the idea of a cascade out of my mind and style this tree as an informal upright. I kept a lot of that right branch because I still have this cascade or semi cascade idea in mind when it gets bigger. The whole look of the tree is still contrived mallsai - maybe even moreso than before. I was afraid to remove much more foliage than I did as it still hasnt completely filled the pots with roots and I want it to have as much energy moving into dormancy as it can. Oh, and it should really be in the ground.
Hopefully someone gets some enjoyment out of the completely novice progression and critique! I'd love to hear anyone else's opinions on this progression!
