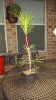
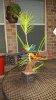
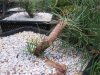
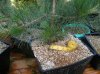
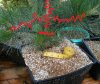
Ok first off, recognize that this is atleast 6 years away from being anything recognizable to a bonsai/pre-bonsai. I have maybe 25-30 pines that look like your's and another 50ish that are 1-4 years older than your's. First course of action is to repot your seedling into a colander, pond basket, vance wood redwood container, anything that gets a ton of air into the root system and drains well. Personally, I like pond baskets cause they are cheap and readily available to me. For this size plant, I would look to get a container in the 10" range. Ok, next use your typical free draining bonsai soil. I personally favor mostly pumice these days. Go through your typical repotting steps to get this tree into the container. I didnt mention it before, but do this in the late winter/spring when you typically repot your other trees! Next, what I typically do at the two year mark, is wire my initial trunk line when I repot. I find it easier to wire the seedlings when they are out of their container. Also, if you leave a tag end of the wire into the soil, it can function as an anchor. For the rest of the year, fertilize the crap out of this seedling--I favor a lesco commercial slow release granule that is 14-14-14 along with a regimen of miracle grow. Water it like the rest of your plants. Without chopping anything, needle plucking, decandling, etc. you should see some nice backbudding along the lower trunk where I have it circled in purple. Red is a long neck where no buds exist, but needle buds exist in the purple zone. Vigorous growth should give you some buds along the trunk in that area. On to crude diagram #2. The brown section is your first trunk line. this is what you are wiring into place when you repot. In my diagram, your first trunk length will be about 6-8" off the soil. The green sections are sacrifice leaders. You should grow out those really low buds to increase the trunk girth at the nebari and promote increased taper. You will also use one to build your first trunk section. Once your trunk reaches its desired thickness, chop at the red line with a #1 next to it. Now, you should be chopping the sacrifice leader back to where you have two buds/branches. these will become trunk section #2(in orange) and branch #1(also in orange). Wire both to put some movement into them, and get them where you want them. Then, repeat the trunk building step using another sacrifice leader. Chop again at red line #2, and continue the process of selecting a new trunk leader, and wiring a branch into place. Now, this is a silly diagram of what some would consider a "cookie cutter" (what a BS term) informal upright pine, but the principles are applied for growing stock of mostly any species, and any style. Its all about movement, taper, and branch placement.
Also, check out Eric's thread on this forum for growing pines from seed. Bonsai Tonight is an excellent resource.