A couple projects for Smoke...

JoeR

Masterpiece
Messages
3,949
Reaction score
3,452
Location
Sandhills of North Carolina
USDA Zone
8a
I spend a lot of time reading this forum, and out of the people who post here I've probably learned the most useful growing techniques from @Smoke , specifically about tridents and creating material from root cuttings. So I thought I'd post some projects inspired by Smoke that I'm working on and growing out. Because, after all, without members like him there would be no reason to be on this forum!


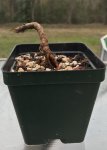
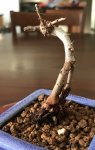
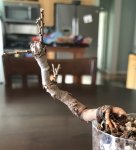
First up, a trident maple forest created from seedling I bought sight unseen from Julian Adams 2 years ago. They were 5-7 years old when I bought them so they were no longer pliable. Not my best work for sure, but it was fun to make and I think with 2 or more seedlings added it would look better. Two of them will be allowed to grow while the other ones get cut back.

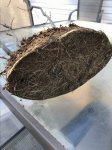
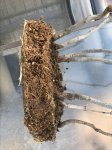
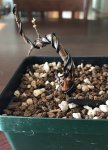
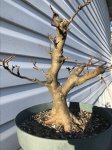
This is what the roots looked like yesterday, growing mostly in the pumice drainage layer. And the next picture is of it after the repot.


More projects coming in the next posts...
 

Attachments

  • IMG_0370.JPG
    IMG_0370.JPG
    307.1 KB · Views: 383
  • IMG_0374.JPG
    IMG_0374.JPG
    312.4 KB · Views: 432
  • IMG_0383.JPG
    IMG_0383.JPG
    236.8 KB · Views: 440
Messages
1,078
Reaction score
1,284
Location
Germantown, TN
USDA Zone
7b
Hey great stuff @JoeR. There's something about pumice man, I keep adding more and more to my mixes. Eventually I'll get it TOO dry supposedly, but until then the root and stem growth has been killer.
 

JoeR

Masterpiece
Messages
3,949
Reaction score
3,452
Location
Sandhills of North Carolina
USDA Zone
8a
Next up are some ugly crabapple root cuttings, 'liset' is the cultivar I believe. Some will have their roots slowly exposed; I wired them together so we'll see what they look like in a year.

More coming in the morning, a big trident project and some more root cuttings
 

Attachments

  • IMG_0386.JPG
    IMG_0386.JPG
    107.8 KB · Views: 387
  • IMG_0387.JPG
    IMG_0387.JPG
    180.5 KB · Views: 308
  • IMG_0391.JPG
    IMG_0391.JPG
    163.1 KB · Views: 288
  • IMG_0392.JPG
    IMG_0392.JPG
    166.3 KB · Views: 282
  • IMG_0395.JPG
    IMG_0395.JPG
    183.3 KB · Views: 274
  • IMG_0397.JPG
    IMG_0397.JPG
    170.8 KB · Views: 285

JoeR

Masterpiece
Messages
3,949
Reaction score
3,452
Location
Sandhills of North Carolina
USDA Zone
8a
I don't know if you wired them or they came that good, but those are really nice with good natural movement. Nice taper too.
Thanks, they were lightly wired once. Most movement is due to often cut backs, and the wounds are healed now so it's hard to tell.
 

JoeR

Masterpiece
Messages
3,949
Reaction score
3,452
Location
Sandhills of North Carolina
USDA Zone
8a
Hey great stuff @JoeR. There's something about pumice man, I keep adding more and more to my mixes. Eventually I'll get it TOO dry supposedly, but until then the root and stem growth has been killer.
I feel the same way. If there's an option, the roots ALWAYS seem to pick the pumice. It costs me ~$25-$30 for three gallons though :(
 

Smoke

Ignore-Amus
Messages
11,668
Reaction score
20,727
Location
Fresno, CA
USDA Zone
9
Next up are some ugly crabapple root cuttings, 'liset' is the cultivar I believe. Some will have their roots slowly exposed; I wired them together so we'll see what they look like in a year.

More coming in the morning, a big trident project and some more root cuttings
The next time you try these try planting in a cut off water bottle. Just cut off the top and neck of the water bottle and you end up with a two inch diameter clear plastic tube about 6 inches long. Put that in the dirt about an inch and put the plant roots in the tube and back fill with soil. About every three weeks during the growing season you can cut the water bottle down a half inch or so forcing the roots to grow deeper in the bottle and giving you the long roots you need for exposing!

044.JPG
 

sorce

Nonsense Rascal
Messages
32,912
Reaction score
45,595
Location
Berwyn, Il
USDA Zone
6.2
That lil group looks good.

I feel it may not need 2 more.

But also, if you do add them, you will do it nicely!

Sorce
 

JoeR

Masterpiece
Messages
3,949
Reaction score
3,452
Location
Sandhills of North Carolina
USDA Zone
8a
Today's project: seiju elm root cuttings. They were taken last spring and I repotted them this morning. Sorry for the crappy pictures, they don't do them justice so maybe I'll take some better ones later. After reviewing the photos, I may prune a few branches shorter but you get the idea. I also did as Smoke suggested with the plastic bottles, can't wait to see how that turns out. The one in the larger terra cotta pot over hangs more than he pictures show.


They're mame to small shohin sized, from soil-
-Blue pot 2 3/4"
-Green pot 2 3/4"
-Small terra cotta pot 2 1/2"
-Large terra cotta pot 5"
 

Attachments

  • IMG_0403.JPG
    IMG_0403.JPG
    227.7 KB · Views: 261
  • IMG_0409.JPG
    IMG_0409.JPG
    311.6 KB · Views: 250
  • IMG_0413.JPG
    IMG_0413.JPG
    226.2 KB · Views: 246
  • IMG_0414.JPG
    IMG_0414.JPG
    246.5 KB · Views: 238
  • IMG_0417.JPG
    IMG_0417.JPG
    206.7 KB · Views: 244
  • IMG_0419.JPG
    IMG_0419.JPG
    229.1 KB · Views: 298

JoeR

Masterpiece
Messages
3,949
Reaction score
3,452
Location
Sandhills of North Carolina
USDA Zone
8a
And one I've been dying to post, my largest trident project. I just started cutting it back, and I'm thinking I'll definitely be cutting it back further still. I recently and regretfully switched from Android to Apple, and their photo editor thing sucks so the virtual is crappy... doesn't even have brown... but, you get the idea hopefully. The nebari needs work and I will be ground layering instead of repotting to improve it. It sort of undercuts in some areas.
 

Attachments

  • IMG_0433.JPG
    IMG_0433.JPG
    316 KB · Views: 286
  • IMG_0447.PNG
    IMG_0447.PNG
    21.5 KB · Views: 290

JoeR

Masterpiece
Messages
3,949
Reaction score
3,452
Location
Sandhills of North Carolina
USDA Zone
8a
Hmm no one has any suggestions on the big trident? I'll get some more photos today if that would help. And about the ground layer; I've heard some people say to remove the bark below the desired area while others say it doesn't make a difference. I still think the former is the better method?
 
Messages
1,336
Reaction score
1,917
Location
Brabant, Netherlands
That nebari won't win the Japan Beauty Bonsai Contest, but it ain't that bad imho.
Have you thought about doing the Hans van Meer technique on the biggest straightest roots and graft a couple of new ones in on the empty spots?
 

Dav4

Drop Branch Murphy
Messages
13,111
Reaction score
30,186
Location
SE MI- Bonsai'd for 12 years both MA and N GA
USDA Zone
6a
Hmm no one has any suggestions on the big trident? I'll get some more photos today if that would help. And about the ground layer; I've heard some people say to remove the bark below the desired area while others say it doesn't make a difference. I still think the former is the better method?
The future roots develop from the callus that forms from the cambium above the area where the cambium is removed. My suggestion would be to completely remove the cambium, with a bit of the water wood beneath it, below where you want your new roots. You need to remove all the cambium with a wide margin, at least 1.5- 2". Otherwise, a vigorous trident will bridge the gap and the layer will fail. As far as suggestions for the design of the tree, I wouldn't make any decisions until your layer has taken. Based on that single picture, your tree has a nice base and great taper in the lowest quarter of the tree, but that first right branch looks very heavy and there also appears to be some reverse taper midway up the trunk. Again, based on this one picture, I'd be tempted to chop everything off above that first right branch and build the canopy from there... but not until you've done the ground layer.
 
Messages
1,336
Reaction score
1,917
Location
Brabant, Netherlands
20170212_145432.jpgMaybe cut about here and work to to this?:

20170212_150325.jpg
Please excuse the crappy virt, my fingers are a bit too big for smartphone precision.

The branch in orange is that a back branch? It would be a nice spot for a back branch.

More pics would be nice tho! 2d is hard.

And nice trees btw. Those elm mames got my interest.
 

JoeR

Masterpiece
Messages
3,949
Reaction score
3,452
Location
Sandhills of North Carolina
USDA Zone
8a
View attachment 131725Maybe cut about here and work to to this?:

View attachment 131726
Please excuse the crappy virt, my fingers are a bit too big for smartphone precision.

The branch in orange is that a back branch? It would be a nice spot for a back branch.

More pics would be nice tho! 2d is hard.

And nice trees btw. Those elm mames got my interest.
Thanks for the input; The two spots you suggested to chop are exactly what I was thinking when I made the virt I posted. And I have not thought about that technique, I'll keep it in mind. Yes that is a back branch
 

JoeR

Masterpiece
Messages
3,949
Reaction score
3,452
Location
Sandhills of North Carolina
USDA Zone
8a
The future roots develop from the callus that forms from the cambium above the area where the cambium is removed. My suggestion would be to completely remove the cambium, with a bit of the water wood beneath it, below where you want your new roots. You need to remove all the cambium with a wide margin, at least 1.5- 2". Otherwise, a vigorous trident will bridge the gap and the layer will fail. As far as suggestions for the design of the tree, I wouldn't make any decisions until your layer has taken. Based on that single picture, your tree has a nice base and great taper in the lowest quarter of the tree, but that first right branch looks very heavy and there also appears to be some reverse taper midway up the trunk. Again, based on this one picture, I'd be tempted to chop everything off above that first right branch and build the canopy from there... but not until you've done the ground layer.
Thanks; I'll have to take more pictures to give you a better Idea. The one picture doesnt do justice.

I do have to disagree with waiting until the layer has taken to do anything though; it seems counter-productive to postpone a chop that can be done at the same time. Wasted growth, no?
 

Dav4

Drop Branch Murphy
Messages
13,111
Reaction score
30,186
Location
SE MI- Bonsai'd for 12 years both MA and N GA
USDA Zone
6a
Thanks; I'll have to take more pictures to give you a better Idea. The one picture doesnt do justice.

I do have to disagree with waiting until the layer has taken to do anything though; it seems counter-productive to postpone a chop that can be done at the same time. Wasted growth, no?
Well, tridents are quite vigorous, but I'd want as much energy as possible going into the develop of the future nebari... anything chopped off now won't be there to fuel the developing layer.
 
Top Bottom