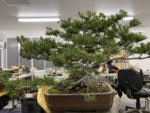
A project JBP gets it’s first pot

Adair M

Pinus Envy
Messages
14,402
Reaction score
34,897
Location
NEGeorgia
USDA Zone
7a
This tree:

31195188-0E97-41B9-AFD8-E2DF2C6CAC5B.jpeg

Is due to get its first real bonsai pot.

I purchased it from Plant City about 5 years ago. They had purchased three JBP from Lone Pine nursery in California, and they had been dug, and shipped bare rooted to Georgia. Steve asked me to pot them for him when they came in. I cut down big plastic pots, and got them in some homemade Boon Mix (equal parts lava, pumice, and akadama). I bought this one. The other two were eventually purchased by my students.

After potting, I didn’t do anything but water and fertilize for a year. They had been bare rooted, and needed to recover.

After a year, I started cutting back the longest branches, hoping to induce backbudding. I put in a guy wire and put in the heavy bend, using a jack. The jack does the bending, the wire just takes up the slack.

After another year, I added a couple grafts.

A year later, I added two more grafts.

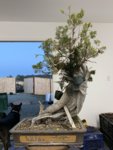
Last weekend, I took the opportunity to consult with Tyler Sherrard, and we did more cut backs. And I gave it this initial wiring/styling. We also used the guy wire to add more bend.

Back home, I decided to pot it. After a bit of futzing around, I was able to remove it from the cut down plastic pot:

2EB2E75E-60E7-465D-A8F9-0874AA11AC5D.jpeg

A4FA3655-E45B-4FA6-BD5B-48502F7B8E4E.jpeg

All that white stuff is mychorrazzae. I didn’t add any when I potted it, and remember, it had been bare rooted! It just grew by itself.

I then proceeded to cut back some heavy roots. And seriously reduce the root ball. Back when I initially potted it, I didn’t cut any roots. Since it was straight out of the field, and bare rooted, I kept everything! Even roots I knew were too long. I just circled them in the plastic pot.

Today was the day to tame the roots! I scraped all the flat mat of roots off the bottom, and I was pleased to see no ugly downward roots! So I trimmed it flat. Going around the edges with my bent tip tweezers was a lot of work, but easy to work since the soil, Boon Mix, stays pretty open, even after 5 years. I cut back some heavy roots with my big root cutters and concave knob cutters.

The final root ball:

495CBE2E-D034-4F97-8CF2-29F207F97347.jpeg

Now for the fun part!

Which pot?

F5DCF82A-AF87-4489-B56E-94F90738B938.jpeg

Or...

D5A653E4-A1B7-4034-8E21-DC061BC80FD0.jpeg

I could use either.

I chose the larger pot because I had been pretty hard on the roots, and I wanted to get it grow. The smaller pot would make a good show pot in the future.

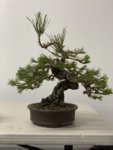
Here it is potted up:

06144228-6875-466C-8BFF-89334D551FB4.jpeg
 

coachspinks

Chumono
Messages
645
Reaction score
793
Location
Just south of Atlanta
USDA Zone
8b
I spent a few minutes watching you work on it Sunday morning. I thought it looked good then, even better now
 

Colorado

Masterpiece
Messages
3,132
Reaction score
8,310
Location
Golden, Colorado
USDA Zone
5b
Wow, gorgeous tree and gorgeous pot. What type of pot is that?

Also great choice on the Boca vegan chicken patties - those are a staple in our household ?

Any idea how old the tree is? Very jealous!
 

Adair M

Pinus Envy
Messages
14,402
Reaction score
34,897
Location
NEGeorgia
USDA Zone
7a
The tree is probably 25 years old now. Twenty years in the field, 5 years out.

It’s a signed Tokoname pot. I purchased it at the Atlanta Bonsai Show auction. Vintage 2004, I believe.
 

coltranem

Chumono
Messages
759
Reaction score
1,010
Location
Massachusetts
USDA Zone
6a
Thanks for sharing the story of this tree's development to now. Do you happen to have a picture before the bend?
 

Cosmos

Shohin
Messages
457
Reaction score
858
Location
Mauricie, QC
USDA Zone
4
Nice to see you post the developement a more raw piece of material than what you usually seem to work with. Looking forward to the updates.
 

Nybonsai12

Masterpiece
Messages
3,823
Reaction score
7,635
Location
NY
USDA Zone
7a
Thanks for sharing. Question...any reason why the two left branches appear to be placed straight out to the side while the other branches on the top and right side have sharp downward angles?
 

Adair M

Pinus Envy
Messages
14,402
Reaction score
34,897
Location
NEGeorgia
USDA Zone
7a
Thanks for sharing the story of this tree's development to now. Do you happen to have a picture before the bend?
So, I had to go into the WayBack machine...

Here it is after black plastic rope was applied, and Jackie was mounted, but before any bending:

1A416AA6-0E1A-4BCF-BA18-3FEC427B5868.jpeg

And here it is after:

57AABE97-59D9-4A19-BFA7-194C51932094.jpeg

And some pruning!
 

Adair M

Pinus Envy
Messages
14,402
Reaction score
34,897
Location
NEGeorgia
USDA Zone
7a
Thanks for sharing. Question...any reason why the two left branches appear to be placed straight out to the side while the other branches on the top and right side have sharp downward angles?
Oh, those branches are going to be grafted. Within an inch or two of the trunk. All that branch you see will get cut off! Lol!!!

This tree is FAR from its finished image. I’m still working on getting the trunk set.

Even those downward branches need backbuds and/or grafts.

Only the first inch or two of any of the branches you see are permanent.
 

Adair M

Pinus Envy
Messages
14,402
Reaction score
34,897
Location
NEGeorgia
USDA Zone
7a
Nice to see you post the developement a more raw piece of material than what you usually seem to work with. Looking forward to the updates.
I work on project trees, too. Here’s the thing: on a project tree, you do something, and then you have to leave it alone for a while to recover and grow back. It looks ugly after you do what you did, then, it looks ugly when it grows back.

Then, 3 months (or 6 months, or maybe a year or two) later, it’s time to do the next thing. It takes multiple iterations of “doing something and waiting” before the tree begins to take shape.

Ha! Perhaps one of the primary “mis-information” educational things we do in the US is to have the masters perform the “one day demonstrations” where they take a piece of raw material and transform it into a styled bonsai in an afternoon. Really, that’s NOT the way it’s done! Instead, it’s multiple baby steps.
 

Adair M

Pinus Envy
Messages
14,402
Reaction score
34,897
Location
NEGeorgia
USDA Zone
7a
Here are a few of my other projects:
 

Attachments

  • 3327B795-DAC3-49D8-8CB0-6ED107BE1F67.jpeg
    3327B795-DAC3-49D8-8CB0-6ED107BE1F67.jpeg
    103.8 KB · Views: 85
  • 4B248799-2F56-4054-BFC8-8B3860BB7AB0.jpeg
    4B248799-2F56-4054-BFC8-8B3860BB7AB0.jpeg
    201.4 KB · Views: 99
  • F5F3AAEB-37C1-47E5-ADDB-7F3364B8373C.jpeg
    F5F3AAEB-37C1-47E5-ADDB-7F3364B8373C.jpeg
    132.9 KB · Views: 102
  • 5DC5E991-5D16-4A62-9DDE-246A40686C96.jpeg
    5DC5E991-5D16-4A62-9DDE-246A40686C96.jpeg
    211.5 KB · Views: 101
  • C3C79B56-D3B0-4E1E-BC1C-94C6950201D3.jpeg
    C3C79B56-D3B0-4E1E-BC1C-94C6950201D3.jpeg
    201.2 KB · Views: 103
  • D044D64A-3514-497B-91A7-D84C7945B7BF.jpeg
    D044D64A-3514-497B-91A7-D84C7945B7BF.jpeg
    193 KB · Views: 110
  • D6E39CCE-D8D4-46CF-9A8A-BD1A5DA2FEFF.jpeg
    D6E39CCE-D8D4-46CF-9A8A-BD1A5DA2FEFF.jpeg
    218.4 KB · Views: 97

coltranem

Chumono
Messages
759
Reaction score
1,010
Location
Massachusetts
USDA Zone
6a
Thanks Adair. Seeing the slow steps is very helpful. Even if it means waiting 12 months for the next posting.
 
Last edited:

Cosmos

Shohin
Messages
457
Reaction score
858
Location
Mauricie, QC
USDA Zone
4
I work on project trees, too. Here’s the thing: on a project tree, you do something, and then you have to leave it alone for a while to recover and grow back. It looks ugly after you do what you did, then, it looks ugly when it grows back.

Then, 3 months (or 6 months, or maybe a year or two) later, it’s time to do the next thing. It takes multiple iterations of “doing something and waiting” before the tree begins to take shape.

It was not meant as a slight of anything, it’s great to see a high-level practitionner like you show his "experiments". It makes for less impactful pictures on themselves, but beginners like me learn a lot from those Smoke-like progressions.

Ha! Perhaps one of the primary “mis-information” educational things we do in the US is to have the masters perform the “one day demonstrations” where they take a piece of raw material and transform it into a styled bonsai in an afternoon. Really, that’s NOT the way it’s done! Instead, it’s multiple baby steps.

Agreed.
 

Adair M

Pinus Envy
Messages
14,402
Reaction score
34,897
Location
NEGeorgia
USDA Zone
7a
It was not meant as a slight of anything, it’s great to see a high-level practitionner like you show his "experiments". It makes for less impactful pictures on themselves, but beginners like me learn a lot from those Smoke-like progressions.


Agreed.
If you want to see some progressions, get a copy of Bill Valavanis’ book: Classical Bonsai Art, a Half Century of Bonsai Study. Can’t beat his 50 years of photos and commentary!
 
Top Bottom