Air layered palmatum

Bnana

Chumono
Messages
641
Reaction score
672
Location
The Netherlands
USDA Zone
8
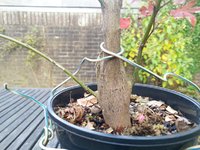
I made an air layer from a Japanese maple in my garden. It worked well and the layer had a good start with plenty of roots.
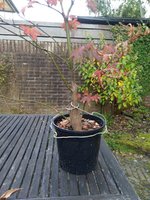
Now the question arises how to develop it. I have no experience with maples. I removed some large branches when I separated it, that's obvious I guess. The trunk has a 4.5 cm diameter.
It doesn't have a lot of movement but it has taper. So I'm thinking about a fat little upright that can develop a nice crown and nebari over the coming years.

But now how and where to cut? Leave the two lower branches to fasten the trunk and cut them back later? Where should I chop?
Hoping for some input from people with a better trained eye.
The ugly wire is just to keep it stable after removing it from the tree.
IMG_20201014_165010.jpgIMG_20201014_164934.jpgIMG_20201014_164927.jpgIMG_20201014_164920.jpgIMG_20201014_164910.jpg
 

0soyoung

Imperial Masterpiece
Messages
7,500
Reaction score
12,874
Location
Anacortes, WA (AHS heat zone 1)
USDA Zone
8b
There are lots of options. The principle one I see is to chop the trunk down to those two lowest branches. This would eliminate that big wound you have covered with Al foil, but would leave you with 'healing' over the big chop that could take 5 to 10 years to be completed. To get that to happen asap you will need to just let those branches run each season. However, one of the branches will be the trunk and the other the lowest and heaviest branch which means the adventure for the foreseeable future would be managing the growth of these two stems each season - except for repotting every couple of years to develop the nebari.

This idea eliminates most of your layer and destine it for becoming compost. Instead, you could layer this layer, say at roughly the point where you have wire looped around it - just above that big foil covered wound. You could also make another layer farther up, say just below the branching at the top of your first photo. Both could be affected next season as there would be ample foliage to power the formation of adventitious roots in each location (i.e., there is foliage above each girdle). Aside from assuring that there is foliage associated with each girdle, a key factor in choosing the placement is the distance to the nearest node above (this is the minimum height you can have a branch on the explant) and possibly the existing branching's interest as the lower parts of a bonsai.

I think this is about it, in general terms, though there are many more specific possibilities. But those are your joyous problems!
 

Bnana

Chumono
Messages
641
Reaction score
672
Location
The Netherlands
USDA Zone
8
That's quite a drastic cut, I didn't even think of that option. An idea I had was to cut the trunk above the first brach adove the wire. That branch could be the leader, I'd have some more trunk already and two lower branches. On the top part of the trunk there are quite a few buds that could give me branches in the crown.
That would mean the big wound stays and needs to heal over (although that likely will be the back). The lower two branches would remain and they are at similar height, that might be problematic.

I'm primarily interested in the lower part. The layers I can get from this the way you mention I can also get from the main tree in the garden. So composting parts is no problem.

Something to think about. This winter I'll place it on a tile and spread the roots of nicely. Didn't want to disturb them to much potting it the first time.
 

Bnana

Chumono
Messages
641
Reaction score
672
Location
The Netherlands
USDA Zone
8
The roots are about two cm below the soil surface now. Where the branches are there is of course a little bulge at the base but not a real reverse taper.
Cutting back those branches might prevent the development of reverse taper and Osoyoung's idea will also solve this.
 

Bnana

Chumono
Messages
641
Reaction score
672
Location
The Netherlands
USDA Zone
8
I see these options:
Just above the branches making one of these the new leader (black line). The one on the right will be most suitable I guess. But won't that wound be very ugly? it's not behind the trunk as the current wound is.

Intermediate (red line), keeping more trunk but giving me a new leader. I might have to shorten the lower branches so they do not create reverse taper.
The leader will be allowed to grow for some time but hopefully there will be enough buds emerging lower as well
High, the purple line, keeping more tree but it will be pretty tall.

There seem to be quite a few spots on the trunk where buds can form.
Untitled.jpg
 

Leo in N E Illinois

The Professor
Messages
11,341
Reaction score
23,294
Location
on the IL-WI border, a mile from ''da Lake''
USDA Zone
5b
None of your choices would result in a "quick instant bonsai". No matter which of the lines, purple, red, or black you choose to prune to, you will have 10 years of working to heal over scars.

So what do you want, the black line will give you the smallest "finished" tree. The red and purple lines will leave you with larger trees, and larger finished trees. Myself I would probably go with the purple, as I like maples to finish near one meter tall.

Over winter I suggest you re-cut, or re-carve the wound you have covered with aluminium foil. It is very bad technique to leave that "heel" at the low point of the cut. The wound must be brought flush, to slightly below the bark all the way around, so that the new callus, can roll over the wound. That heel at the base of the cut will prevent the wound from having callus roll over. It is guaranteed to not heal as the cut currently is.

A diagonal cutter such as the image below is useful for "nibbling away" at large wounds to shape them. You may have to use a scalpel or very sharp knife to cut any ridge of wood at the outer edge of the wound. Slightly undercut the rolling callus to make certain the callus can roll over the wound.

Similarly if you go with only the purple line for pruning, you need to address the stub just above the red line. Do this as time permits over winter.

Quite honestly, you missed an opportunity, when you planted the air layer as you removed it from the parent tree, you should have planted it in a container with less than 15 cm depth, if possible 10 cm of depth. I would have used a much wider, more shallow container. This is an opportunity lost, and now you will have to spend time correcting the development of root mass that is not shaped correctly for future bonsai pots.

Over the winter find a wide and shallow training container. I use flats with mesh bottoms that are 40 x 40 x 12.5 cm. They hold roughly 10 or 11 liters by volume of potting media. This sort of shape is better for developing maples with an eye towards wide shallow bonsai pots.

If you can find a suitable training pot, repot in spring.

If not, just do your wound care.

I would probably not do any pruning initially, you need to get wounds to begin to heal, and growth is the main way to do so, I would consider letting the tree "grow wild" for the summer of 2021 after addressing the wounds over winter, and possibly repotting in spring into a training container.

At least that is what I would do.

If you went with the black line for the smallest possible tree, you can continue to use the current pot as the training pot.

diagonal cutter.jpg
 

Bnana

Chumono
Messages
641
Reaction score
672
Location
The Netherlands
USDA Zone
8
Thanks, that's a lot of info. I know it's not an instant bonsai but I'm happy to start with something more than a twig in a pot (a branch in a pot?).

When I separated it, I didn't want to do too much as I didn't want to damage the roots. So I quickly cut of some main branches that made it unmanageable and put it in a big pot. The roots are still in the sphagnum they grew into. It did survive that and I hope the roots will be less sensitive in winter so that I can repot it, spread the roots and shape the wounds. But I didn't know that a heel was so problematic, thanks for that tip.
An option is to plant it in the ground on a tile as I regularly read that that is better for growth. But otherwise I can get a container that size to grow it in. I do like the plastic bonsai training pots for that, quite cheap but are more bonsai like than the bottom half of a big nursery pot.

I don't have many bonsai so spending time on the roots this winter is no problem. That's also part of the fun. I do understand that this is very far from a decent bonsai but having some experienced people suggesting things does help to see what is possible and avoiding stupid mistakes I'd regret later. Whether I leave the current wound (cleaned) or make a big cut at the black line that won't make a huge difference in size of the wound and thus healing time. 10 years is okay, I'd be very happy if it looks lik a reasonable bonsai in 10 years. Hopefully will be prettier than now already quite a few years before that.
 

leatherback

The Treedeemer
Messages
14,054
Reaction score
27,394
Location
Northern Germany
USDA Zone
7
Is this one of the wine-red maples? An atropurpureum?
Keep in mind they have a coarse growth pattern with particularly long internodes. If so, consider using this as a training plant, and keep your eyes open for other varieties of japanese maples too.
 

Bnana

Chumono
Messages
641
Reaction score
672
Location
The Netherlands
USDA Zone
8
It might be atropurpureum, I'm not sure. In the bush in my garden the ramification is not bad, the twigs have internodes of about a centimeter.
I'll plan this as a large bonsai, about a meter tall, that also reduces this problem.
 

Bnana

Chumono
Messages
641
Reaction score
672
Location
The Netherlands
USDA Zone
8
It's been in the garden for a long time so it doesn't have a label but the internodes are definetly not that long.
I'll give it a try and see how it will develop. But the connects here does give me an idea of how to approach this tree, that's very helpful.
 

Bnana

Chumono
Messages
641
Reaction score
672
Location
The Netherlands
USDA Zone
8
There's one thing that's not clear to me. I understood that I should make the wounds lower, flush with the tree and make them a bit hollow, allowing the callus to roll over. However I see warnings in some videos that you should leave a bit of the branch to allow for a bit of die back. Is that no problem in this case?

I did order a large training pot, that's 12 cm deep to plant this tree in this winter.
 

Shibui

Imperial Masterpiece
Messages
7,664
Reaction score
15,466
Location
Yackandandah, Australia
USDA Zone
9?
I find that if I chop flush and seal the cut right away there is minimal die back. With cuts less than around 1 cm diameter there is rarely any die back whether it is sealed or not.
You can also leave a stub and cut back after the sap has rerouted around the site. By then you can often see which part is live and which is not and cut right to the live section.
 

sorce

Nonsense Rascal
Messages
32,912
Reaction score
45,595
Location
Berwyn, Il
USDA Zone
6.2
I would chalk this one into the "practice" category for your next layer that can be more "instant".

Truth Truth, there is certainly a better spot to layer a new tree off your bush and I'd rather spend a half hour leading you there, to a tree that will be twice as nice as this by the time you remove it next, or better, in a couple years.

That large wound should've been healed before removal.
Large wounds could/should be used as the beginning of your ring barking.

No offense, as I completely commend all work regardless of it's reason, but the longer we beat around this bush, the less good trees you'll be able to layer off it.

Sorce
 

Bnana

Chumono
Messages
641
Reaction score
672
Location
The Netherlands
USDA Zone
8
Thanks,
So you would do the removal of side branches to create taper before air layering. Guess that would heal faster indeed. Never thought about that.

I do see this as a tree to practice layering and shaping an Acer. I liked the taper and thicker truck at the base in this one. It's not a great tree, but good enough to try stuff on.
 
Top Bottom