SU2
Omono
I'm thankful to this message board for stressing to get my trees off the ground (should probably make a stands thread, have fully ringed my backyard w/ stands/benches now, painted 1 shade, it's a bonsai-fence lol!!), as soon as I did that I realized how important containers were (and how bad the containers on some specimen made them look, seeing how much a difference containers make in the overall aesthetic of a specimen)
Being that I do everything bonsai 'DIY', and have a natural love for cement/mortar in general, mortar containers were the obvious choice for me- I started w/ just using forms and ending up w/ containers that 'sunk', where the tops of the edges were far thinner than the bottoms (and the internal volume was terrible due to the slouched mortar) I'm still trying different approaches every time I go and make a batch of pots - have to make ~30-40 by spring if I'm to do the massive styling & re-potting I've got planned - and wanted to share my last batch's random ideas, in hopes of suggestions/advice on where I can make improvements! Each batch is coming out better but would really like to get to 'perfect' sooner than later, would suck to get to where they came out *exactly* how I wanted on my 40th container, I'd want to gift all of them and start anew lol!
So here's my last batch, w/ a few new tricks
Styrofoam 'plugs' for drainage holes are a must for me, I take these out of their forms at ~24hrs and do a heavy 'finishing' job on them w/ grinders, at that time I use a drill and make the holes nice and circular, and use a thin disk in my angle-grinder to 'connect' the holes so that I can sit them flush on a bench after having wired-in a tree (this is until I figure out a practical way to make containers w/ legs, so far the 'form approach' is working so well and I just can't think of how to incorporate legs into it..

After putting the mud into the form and pressing it to the sides (very carefully if using the spray-oil, have been back&forth using that), I've found that laying a sheet of plastic wrapping down, pushing the mud into form one last time, and then fill it tight with sand, pushing the sand in tight, this keeps the sides from sagging nearly as much and, 24hrs later, I just came back and reclaimed the sand (to be mixed w/ cement in the next batch! Have been using 2:1 sand:cement, instead of the 2.5:1 I'd started with)

New idea I had was that I could use the cut tops of potting containers, set upon ceramic tiles, as forms- seemed like it'd work! Tried 2, had a 50/50 success rate getting them out-of-form at the 24hr mark

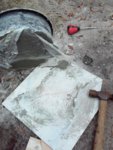
This one didn't make it- I'd used only a ceramic tile and the pot-rim, no oil between anything :/ [edit- see that rectangular pot's highly varied height? I use my grinder to bring the entire rim to the height of the lowest point, a complete PITA that I've yet to find much way around..]

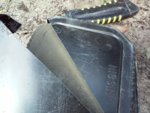
But the larger one, I made that 2nd and had the idea to put a layer of the plastic sheeting down, I figured that I could always just hit the tile w/ a hammer and it'd crack-off of the pot once the pot was further cured! (there's always the rush to get them out-of-form though, because they're still coming out incredibly 'rough around the edges' when right out of a form, I spend a good amount of time w/ various disks & bits on my grinders & drill to 'finish' these at ~24hrs when they're still kind of soft and flap disks still kind of have a realistic effect on them!)

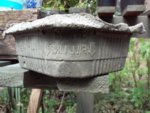
I noticed the ribbing on a container of some 'Ramen'-type single-serve someone was eating, took the container- am real happy with how these turned out and wish I had shots of it after doing my finishing work (grinding cement makes a mess, no camera at that point lol) but these forms make great containers for small specimen and, w/ them being super disposable, I don't even have to bother trying to tease the container out of its form, I just use a razor blade to remove the form


This is the 2nd time I've used this form, I really love how the first turned out - I put it in the background of the pic on the cinder block, it's got a sideways bougie in it - have a feeling I'll make at least a few more w/ this form, such a good size for smaller stuff!

Still not happy with much slouch there is, need to get a new cement (or pre-made) that cures quicker, the slouch is just unreal and I can't make the mud any drier, the sand-in-plastic-sheet idea for inside the forms has helped but I'm still having to spend far too-long on them w/ the grinder afterwards.
(I should note that these all go to a bucket for ~1mo, I change the water in it every few days, so the chemicals that're gonna leach during the curing process can be mostly gone by the time I'm using them - I've got a few in use now, one for over a month and no problems, think that means I'm ok! Next up is a 2nd attempt at custom forms and slabs, my first attempt came out so terrible )
)
Being that I do everything bonsai 'DIY', and have a natural love for cement/mortar in general, mortar containers were the obvious choice for me- I started w/ just using forms and ending up w/ containers that 'sunk', where the tops of the edges were far thinner than the bottoms (and the internal volume was terrible due to the slouched mortar) I'm still trying different approaches every time I go and make a batch of pots - have to make ~30-40 by spring if I'm to do the massive styling & re-potting I've got planned - and wanted to share my last batch's random ideas, in hopes of suggestions/advice on where I can make improvements! Each batch is coming out better but would really like to get to 'perfect' sooner than later, would suck to get to where they came out *exactly* how I wanted on my 40th container, I'd want to gift all of them and start anew lol!
So here's my last batch, w/ a few new tricks
Styrofoam 'plugs' for drainage holes are a must for me, I take these out of their forms at ~24hrs and do a heavy 'finishing' job on them w/ grinders, at that time I use a drill and make the holes nice and circular, and use a thin disk in my angle-grinder to 'connect' the holes so that I can sit them flush on a bench after having wired-in a tree (this is until I figure out a practical way to make containers w/ legs, so far the 'form approach' is working so well and I just can't think of how to incorporate legs into it..

After putting the mud into the form and pressing it to the sides (very carefully if using the spray-oil, have been back&forth using that), I've found that laying a sheet of plastic wrapping down, pushing the mud into form one last time, and then fill it tight with sand, pushing the sand in tight, this keeps the sides from sagging nearly as much and, 24hrs later, I just came back and reclaimed the sand (to be mixed w/ cement in the next batch! Have been using 2:1 sand:cement, instead of the 2.5:1 I'd started with)

New idea I had was that I could use the cut tops of potting containers, set upon ceramic tiles, as forms- seemed like it'd work! Tried 2, had a 50/50 success rate getting them out-of-form at the 24hr mark

This one didn't make it- I'd used only a ceramic tile and the pot-rim, no oil between anything :/ [edit- see that rectangular pot's highly varied height? I use my grinder to bring the entire rim to the height of the lowest point, a complete PITA that I've yet to find much way around..]

But the larger one, I made that 2nd and had the idea to put a layer of the plastic sheeting down, I figured that I could always just hit the tile w/ a hammer and it'd crack-off of the pot once the pot was further cured! (there's always the rush to get them out-of-form though, because they're still coming out incredibly 'rough around the edges' when right out of a form, I spend a good amount of time w/ various disks & bits on my grinders & drill to 'finish' these at ~24hrs when they're still kind of soft and flap disks still kind of have a realistic effect on them!)

I noticed the ribbing on a container of some 'Ramen'-type single-serve someone was eating, took the container- am real happy with how these turned out and wish I had shots of it after doing my finishing work (grinding cement makes a mess, no camera at that point lol) but these forms make great containers for small specimen and, w/ them being super disposable, I don't even have to bother trying to tease the container out of its form, I just use a razor blade to remove the form


This is the 2nd time I've used this form, I really love how the first turned out - I put it in the background of the pic on the cinder block, it's got a sideways bougie in it

Still not happy with much slouch there is, need to get a new cement (or pre-made) that cures quicker, the slouch is just unreal and I can't make the mud any drier, the sand-in-plastic-sheet idea for inside the forms has helped but I'm still having to spend far too-long on them w/ the grinder afterwards.
(I should note that these all go to a bucket for ~1mo, I change the water in it every few days, so the chemicals that're gonna leach during the curing process can be mostly gone by the time I'm using them - I've got a few in use now, one for over a month and no problems, think that means I'm ok! Next up is a 2nd attempt at custom forms and slabs, my first attempt came out so terrible

