Azalea Wars 1 - Waterwashing Roots - Satsuki and other Azaleas - From an Inquisitive person

Deep Sea Diver

Masterpiece
Messages
4,412
Reaction score
9,121
Location
Bothell, WA
USDA Zone
8b
Thanks for clarifying. I think we’re essentially on the same page, and I defer to your broader base of experience. I have three box-store mutants on my work schedule this weekend.
Good luck on your work this weekend! Can you please post how this went, including images?
This is how I've always handled new azalea stock, I've never had one die unless I coupled the initial reduction with cutting it back to a stub simultaneously.
Your message really got me thinking…. I don’t cut back much at all during rootwashing.… mostly not….and never to a stub. Occasionally I cut an errant branch down flush and cut putty.

So what about the “One insult at a time” guideline for azaleas? I think this depends…on a lot of things….experience working with azaleas, age/heath/cultivar/species of tree, location and ability to care for the tree….

To me it seems on the 1 gallon and less size azaleas to space out the insults for 1 gallon or less azaleas.…..

For example when rootwashing in early spring, no cutback or wiring is done until late June if there is a positive response. Trees cutback in summer here aren’t rootwashed until next spring. The types I work with are mostly satsuki, but also Kurume, R. kiusianum and assorted hybrids.

On the other hand, @Shibui does both drastic cutbacks and root cleaning at once on landscape azaleas with great success. Not sure exactly which types of azaleas he’s worked with. I suspect mostly Kurumes.

Cheers
DSD sends
 

Glaucus

Chumono
Messages
950
Reaction score
1,736
Location
Netherlands
USDA Zone
7b
So you use a spray nozzle, right? Not a single beam?

It could be that since you do your repotting in early spring, that you may be damaging roots. But it is not an issue because you repot at the ideal time.
And that if you did it in summer, 'blast' the roots, then cut back hard, that then it would be at risk.

The thing with leaves and removing them, yes or no, in summer is that leaves is what a plant uses to keep cool, by evaporating water. Which puts demand on the roots.
And leaves is also what shades the trunk of the plant from direct sunlight. Maybe ideal is removing the vigorously growing shoots that lose water easily. But keeping enough so the plant can cool and shade the trunk.

And the actual weather during that time of season also is essential. Right now, we have some 15C weather predicted. But we had really dry weather with 25C earlier this month.
But now would be a much better weather for a repot.
I usually do repotting when there is some rain and cloudy weather predicted. I don't bare root. For nursery plants, I open the root ball. No point trying to get old soil out, I feel. That would require something heavy duty like pressurized water. I do use slow running water sometimes, with a fine spray nozzle. Just to wash out the finest particles. That actually works really well at removing some stuff and making the roots visible.
If the azalea is in kanuma, I do try much harder to get old kanuma out. Because it can really completely fall apart rather easily. Kanuma dust is a worse growing medium than peat.

And I am actually also not really sure how root growth responds to these treatments. Most of the time I planted azaleas in the garden. Other times, I just repot seedlings before they are really pot bound.
Sometimes I transplant azaleas from my garden and they have very little roots, and I suspect grubs. Sometimes they have surprisingly many roots. Not seeing a pattern so far. Besides more roots -> more health -> more growth. But that's obvious.
 
Last edited:

Deep Sea Diver

Masterpiece
Messages
4,412
Reaction score
9,121
Location
Bothell, WA
USDA Zone
8b
…..Yes, a Joshua Roth water wand of high on the stong house water pressure we have in our area. It throws out as much pressure as the roots can stand.

It could be that since you do your repotting in early spring, that you may be damaging roots. But it is not an issue because you repot at the ideal time.

….I rootwash until mid July.

And that if you did it in summer, 'blast' the roots, then cut back hard, that then it would be at risk.

… I’d say a small azalea 1G or less would be.

Maybe ideal is removing the vigorously growing shoots that lose water easily. But keeping enough so the plant can cool and shade the trunk.

…. This would be a good experiment.

And the actual weather during that time of season also is essential. Right now, we have some 15C weather predicted. But we had really dry weather with 25C earlier this month.

…. For me it’s the weather 4-6 weeks afterwards that matters most….

If the azalea is in kanuma, I do try much harder to get old kanuma out.

… if one has all kanuma, there is no need to wash it out unless the shin is dry. (Kanuma has the same properties as akadama, Just softer). Then it’s time to tunnel, drill, or root wash. Yet this takes a long time to occur. I wouldn’t hazard a guess but know its at least four years with proper care.

Because it can really completely fall apart rather easily. Kanuma dust is a worse growing medium than peat.

…. imho. For cuttings and seedlings agree to peat. Somewhere at 3 yrs? It’s time to get the plant into kanuma. Here’s where one sets the structure makes initial bends and sorts out the nebari. For the last one needs a good fine grained media. If one waits the plants has to be root pruned and sorted all over again… this would be going a step backwards in overall development.

Sometimes I transplant azaleas from my garden and they have very little roots, and I suspect grubs. Sometimes they have surprisingly many roots. Not seeing a pattern so far. Besides more roots -> more health -> more growth. But that's obvious.

….yes planting in a garden brings in a whole lot more variables. In our case them pesky rabbits.

cheers
DSD sends
 

Deep Sea Diver

Masterpiece
Messages
4,412
Reaction score
9,121
Location
Bothell, WA
USDA Zone
8b
Addendum. …. Just to not be misunderstood…one doesn’t use full force all the time. It depends media in the rootball and one’s progress.

Start off with chop sticking the top radially, down the sides and into the bottom, then wash. Basically repeat. Prune as needed to lay out nebari. Near the end one basically is mostly working the top and bottom.

Happy Friday!
DSD sends
 

Deep Sea Diver

Masterpiece
Messages
4,412
Reaction score
9,121
Location
Bothell, WA
USDA Zone
8b
Because you have not yet tried Aug, Sep, Oct ... ??
Its entirely possible

A couple reasons why I don’t rootwash in these months.

…. root washing in August - September in my neck of the woods the azlaeas would have a hard time pushing sufficient growth to be strong enough and harden off to be of positive energy benefit to the plant before winter. Secondly, my experience with fungus during winter over. Sprays will negatively affect the young foliage, while not spraying will leave them susceptible. H2O2 usually helps provide safe storage for older foliage, but the youngest is most at risk.

….. Oct - Late January. What would be the benefit? They wouldn’t grow, so the plant roots sit dormant and damaged, somewhat like a repotting, all winter. Leaving them susceptible to frosts and fungus. February is a bridge month here.

Unless…. one provides an indoor grow facility. That would work.

I did rootwash 6 azaleas in December ‘19, put the plants on heat mats, led plant grow lights In the garage. They responded as usual, in about 6 weeks to solid growth, but with soft growth. While hardening off when temperatures rose outside the growth was more fragile and stalled, finally responding just behind the wintered over bunch. I need more work on this flight path.

I came to the personal realization unless I totally wintered over the plants, no real horticultural gain and possible damage or loss of plants vs continuous care wasn’t a good trade off. Instead I’ve been using the space to winter over multiple trays of azalea cuttings. It’s certainly possible to do
 

0soyoung

Imperial Masterpiece
Messages
7,496
Reaction score
12,832
Location
Anacortes, WA (AHS heat zone 1)
USDA Zone
8b
I'll just tell you that it is just fine in my neck of the woods through October, though I have no true satsuki.
I have no greenhouse. Everything sits outside 24x365.
But I've been told repeatedly, repeatedly, that I live on an island.
 

Deep Sea Diver

Masterpiece
Messages
4,412
Reaction score
9,121
Location
Bothell, WA
USDA Zone
8b
I'll just tell you that it is just fine in my neck of the woods through October, though I have no true satsuki.
I have no greenhouse. Everything sits outside 24x365.
But I've been told repeatedly, repeatedly, that I live on an island.
🤣 Isn’t Anacortes actually part of the Banana Belt of WA?
 

Deep Sea Diver

Masterpiece
Messages
4,412
Reaction score
9,121
Location
Bothell, WA
USDA Zone
8b
I was rereading Callaham’s ’Satsuki Azaleas’ book the other day and saw, as he described it ‘cleaning Hydraulic Blasting‘ being described as the way to remove previous growing medium. The example used a much larger tree then we normally use on P64.

Callaham shows, in the accompanied photo two hose nozzles, a high pressure jet and another with a forceful spray being used simultaneously used to blast the medium off an older azalea. He also says immersing the root cake in water will prevent splatter. I actually tried this method, beware where you point the hose when cleaning underwater! 😉

cheers
DSD sends
 

Deep Sea Diver

Masterpiece
Messages
4,412
Reaction score
9,121
Location
Bothell, WA
USDA Zone
8b
Part One - Waterwashing Azalea Roots using small stock.

Since it’s easier to show close ups of waterwashing azaleas (and subsequent repotting) on smaller stock, this entry will be a step by step of the process using 3” nursery liner stock.

Rotate the tree and aterwash the roots immediately after removing the liner. Chopstick the top outwards, the sides downwards and the bottom upwards lightly.

3EEB151F-53F5-4C9B-9EAC-ACC974D116F8.jpeg CBE664E6-565A-4A2C-A1C7-7B543ECA66DA.jpeg

Next chopstick the bottom while washing. The roots will begin to flare out into your palm. Repeat on top while over an upturned liner. After you are finished the root mass will look like the photo below.

EFFDADF0-81A2-40E1-A27E-ED053B16BA3A.jpeg

Repeat process and the debris will slowly wash out.

09753518-6A8D-4EF0-B1C5-23F5CF22D8D8.jpeg

Finally tease the roots gently and wash repeatedly top and bottom to remove all bark possible. Silvers will be buried in the fiberous roots, work it out. use fingers and chopsticks. Remove the grains of pumice or perlite as possible… these particles can ‘lock’ the roots around the bark.

Anyways wash the bottom of the roots into your palm to keep the roots flared. Same with the top washing…do it on the upturned liner. Submerging in a largish shallow pan can help. Be sure to keep the roots flared.

Afterwhile the roots will have almost all of the debris removed

AA688688-E466-4306-BD62-CBF92C92A3A5.jpeg 7867D8BF-9D84-4F13-8320-5AB0337AA7D9.jpeg

Place the roots tree in a cool water bath and lightly swirl. Many of the rest of the bark slivers tend to release. Change the water and the tree is ready for repotting. Notice how the roots naturally flare out.

C0B19216-D881-4135-9501-48D4F4A3E367.jpeg

Cheers
DSD sends
 

Deep Sea Diver

Masterpiece
Messages
4,412
Reaction score
9,121
Location
Bothell, WA
USDA Zone
8b
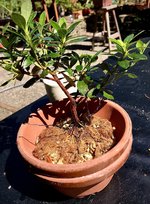
Part Two - Potting Waterwashed Azaleas

A great advantage of waterwashing young stock is, properly done, one gets a fantastic start on an awesome nebari. A second is one knows exactly the layout and condition of the roots. Third one knows there is nothing on the roots besides the new media. This gives the hobbyist total control over the process and allows them to narrow down any issues later. Finally, it’s really easy to work the nebari next spring and up pot these to the next size pot.

If I follow this process properly, the only major thing I concern myself about is ensuring proper after care.

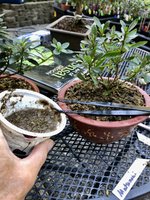
I usually use 4.5 - 5” Tokoname training pots for small stock. Once in a while the roots will be small and a 4” pot will be needed. These fit together nicely on a bench, are cheap, relatively sturdy and avoid plastic. I’ve been getting these from NE Bonsai gardens/Bonsai Outlet… yet likely one could get these many other places…like Weigerts etc… and maybe at a better price!

The pot shown below has the screen already installed and the hold down wires placed.

Two things I do perhaps differently then others.

First the wire holes are bored out to 5/16” to give extra drainage. Usually the wire holes are very small, so I submerge the pots in a tray with wood chocks inside and bore these with a diamond bit to enlarge the holes. Bit cost about 18USD.

Second, the tie down wires are twisted and crossed.

At first I didn’t do this, yet on pot after pot I felt the wires slip. Crossing and twisting the wires allow one to have total control of each wire end. Also, on small pots, it doesnt much matter which wire end you use to twist to another… unless one horses the ends to tighten. But gentle Is the key with azalea roots and with Kanuma.

Incidently I’m presently using 90/10 small kamuna/small pumice. I source the Kanuma all over. Pumice comes from General Pumice. Their product comes presorted.

0BAD23A8-8501-4B5F-A2C0-0381FB49E8B8.jpeg

Another thing I do is hold down the roots with a partial basket tiedown. This gives one more control of the roots/trunk.

To make these: take a 3” piece of wire and twist back to form a very small loop on both ends, similar to the butterfly some folks use to install screening. Length varies 3/4 -1” is usual depleting on trunk/root mass. Position these butterfly opposite to one another across the pot, each with the loops threaded through two wire ends on that side. Bend the tie down wire back over the rim with the butterfly firmly up to the top of the rim… or on the rim to keep control of the bow tie.

2E1AF711-8D46-4DA8-BAD1-05BA1E2AC380.jpeg

Next media is added about 2/3 of the way. Try to cone up the media in the middle… almost to the top of the rim so it will rise to meet the base of the trunk while the root tips flare down. The dome will compress as the wires are tightened.

2EA25874-60E6-4D7A-9321-0CA2C8D6DD82.jpeg

Place the tree into the pot
0DD09D81-BE6F-48DB-BB31-565DD25C3764.jpeg

Gently pull one set of two wires across on either side of the trunk, then the other set. Position the butterfly near the trunk… about 3/4” or less away depending on the size and thickness of the roots near the nebari. Big roots, thick nebari hold better so the butterfly can be spaced away a bit more.

The goal is to hold the trunk and roots in position, but not to have to ‘reef’ down a lot when tightening.

btw: If the wires start to displace the roots to one side, when tying off, use a chopstick to tease the roots to each side of the wires to give an equal distribution of the roots around the pot. If all else fails use scissors to snip a little bit to make a clear path for the wire.

Getting ready to tie down.

D75FAC38-FF3C-4DAD-817E-69715DA2C7E9.jpeg

Initial tiedown.

0DD09D81-BE6F-48DB-BB31-565DD25C3764.jpeg

Once tied down gently, add more media along the sides and gently chopstick it under the roots as you move around the pot to firm things up. Too much chop sticking will break up the soft Kanuma in the media. This will cause the soil level to sink when watering.

Be careful as this may push the roots out of the media. If this happens, carefully undermine that section, push the roots down and bury them. Leave about 1/4 space of rim left to leave room for moss and ensure proper drainage.

obtw: The time to add solid Biochar, if that’s something you do, is during this step. If ground up, put on top as you are watering in the media the final time.

7E095F8E-A15C-4952-9E68-BAC2E48B1C07.jpeg

Now water the surface lightly with a wand. Then submerge the pot in water to just below the top of the media. (Submerge too deep and the media will float away.) The rationale is this step is done to ensure the media is fully saturated. Drain, repeat until the drain water is clear.

I often leave the tiedown ends sticking out so I can snug down if needed now.

Finally use a wand to water the surface again until the drain water is clear. (You can skip the submerging step if you so desire. I find the media stabilizes better when submerging, but this is up for debate! )

61A6C8A8-4C5B-45D8-967C-99229015F98F.jpeg A14D369D-024E-4780-8938-9E0219876EA8.jpeg

Adding moss. The idea of adding moss is the top portion of the media is very important to the health of the azalea, so I add moss to help stabilize the media and to help protect the roots below.

I use 60/40 Yamagoke/Sphagnum moss shredded, apply it dry, then stabilize the moss by wetting down with a spray bottle. Afterwards mist the entire shooting match.

(Some folks wet the moss for a day in advance, then apply it wet. Sounds like something for me to try out the next time I add moss!)

9152FB9E-81FA-48C8-BADC-2FB356C0A0B0.jpeg 449303A7-0928-4CB1-A601-9882B0A15892.jpeg D507F679-A357-42EB-97DC-B2CCC98D6309.jpeg

I was just about to post this when I out watering and it struck me there was no mention of timing and care these posts.

Timing

As much as I say Azaleas ain’t Shrinking Violets, if one water washes and then stores an Azalea in the heat or direct sun… the azaleas will resemble Shrinking Violets in short order!

Moderation in temperature is the name of the game. So ideally 50-70F 10-21C would be really nice. Where I live this usually lets me work from about the middle of March to the middle of June.

Could one do this procedure in late September without a special enclosure or greenhouse? I don’t know. Yet I wouldn’t recommend it as I’ve observed my azaleas take 4-6 weeks to recover. Then they push strongly.

How about doing this process at 80F/21C? Might work, haven’t tried yet. Likely with correct aftercare. How about 90F/32C… you’ve got to be kidding!

So waterwashing in late September is cutting it too fine without special protection imho. I do have a couple greenhouses, so I guess later on this year with time, I’ll try it and see how things work out.

Care - Its key to remember is this is major tree surgery! No matter how gentle you were, these roots were damaged and, more importantly perhaps, the rhizosphere has sustained major damage which it will not recover from for at least a couple weeks.

Please do not toss the pot in with the rest of the collection and watch to see what will happen…because you will likely have just added a Shrinking Violet to your collection!

Keep out of sunlight for about 3-4 weeks. Bright shade at max. After that try dappled shade/early morning sun. Ease in to full sun. One will know when the plant has recovered.

Keep out of excess temperatures. Initially roughly over 82F / 28C briefly would be my top limit.

Fertilizer - Wait at least 3-4 weeks or until new growth appears. Start with 1/2 strength liquid fertilizer, wait two weeks… if good then, one can up the amount.

Sound a bit conservative here? Yep! I would rather baby the trees a bit up front for years of enjoyment. It’s a small price to pay.

04D9EA18-9BAB-4014-96A1-8A202CF2CE41.jpeg

Cheers
DSD sends

obtw - what if you don’t like this process? Do something else! After all, your trees, your choice! 😎
 

Attachments

  • C57D72C0-B506-4D7C-AB30-A03F3B0210DD.jpeg
    C57D72C0-B506-4D7C-AB30-A03F3B0210DD.jpeg
    296.4 KB · Views: 16
  • BF0CA540-3942-4D0D-A0A2-36C6B0EBB7A7.jpeg
    BF0CA540-3942-4D0D-A0A2-36C6B0EBB7A7.jpeg
    315.3 KB · Views: 25
Last edited:

Thomas Mitchell

Sapling
Messages
47
Reaction score
90
Location
Maple Heights & Beaver, WA
USDA Zone
8b
DSD, thanks for all your time creating this post. It's super helpful and has inspired me to try some testing.

You remarked on my use of pond baskets for satsuki a while back in the contest thread. When I repotted a couple this spring, they came out with a great, dense mass of fine roots which made reduction and moving into smaller pots easy. However, I have no control to know whether I would have been better off with a different pot. I like the small baskets as they are cheap, light and easy to store stacked. Plastic is kind of a drag though.

I'll do some experimentation next spring and report back.
 

Deep Sea Diver

Masterpiece
Messages
4,412
Reaction score
9,121
Location
Bothell, WA
USDA Zone
8b
Thank you!

Azaleas naturally push a really dense mass of fine roots.

One of the keys is to keep the roots from drying as this slows their growth (at the least.) That’s why they are normally potted in ceramic pots when grown out in pots. Tokoname pots are inexpensive, and give high moisture control.

Yet azaleas can be remarkably hardy. I’m doing tests on six azaleas (two cultivars) from the nursery…. on not watering, over fertilizing and soaking the roots continuously. So far the azaleas not watered went over three full weeks before one of them showed big signs of trouble. During this time the two azaleas not watered slowed their growth markedly compared to the other trials. It’s been over 90F all week… 94F today,

Sounds like you are very conscientious about keeping your azalea watered! I’m interested to see how your azaleas fair over time.

Cheers
DSD sends
 

Deep Sea Diver

Masterpiece
Messages
4,412
Reaction score
9,121
Location
Bothell, WA
USDA Zone
8b
Must be a spell correct error.

Tokoname = terra cotta?
😉. Actually Japanese terra cotta. “Tokoname grow pot” is a more proper name.

In my experience these pots are much thicker and harder (and sides a bit steeper) then the terracotta we have available.

Also, these pots don’t “weep” much at all compared to local terracotta.. Some folks think these pots are fired at a higher temperature.

(Sarcastic). Likely someday the Japanese will get the word and make these cheap like the ones we have locally!

cheers
DSD sends
 

Glaucus

Chumono
Messages
950
Reaction score
1,736
Location
Netherlands
USDA Zone
7b
Of course the natural advice to give is to say 'keep azalea roots moist, not wet'.
But actually while repotting my azalea seedlings, many of them have dry roots. I repot them before I water everything.
And then the roots are basically completely dry while being potbound (as they need a repot). And these plants look great with good growth.
That said, 1 in 20 sometimes has some burned leaf tips.
They are not bonsai and in peat-based potting soil & perlite 50/50.

In contrast, I see seedlings that are a bit overpotted and have maybe less leaves and are therefore not pot-bound.
And these don't look the same way. They grow slower and their leaves are less green.
So I would say that in reality you do want your roots to dry up completely. But only at the end of the day when you are about to water.
Not sure if this translates to kanuma, as I do not have hundreds of seedlings in pure kanuma.
 

Deep Sea Diver

Masterpiece
Messages
4,412
Reaction score
9,121
Location
Bothell, WA
USDA Zone
8b
Completely drying occurs sometimes with a few of my peat/perlite seedlings that at vigorous or in a sunny spot….then they have to be submerged to rewet their tiny root balls. Given the leaves/stems haven’t started to droop, the seedling often recovers. Once it’s lost turgor, recovery is infrequent in my experience. I’ve never tried to repot a completely dry azalea root ball myself.

Can’t say I would want to do this to 3-5 year trees though.

cheers
DSD sends
 

Seany

Seedling
Messages
14
Reaction score
3
Location
Irvine CA
USDA Zone
9
Interesting thread. I just want to add that I couldn't read this without imagining the distinctive, root-beer-like smell of azalea roots!
 

Deep Sea Diver

Masterpiece
Messages
4,412
Reaction score
9,121
Location
Bothell, WA
USDA Zone
8b
Funny…. but now that you mention it, they do smell kings of like root beer…. the old fashioned sassafras type!

Cheers
DSD sends
 

Deep Sea Diver

Masterpiece
Messages
4,412
Reaction score
9,121
Location
Bothell, WA
USDA Zone
8b
Waterwashing Azaleas Update - Moss

As I was prowling about the back forty, looking at the waterwashed azaleas from this post, I noticed the moss wasn’t completely covering the media on some pots.

This does happen, especially on the front end and after winter storage.

Partial coverage also shows up when the local gangs of ‘tweety birds’ run amok on the pots, pecking here and there for bugs and stuff to grind food in their gullets.

Today was a time to revisit some of these azaleas and lay out one way to repatch the moss.

Back in the day I just put moss on the pots, wetted it and walked. The results were not good.

Nowadays I’ve gotten wiser , older and craftier.

Patching moss.

The first step is to rub the moss against a screen to break up the big chunks. This helps give the moss more surface area and allows the moss to stick better.

B4BBCE65-8DC2-405F-9E4A-9BAAAE699A45.jpeg

Next, flood the moss with water and wait at least 15 minutes, stirring occasionally. I usually use a quart container for the moss slurry and apply using a yogurt container.

C123FD0C-E03B-4365-9645-26C57A72A445.jpeg

Start slowly pouring the mixture on the media a bit at a time. Use a tweezers or rod to help direct the flow. Start at the trunk and work around the pot. Work on a sector at a time until the entire surface where moss is needed is covered.

Gently pour the slurry on top of the media, working sideways towards the trunk. Add water in the moss container periodically to keep the slurry mobile. This makes the moss flow, laying down nicely, blending together adjacent patches. Pat down as needed.

79C5C459-4F42-48C3-9E8C-2738FA4C7391.jpeg

Finally put the pots in dappled sunlight or bright shade for a up to a week.. This keeps the moss from drying out and gives the moss a chance to get started growing. Water as it begins to dry.

If there is any mossy water left over, pour on other trees where more moss coverage is needed. This water will have bits of moss and spores.

I like to start this project when I know I’ll be around for a couple days so it’s easy to keep an eye on the pots.

cheers
DSD sends
 

Attachments

  • 1C554202-DBE9-4115-B249-9E14BFF9606E.jpeg
    1C554202-DBE9-4115-B249-9E14BFF9606E.jpeg
    302.5 KB · Views: 25
Top Bottom