Bad at Japanese Maples #1

Messages
1,513
Reaction score
3,189
Location
Eastern MA
USDA Zone
6B
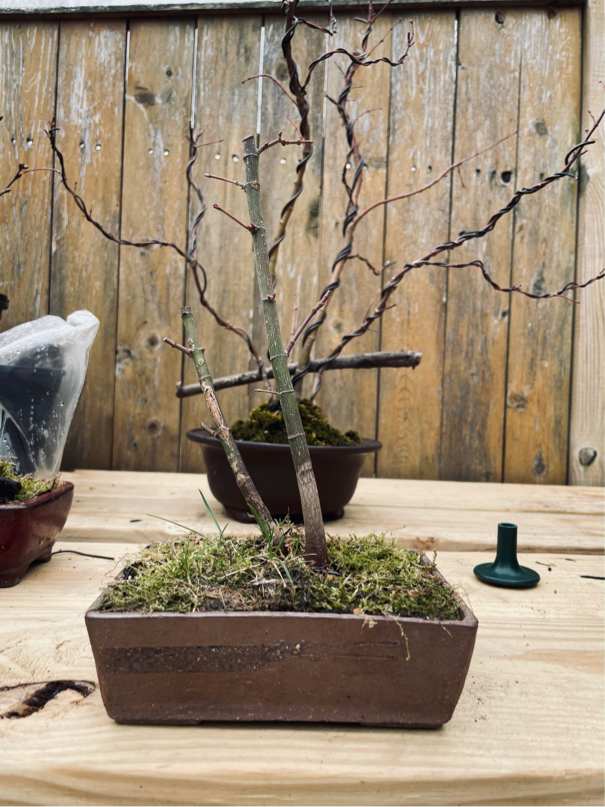
OK, so got the larches thread on its way, now one for maples. I picked this up recently to work on in spring, if only to repot.

What I'm currently seeing here is where the tree was chopped and a new apex was made - the chop that was made seems high to me, and the section too straight. Do you agree? My initial thought was to cut this back and try to make a more compressed tree, rather than what this was building towards which I see as a much larger tree than what's in my head. I can see this tree if I were to keep it, but it's just staring at me now with no leaves on the tree, and it doesn't seem ideal. It looks like there's only one ring near the top where I would anticipate new shoots reliably, so I THINK that means that if I want to mess with this I'm basically going to have to take the whole thing off and use the branch at the bottom of the current apex as a new leader.

The arrow is pointing to what I'm thinking is a sacrifice branch that I don't know if I want.

IMG_3086.jpg

Now, based on the current branching, that seems like the front, you can kind of make a triangle whose peak is leaning off to the right with the shape of the branches as they are now, but I don't think it takes into account the nebari, which I'm going to need to dig out to see this better, but there's something interesting going on, and that front really loses it. That flat piece on the left is pointing straight at the camera in the wide shot.

IMG_3082.jpg

Finally, there's these two branches coming out lower on the tree. I don't know that I want them both there, it seems like one was either grown to replace the thicker one, or it was being used as a sacrifice. Might be good to keep for now to keep thickening the trunk, but of course there's the concern of scarring with it getting too big (which maybe it already is, I don't know). This section is on the lower right of the trunk in the wide shot.


IMG_3084.jpg

Anyways, thoughts welcome and I'll be following up in this thread as I progress. I suppose I could go nuts and chop it above the first branch and try for a shohin, but I feel like with the material as it stands now I should try to utilize what I have rather than discarding it and regrowing from scratch.

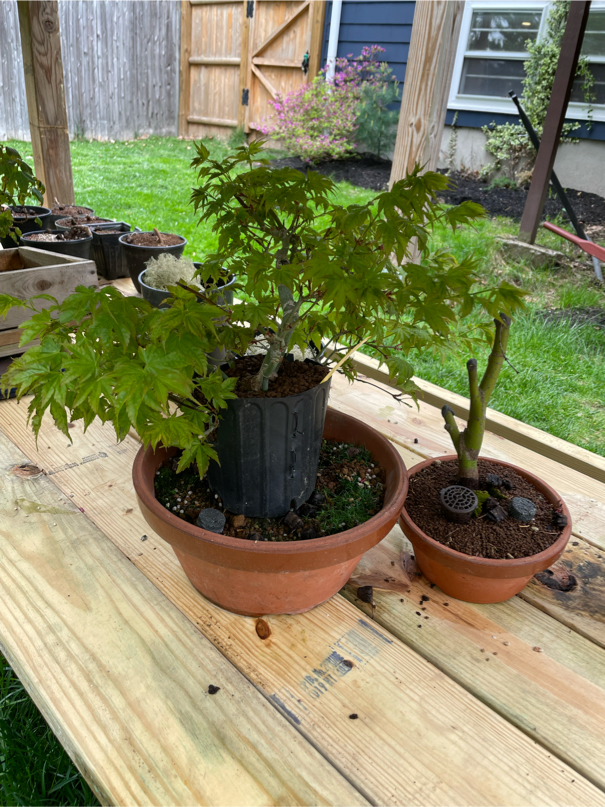
I also have a clump going but figured I'd start here.
 
Last edited:

Dav4

Drop Branch Murphy
Messages
13,098
Reaction score
30,141
Location
SE MI- Bonsai'd for 12 years both MA and N GA
USDA Zone
6a
Don't chop yet. For best advice/input, we'd see pics from multiple angles with more of the surface roots exposed. Any chance you can slip it out of the pot and expose more of the base, then post more pictures?
 
Messages
1,513
Reaction score
3,189
Location
Eastern MA
USDA Zone
6B
Don't chop yet. For best advice/input, we'd see pics from multiple angles with more of the surface roots exposed. Any chance you can slip it out of the pot and expose more of the base, then post more pictures?

I could, I'm a little reticent to do so given the temperatures outside, but perhaps taking the top layer off isn't too big of a deal.

I don't plan to make any cuts til March at the least, so I haven't fired up the chainsaw just yet ;)
 

0soyoung

Imperial Masterpiece
Messages
7,500
Reaction score
12,872
Location
Anacortes, WA (AHS heat zone 1)
USDA Zone
8b
I guess you are referring to the previous owner when you say 'bad at Japanese maples'.

I can offer you a couple of further considerations (aside from advising you to ignore the existing branching unless if fits you aims).
  1. Big chop scars take a long time to be grown over and then some more time to look good --> you want to position them to the back, out of sight.
  2. Perspective, or a sense of depth, will help your design to be more effective --> you want heavier branches in front and thinner ones in back.
Considering these two things, I would consider the front of the tree being the back, as first pictured. The long straight sacrifice will likely need to be removed anyway, but the top of the tree is coming toward the viewer (as it should) from this side. Being in front, longer internodes are acceptable and there is an outside chance that you might want to keep it as you could put a thread graft or two on it. If you decide to remove it, then there will be a scar to be covered --> can it be cut to not be a problem or does this equal a death knell for this view being the front?
 
Messages
1,513
Reaction score
3,189
Location
Eastern MA
USDA Zone
6B
Here we go... i made a 360 video. There’s a scar on the other side, too, haha

 
Messages
1,513
Reaction score
3,189
Location
Eastern MA
USDA Zone
6B
i don’t think it’s smart to take more off the roots right now, but a general peek of the nebari (video starts and ends with the same front and back as the first video did)

 
Last edited:

SeanS

Omono
Messages
1,237
Reaction score
3,473
Location
Johannesburg, South Africa (SOUTHERN HEMISPHERE)
USDA Zone
9b
The back of the tree seems like a much better front to me even with the scar. The trunk moves forward (towards the current back) if you rotate 180° and you could grow a new leader from the base of that current long straight neck if you chop it off and get buds to pop there.
 
Messages
1,513
Reaction score
3,189
Location
Eastern MA
USDA Zone
6B
Yeah you can kind of see me pausing at that moment in the video - that wasn't intentionally to show the other side, it was me going, huh, I think they might be right in my head
 

Dav4

Drop Branch Murphy
Messages
13,098
Reaction score
30,141
Location
SE MI- Bonsai'd for 12 years both MA and N GA
USDA Zone
6a
I could, I'm a little reticent to do so given the temperatures outside, but perhaps taking the top layer off isn't too big of a deal.

I don't plan to make any cuts til March at the least, so I haven't fired up the chainsaw just yet ;)
All you need to do is pull the root ball from the pot and lightly brush the soil off the top and away from the trunk... then take a video of the entire tree. You won't really be disturbing the roots if that's your concern.
 

Shibui

Imperial Masterpiece
Messages
7,642
Reaction score
15,419
Location
Yackandandah, Australia
USDA Zone
9?
I agree that the trunk appears to look better from the other side. No bug scar, apex comes forward, trunk curves look good, etc. Take a good lok from somewhere round that side for possible designs.
That skinny little 'sacrifice' branch could be really useful if you view the tree from that other side.

Finally, there's these two branches coming out lower on the tree. I don't know that I want them both there, it seems like one was either grown to replace the thicker one, or it was being used as a sacrifice.
I think you may be reading too much into the previous development. JM are notorious for growing many shoots from one spot and many growers are reluctant to prune so there are lots of these trees with multiple branches where there should only be one. The thicker one may be useful if the front changes but I suspect the thinner one will be in the way.

This tree has had several chops. The first is where the large scar is then there are several more chops up the main trunk which is perfectly acceptable. The new shoot from the first chop (larger scar) grew rapidly and had a long internode. That's the section marked in pink on the original photo. It would have been better to cut that right off back then and get a second shoot with more compact internodes but I think that section will fit into your proposed tree without too much distraction. If it were higher up the trunk it would be a problem. New buds cannot grow from between nodes so that straight section will only produce shoots from the base and the top as it already has done. If that section does disturb you it will need to be removed. Just realize that will entail quite a few years of development to replace the apex. there is another really long internode in the lowest branch that cannot be ignored. Definitely need to chop that and regrow the branch if it is to be used.
There are a number of places where there are more than 1 branch growing close together. JM quickly swell where there are bunches of branches so it is really important to remove some as soon as possible.

When you consider a design for this maple please consider the natural growth shapes of JM. They rarely grow with horizontal branches in layers but many bonsai growers insist on following the cookie cutter horizontal branch plan. More natural shape is ascending branches (almost trunks in older trees) that then sweep out to form the branch pads. Your tree already has ascending main branches so is headed in that direction and I would use that to advantage.
 
Messages
1,513
Reaction score
3,189
Location
Eastern MA
USDA Zone
6B
I agree that the trunk appears to look better from the other side. No bug scar, apex comes forward, trunk curves look good, etc. Take a good lok from somewhere round that side for possible designs.
That skinny little 'sacrifice' branch could be really useful if you view the tree from that other side.


I think you may be reading too much into the previous development. JM are notorious for growing many shoots from one spot and many growers are reluctant to prune so there are lots of these trees with multiple branches where there should only be one. The thicker one may be useful if the front changes but I suspect the thinner one will be in the way.

This tree has had several chops. The first is where the large scar is then there are several more chops up the main trunk which is perfectly acceptable. The new shoot from the first chop (larger scar) grew rapidly and had a long internode. That's the section marked in pink on the original photo. It would have been better to cut that right off back then and get a second shoot with more compact internodes but I think that section will fit into your proposed tree without too much distraction. If it were higher up the trunk it would be a problem. New buds cannot grow from between nodes so that straight section will only produce shoots from the base and the top as it already has done. If that section does disturb you it will need to be removed. Just realize that will entail quite a few years of development to replace the apex. there is another really long internode in the lowest branch that cannot be ignored. Definitely need to chop that and regrow the branch if it is to be used.
There are a number of places where there are more than 1 branch growing close together. JM quickly swell where there are bunches of branches so it is really important to remove some as soon as possible.

When you consider a design for this maple please consider the natural growth shapes of JM. They rarely grow with horizontal branches in layers but many bonsai growers insist on following the cookie cutter horizontal branch plan. More natural shape is ascending branches (almost trunks in older trees) that then sweep out to form the branch pads. Your tree already has ascending main branches so is headed in that direction and I would use that to advantage.

This is fantastic, thank you, and it makes sense. I didn’t know that about the cookie cutter vs the natural - I think I’ve probably had that “cookie cutter” shape in my head, and have been thinking about how to achieve it, but clearly I need to look more closely at more JMs to see how I can make this one as strong as possible using the more natural style.
 

Leo in N E Illinois

The Professor
Messages
11,339
Reaction score
23,280
Location
on the IL-WI border, a mile from ''da Lake''
USDA Zone
5b
I more or less agree with Dav4 and @0soyoung and @Shibui

On your video, the front I would use is somewhere around 5 seconds thru about 9 seconds. This region puts the tree leaning toward the viewer. I agree with @Shibui that you could consider a more ascending design to the branches. Maples in nature do a 1, 2, 4, 8 etc, type of informal broom, more than they do a single trunk with horizontal branches.

I would work with what you have, no chopping of the main leader. That straight segment you marked in pink is only a moderate problem, it can be worked with. Three possible approaches for that straight segment. 1.) Ignore it, it is not that bad, not great, but not that bad. 2.) have one of the lower, ascending branches cross this segment, preferably with some foliage in front of the straight segment. This would visually divide the segment into 2, making it much less noticeable. This is an "in leaf" cure. Bare tree in winter will still show the flaw. 3.) Your best solution is to pass a thread graft through this branch somewhere near its midpoint. I would shoot for slightly above the midpoint. You can in preparation for #3 bring a branch across, #2. The last option, chopping and starting over would mean many years before this tree looks like something again. If you are under 30 years old, sure, this can work. If you are over 60 years old, do you really want to put the time in? You can have a nice, medium quality tree that will look great simply by working with the long straight segment.

Draw or use "Paint" programs using photos from every 45 degrees of this tree. Have the camera lens on the same plane as the rim of the pot, or better yet, when you take the tree out of the pot, take the stills, with the camera level with the top of the nebari. This will give you the best perspective for designing the tree. Then using these stills draw out your options. Stick figures are okay, but do the drawing or paint program. The time you put into this will help you really "see" all the possible designs for the tree.

But if you still want to chop, just realize, you will have added a decade to the time for which this tree will look like anything. As it is now, just a few years, it can look like a nice tree. It won't be a National Champion, but very few trees ever do end up "Champions".
 
Messages
1,513
Reaction score
3,189
Location
Eastern MA
USDA Zone
6B
I more or less agree with Dav4 and @0soyoung and @Shibui

On your video, the front I would use is somewhere around 5 seconds thru about 9 seconds. This region puts the tree leaning toward the viewer. I agree with @Shibui that you could consider a more ascending design to the branches. Maples in nature do a 1, 2, 4, 8 etc, type of informal broom, more than they do a single trunk with horizontal branches.

I would work with what you have, no chopping of the main leader. That straight segment you marked in pink is only a moderate problem, it can be worked with. Three possible approaches for that straight segment. 1.) Ignore it, it is not that bad, not great, but not that bad. 2.) have one of the lower, ascending branches cross this segment, preferably with some foliage in front of the straight segment. This would visually divide the segment into 2, making it much less noticeable. This is an "in leaf" cure. Bare tree in winter will still show the flaw. 3.) Your best solution is to pass a thread graft through this branch somewhere near its midpoint. I would shoot for slightly above the midpoint. You can in preparation for #3 bring a branch across, #2. The last option, chopping and starting over would mean many years before this tree looks like something again. If you are under 30 years old, sure, this can work. If you are over 60 years old, do you really want to put the time in? You can have a nice, medium quality tree that will look great simply by working with the long straight segment.

Draw or use "Paint" programs using photos from every 45 degrees of this tree. Have the camera lens on the same plane as the rim of the pot, or better yet, when you take the tree out of the pot, take the stills, with the camera level with the top of the nebari. This will give you the best perspective for designing the tree. Then using these stills draw out your options. Stick figures are okay, but do the drawing or paint program. The time you put into this will help you really "see" all the possible designs for the tree.

But if you still want to chop, just realize, you will have added a decade to the time for which this tree will look like anything. As it is now, just a few years, it can look like a nice tree. It won't be a National Champion, but very few trees ever do end up "Champions".

This is fantastic advice, thank you. And the thread grafting is a great idea. I should perhaps be more choosy, but I definitely do not entertain fantasies of this being a show tree. It’s good enough to do as well as I can. I’m 38, so while I don’t plan to check out tomorrow, I think it probably makes sense not to chop this tree.

I think this is this kind of thing I’m trying to dial in - the scope of time for some of these projects. Sometimes it feels like folks grow a thicker trunk, chop it, and in a year it’s on its way to being a shohin - I know that’s not the case, but it feels it sometimes.

So I’ll look at this and my lizard brain is like, oh, sure, chop it, couple years from now it’ll look great, but my logical brain tells me to pump the brakes.

So I guess it’s good I found a group of folks with experience who can slap my wrist here and there and remind me of the actual scope of some of the ideas I may have
 

Leo in N E Illinois

The Professor
Messages
11,339
Reaction score
23,280
Location
on the IL-WI border, a mile from ''da Lake''
USDA Zone
5b
If you already have a few trees that are closer to "exhibit ready", then chopping and essentially starting over makes more sense. If this tree is one of your closest to being "exhibit ready" then the option of working with what you have makes more sense. Get a few more trees, some in earlier phases of development, and a at least one or two that are in more advanced stages of development. Having trees at more advanced stages will give you better, more experience in the "art of bonsai", rather than being stuck in the "nurseryman's phase" of bonsai.

I would just keep the branch and work with it.
 
  • Like
Reactions: Ugo
Messages
1,513
Reaction score
3,189
Location
Eastern MA
USDA Zone
6B
If you already have a few trees that are closer to "exhibit ready", then chopping and essentially starting over makes more sense. If this tree is one of your closest to being "exhibit ready" then the option of working with what you have makes more sense. Get a few more trees, some in earlier phases of development, and a at least one or two that are in more advanced stages of development. Having trees at more advanced stages will give you better, more experience in the "art of bonsai", rather than being stuck in the "nurseryman's phase" of bonsai.

I would just keep the branch and work with it.

Yep - that’s my general plan. I have a handful of tropicals in more “complete” of a state or close enough, but that doesn’t mean I only want to looks at sticks in mud when it comes to deciduous. I’m keeping my eyes peeled for the right JM to have as an at least closer to “finished” one, but for now most of my outdoor plants are pretty early on
 
Messages
1,513
Reaction score
3,189
Location
Eastern MA
USDA Zone
6B
After speaking with Zuma at Bonsai West today I think the plan is to air layer off the top and use the base for a shohin. There is a portion of the middle section that could be positioned to make an interesting multi-trunk. This is exciting news for me as a fat little shohin maple was high on my list to pursue, but it hadn't crossed my mind to do it with this one!

Not sure about the very top with the problematic internode. I really hadn't looked at it in this light before, so maybe there's a mame or something else up there I can pull off of it. We discussed growing out whips to graft there, but as soon as he mentioned the idea of the shohin I was sold. I love all the bonsai, but the smaller they go the more my love increases, it seems.

I gotta get on figuring out how to build a decent bench.
 
Last edited:
Messages
1,513
Reaction score
3,189
Location
Eastern MA
USDA Zone
6B
OAqN9uA.jpg
mH0252H.jpg
i might just repurpose this to be my maple thread

here’s my clump for now

someone had told me you could work maples mid winter. You really can’t but I thought I’d see what happened with a couple saplings

technically they did survive and are budding
 
Messages
1,513
Reaction score
3,189
Location
Eastern MA
USDA Zone
6B
They shared some photos of Zuma doing the air layer - this is my first time, so I was observing. Very clean cuts, no touching of the bark to avoid skin oils etc getting on it, and then painting the upper cut with Clonex before surrounding in akadama. The top will be a clump shohin, and the bottom will end up being a sumo shohin.

 
Top Bottom