Black Pine Seedling Cuttings

M. Frary

Bonsai Godzilla
Messages
14,307
Reaction score
22,120
Location
Mio Michigan
USDA Zone
4
hmmm...anyone else notice this?

One starts with a Porsche and switches to a VW while the other starts with a VW and switches to a Porsche....yet they are both successful. Kind of makes one wonder if either is better than the other....really?
Could have just stayed in the VW for the whole time is what I get from it.
 

markyscott

Imperial Masterpiece
Messages
6,124
Reaction score
21,424
Location
Delaplane VA
USDA Zone
6B
Well said.. Didn't mean to derail your thread, just going where the conversation took it...

So, back to the point I meant to be making regarding seedling cuttings- do you think it is sufficient to just remove the tap root and leaves me fine roots at the top of the mass the way I did, or is there little benefit to that, and the full seedling cutting method would produce dramatically better results? Perhaps someone who has tried both before could comment? I am fairly new to growing Pines from seed, so I want to get it right... I plan on doing another batch next year most likely. Maybe @Eric Schrader has some input there? Seems I saw him say he had tried bothe the seedling cuttings and had grown them without doing the cuttings...?

I've been a member here long enough to be able to anticipate where this discussion was headed. It's probably too late to redirect already, but we can try. All you have to do is shout "squirrel" and there'll be another soil discussion. So boring.

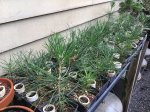
Anyway - I reread your thread and I'm not sure I'm clear on exactly what you did. Are you saying you left the long stem you showed in this picture and then just removed the tap root? If so, what happened to the long stem in this picture?

Scott
 

Eric Group

Masterpiece
Messages
4,554
Reaction score
4,855
Location
Columbia, SC
I've been a member here long enough to be able to anticipate where this discussion was headed. It's probably too late to redirect already, but we can try. All you have to do is shout "squirrel" and there'll be another soil discussion. So boring.

Anyway - I reread your thread and I'm not sure I'm clear on exactly what you did. Are you saying you left the long stem you showed in this picture and then just removed the tap root? If so, what happened to the long stem in this picture?

Scott
Yes, exactly. I left the stems, removed the tap root and left a few roots at the top of the roots that were radially spread. The long stems continued to extend, thickened up a bit, and have started to harden off, just as pine seedlings do when left to their own devices without messing with the roots at all. Though most the thick growth seems to come on in the second year when I have grown a few pines in the past... The less than 1 year old ones I have are getting taller, have some movement in the stem and some are extending a second push of growth now and throwing longer needles. I guess I am kind of missing the advantage of cutting them so short... Is it to get nodes that are right at the soil level? Seems unnecessary unless you are planning to produce teeny tiny Mame sized trees! In which case a soil with more... JK!! Couldn't resist...
 

Anthony

Imperial Masterpiece
Messages
6,290
Reaction score
8,389
Location
West Indies [ Caribbean ]
USDA Zone
13
What we noticed was, even if you don't do the seedling root bit, a.s the J.B.pines aged they built surface roots and
one could just remove the ones you didn't want.

This is why I mentioned the Ausbonsai bit for trees with the ability to sprout very low down on the trunk.

What we look for is efficiency and minimum scar work. Hence the mention of soil mix and mention of the seedling
root cutting bit.
Additionally, it is still considered to be novel, growing J.B.pines in the Tropics.
Also we are checking techniques for removal that actually slow down the pine's development.

Those of us with long growing seasons have to explore alternative ideas.
Sort of like using short needle pines that can grow in the Tropics and not needing J.White Pines or cold rooms.
Replacing cold weather trees with Tropicals that can if need be duplicate the fine quality.
Example - Fustic to Zelkova.

Grown tired of the coarse Tropical tree, expected out of the Tropics [ apologies - could have said that better ]
Good Day
Anthony
 

markyscott

Imperial Masterpiece
Messages
6,124
Reaction score
21,424
Location
Delaplane VA
USDA Zone
6B
Yes, exactly. I left the stems, removed the tap root and left a few roots at the top of the roots that were radially spread. The long stems continued to extend, thickened up a bit, and have started to harden off, just as pine seedlings do when left to their own devices without messing with the roots at all. Though most the thick growth seems to come on in the second year when I have grown a few pines in the past... The less than 1 year old ones I have are getting taller, have some movement in the stem and some are extending a second push of growth now and throwing longer needles. I guess I am kind of missing the advantage of cutting them so short... Is it to get nodes that are right at the soil level? Seems unnecessary unless you are planning to produce teeny tiny Mame sized trees! In which case a soil with more... JK!! Couldn't resist...

This is a very interesting question - why cut the stems so short? In BT #20, Mr. Matsuo advises:

image.jpeg

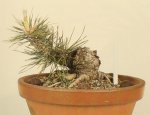
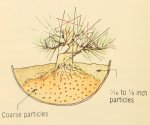
The purpose, I believe, is to get needle buds and the first nodal junction (containing all the adventitious buds) close to the soil level. I do not believe that this is to have branches right at the soil level, but to give some options for trunk development - he wants to create movement and taper right from the nebari, not starting halfway up the trunk in a Shohin tree. Look at this figure he publishes later in his article (please please please don't comment on the soil instructions):

image.jpeg

To create this image, one has to first grow a sacrifice branch vertically to thicken the nebari and first trunk section. Then one must cut back to a low branch to develop a new leader for the next trunk section. Like this:

image.jpeg

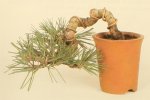
That creates movement and taper right from the soil level and all the way up the tree. There are no branches at the first node - it's another section of trunk. If you don't do this, your taper will start well up the trunk. You can create movement with wire, but the lower section will be without taper. It'll end up like this:

image.jpeg

Not a bad tree, to be sure. There is interesting movement on the trunk, but no taper all the way up to the branches.

Study this figure (I love the cigarette for scale - I think because it hasn't been smoked it's still PC).

image.jpeg

In this case, he's creating a semi-cascade. The first node is the big bend in the trunk - he's allowed a sacrifice branch to grow long to thicken the first basal section and then cut all the way back to the first node to begin training a low branch into a cascading leader. Here's a top view of the same plant:

image.jpeg

Study this figure carefully, because it clearly tells the story. You can clearly see where the sacrifice branches have been eliminated. At each cut back there is both movement and taper that have been created in the trunk line.

Anyway, I strongly encourage anyone interested in this method to beg/borrow/steal BT #20 and read this article. There is also a companion piece describing a modification of this method used to create cascade bonsai as well and some really spectacular trees that Mr. Matsuo created. I'm guessing it will take about ten years to finished tree - interestingly, about the same amount of time it takes to start with a flawed tree and fix it.

Scott
 
Last edited:

Eric Group

Masterpiece
Messages
4,554
Reaction score
4,855
Location
Columbia, SC
This is a very interesting question - why cut the stems so short? In BT #20, Mr. Matsuo advises:

View attachment 115211

The purpose, I believe, is to get needle buds and the first nodal junction (containing all the adventitious buds) close to the soil level. I do not believe that this is to have branches right at the soil level, but to give some options for trunk development - he wants to create movement and taper right from the nebari, not starting halfway up the trunk in a Shohin tree. Look at this figure he publishes later in his article (please please please don't comment on the soil instructions):

View attachment 115214

To create this image, one has to first grow a sacrifice branch vertically to thicken the nebari and first trunk section. Then one must cut back to a low branch to develop a new leader for the next trunk section. Like this:

View attachment 115215

That creates movement and taper right from the soil level and all the way up the tree. There are no branches at the first node - it's another section of trunk. If you don't do this, your taper will start well up the trunk. You can create movement with wire, but the lower section will be without taper. It'll end up like this:

View attachment 115221

Not a bad tree, to be sure. There is interesting movement on the trunk, but no taper all the way up to the branches.

Study this figure (I love the cigarette for scale - I think because it hasn't been smoked it's still PC).

View attachment 115216

In this case, he's creating a semi-cascade. The first node is the big bend in the trunk - he's allowed a sacrifice branch to grow long to thicken the first basal section and then cut all the way back to the first node to begin training a low branch into a cascading leader. Here's a top view of the same plant:

View attachment 115218

Study this figure carefully, because it clearly tells the story. You can clearly see where the sacrifice branches have been eliminated. At each cut back there is both movement and taper that have been created in the trunk line.

Anyway, I strongly encourage anyone interested in this method to beg/borrow/steal BT #20 and read this article. There is also a companion piece describing a modification of this method used to create cascade bonsai as well and some really spectacular trees that Mr. Matsuo created. I'm guessing it will take about ten years to finished tree - interestingly, about the same amount of time it takes to start with a flawed tree and fix it.

Scott
Now THAT is how to steer a thread back on track Marky- great info! Somebody sticky this thread, I think my brain just grew... Probably because it is planted in coarse particles... LOL
 

Adair M

Pinus Envy
Messages
14,402
Reaction score
34,885
Location
NEGeorgia
USDA Zone
7a
This is a very interesting question - why cut the stems so short? In BT #20, Mr. Matsuo advises:

View attachment 115211

The purpose, I believe, is to get needle buds and the first nodal junction (containing all the adventitious buds) close to the soil level. I do not believe that this is to have branches right at the soil level, but to give some options for trunk development - he wants to create movement and taper right from the nebari, not starting halfway up the trunk in a Shohin tree. Look at this figure he publishes later in his article (please please please don't comment on the soil instructions):

View attachment 115214

To create this image, one has to first grow a sacrifice branch vertically to thicken the nebari and first trunk section. Then one must cut back to a low branch to develop a new leader for the next trunk section. Like this:

View attachment 115215

That creates movement and taper right from the soil level and all the way up the tree. There are no branches at the first node - it's another section of trunk. If you don't do this, your taper will start well up the trunk. You can create movement with wire, but the lower section will be without taper. It'll end up like this:

View attachment 115221

Not a bad tree, to be sure. There is interesting movement on the trunk, but no taper all the way up to the branches.

Study this figure (I love the cigarette for scale - I think because it hasn't been smoked it's still PC).

View attachment 115216

In this case, he's creating a semi-cascade. The first node is the big bend in the trunk - he's allowed a sacrifice branch to grow long to thicken the first basal section and then cut all the way back to the first node to begin training a low branch into a cascading leader. Here's a top view of the same plant:

View attachment 115218

Study this figure carefully, because it clearly tells the story. You can clearly see where the sacrifice branches have been eliminated. At each cut back there is both movement and taper that have been created in the trunk line.

Anyway, I strongly encourage anyone interested in this method to beg/borrow/steal BT #20 and read this article. There is also a companion piece describing a modification of this method used to create cascade bonsai as well and some really spectacular trees that Mr. Matsuo created. I'm guessing it will take about ten years to finished tree - interestingly, about the same amount of time it takes to start with a flawed tree and fix it.

Scott
Bingo!

Excellent example of how to build taper!!!

Eric's thread "Some pine seeds 6 years later" follows this exact same technique.

Jonas does this too, and has many pictures of trees in various stages on his blog "BonsaiTonight".
 

Paulpash

Masterpiece
Messages
2,008
Reaction score
6,022
Location
UK. Yorkshire
Hi NY.

I have a heater that comes on when temps dip below 40 and a fan when temps go above 70. The fan gets more of a workout than the heater does, in general. And I put bottom heat on the seedlings. It's all to extend my growing season from ten months to twelve.

In the winter with cold temperatures its normal to get some color change like that in the needles.

Scott

Sheesh, in England you are happy if you get 6 months growing time .....
 

aml1014

Masterpiece
Messages
3,667
Reaction score
5,807
Location
Albuquerque new mexico
USDA Zone
7b
People say it's summer all the time, but it's not true - we have all four seasons. Spring. Almost summer. Summer. And still summer.
Goodness I live in the wrong place! I could handle those seasons better then here. Albuquerque is cold in winter, nice in spring and fall, and blistering hot in summer!

Aaron
 

Adair M

Pinus Envy
Messages
14,402
Reaction score
34,885
Location
NEGeorgia
USDA Zone
7a
People say it's summer all the time, but it's not true - we have all four seasons. Spring. Almost summer. Summer. And still summer.
Ha!!

Just like the threads here on BNut! We have 4 kinds of threads. Threads that were started asking about soil. Threads about to devolve into soil wars. Full flaming soil war threads. Threads their originators are desperately trying to keep from becoming soil war threads!

Lol!
 

markyscott

Imperial Masterpiece
Messages
6,124
Reaction score
21,424
Location
Delaplane VA
USDA Zone
6B
Goodness I live in the wrong place! I could handle those seasons better then here. Albuquerque is cold in winter, nice in spring and fall, and blistering hot in summer!

Aaron

It's the eleventy million percent humidity that takes some getting used to.

S
 

Adair M

Pinus Envy
Messages
14,402
Reaction score
34,885
Location
NEGeorgia
USDA Zone
7a
It's the eleventy million percent humidity that takes some getting used to.

S
But it's a "dry humidity"! Lol!!!

Humidity bothers me worse than heat! I swear profusely in the heat, and with high humidity, I get drenched! Back when I was young, I played a lot of tennis, so I was more used to it. I used to use the heat and humidity as a weapon against my opponents. They were usually stronger than I was, and more coordinated, I would just wear them down. Not just physically, but mentally. I'd bore them to death. Make them hit backhand after backhand, after backhand. Just like I'm doing in this post! Boo00rrrringggg! Lol!

Scott, I'm looking forward to seeing you in Rochester!
 

Dav4

Drop Branch Murphy
Messages
13,099
Reaction score
30,144
Location
SE MI- Bonsai'd for 12 years both MA and N GA
USDA Zone
6a
But it's a "dry humidity"! Lol!!!

Humidity bothers me worse than heat! I swear profusely in the heat, and with high humidity, I get drenched! Back when I was young, I played a lot of tennis, so I was more used to it. I used to use the heat and humidity as a weapon against my opponents. They were usually stronger than I was, and more coordinated, I would just wear them down. Not just physically, but mentally. I'd bore them to death. Make them hit backhand after backhand, after backhand. Just like I'm doing in this post! Boo00rrrringggg! Lol!

Scott, I'm looking forward to seeing you in Rochester!
True dat! I decided to get back in shape this summer and I've been jogging in this soup. The humidity adds a whole new meaning to the phrase "no pain, no gain".
 

markyscott

Imperial Masterpiece
Messages
6,124
Reaction score
21,424
Location
Delaplane VA
USDA Zone
6B
But it's a "dry humidity"! Lol!!!

Humidity bothers me worse than heat! I swear profusely in the heat, and with high humidity, I get drenched! Back when I was young, I played a lot of tennis, so I was more used to it. I used to use the heat and humidity as a weapon against my opponents. They were usually stronger than I was, and more coordinated, I would just wear them down. Not just physically, but mentally. I'd bore them to death. Make them hit backhand after backhand, after backhand. Just like I'm doing in this post! Boo00rrrringggg! Lol!

Scott, I'm looking forward to seeing you in Rochester!

I too - I think you owe me a beer after you grafted that Ume onto my poor Sierra juniper.

S
 

jeanluc83

Omono
Messages
1,452
Reaction score
1,623
Location
Eastern Connecticut
USDA Zone
6a
Top Bottom