Building a rock formation

queenofsheba52

Chumono
Messages
512
Reaction score
576
Location
West Michigan, USA
USDA Zone
5
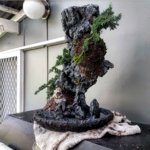
That is definitely 1 Cool Rock!

I've been looking for a way to construct a light weight rock substitute, guess I need to ask my construction friend for a bit of leftover thinset.
 

Beanwagon

Chumono
Messages
578
Reaction score
1,108
Location
Sydney, Australia
That is definitely 1 Cool Rock!

I've been looking for a way to construct a light weight rock substitute, guess I need to ask my construction friend for a bit of leftover thinset.

This was my 1st time and im definitely impressed with the strength and lightweight of the whole thing.

I cant wait to make more
 

herzausstahl

Chumono
Messages
522
Reaction score
547
Location
NE Wisconsin
USDA Zone
5a
I am also adding a waterfall into this.

Looks great! Did you leave planting pockets for the trees? How do you plan to attach them? Will the basin be large enough to hold a waterfall pump? Hard to tell depth, but always easier to build one for that in the future & learn from this one. Worst case drill 2 holes in the bottom, one for a drain tube that could go to a 5 gal pail to house a reservoir for pump & water reservoir for evaporation reasons & 2nd hole for tube running from reservoir to waterfall. Probably an easier way to create a water reservoir but that's just off the top of my head. Cool idea no matter what tho & great construction!
 

Vance Wood

Lord Mugo
Messages
14,002
Reaction score
16,913
Location
Michigan
USDA Zone
5-6
Will it hold up under the assault of weather and seasons?
 

Beanwagon

Chumono
Messages
578
Reaction score
1,108
Location
Sydney, Australia
Nice!

Can you comment on your painting process a little? I've been struggling to produce realistic results on my own experiments.

I the tile adhesive i used was grey and i added some black oxide to it. This mate it look like a natural rock colour from the start. I then painted all the cracks/crevices black. Then i dry brushed the highlights with light grey and some brown. I didnt have a plan or really know what i was doing to be honest
 

Beanwagon

Chumono
Messages
578
Reaction score
1,108
Location
Sydney, Australia
Looks great! Did you leave planting pockets for the trees? How do you plan to attach them? Will the basin be large enough to hold a waterfall pump? Hard to tell depth, but always easier to build one for that in the future & learn from this one. Worst case drill 2 holes in the bottom, one for a drain tube that could go to a 5 gal pail to house a reservoir for pump & water reservoir for evaporation reasons & 2nd hole for tube running from reservoir to waterfall. Probably an easier way to create a water reservoir but that's just off the top of my head. Cool idea no matter what tho & great construction!

I did carve 3 planting pockets. Although the top one is now the waterfall so i have 2 pockets to use. If i wanted i could modify the top to have the roots and the waterfall.

I will have the pump sitting in the base so the water coming down will land back in the reservoir on a loop. Cheers for the ideas. To be honest i didnt plan any of this. I was thinking of starting something like this and i stumbled across a post on another forum which motivated me to do it. It sort of just made itself without any planning what so ever. My next attemp i will actually plan ut better. I still do not know exactly how i will attach the tree's, i will most likely use wire and keto/muck.

I just need to find a good recipe for a keto/muck mix.

Testing out the waterfall today


Beanwagon

Chumono
Messages
578
Reaction score
1,108
Location
Sydney, Australia
If the video is blurry change the quality to 480p

I attempted to plant on this today. Im not confident that that will survive. Nor am i set on the way i have styled the trees. Its all practices anyway. Thoughts? I still need to add more moss and play around with the waterfall
 
Messages
1,654
Reaction score
2,536
Location
Belgium
I like the idea and the result, i like the planting. Working with more advanced material (develop it first in pots) would make this stunning right away. The example of the waterfall doesn't follow a certain path, it's all over the place, it sort of distort the dimension aspect. The red lava at the bottom is the first thing i notice and that's a shame. I couldn't do better so keep improving and updating. Looking forward... What muck did you use? Keto and akadama-powder is what i know is used.
 

Beanwagon

Chumono
Messages
578
Reaction score
1,108
Location
Sydney, Australia
I like the idea and the result, i like the planting. Working with more advanced material (develop it first in pots) would make this stunning right away. The example of the waterfall doesn't follow a certain path, it's all over the place, it sort of distort the dimension aspect. The red lava at the bottom is the first thing i notice and that's a shame. I couldn't do better so keep improving and updating. Looking forward... What muck did you use? Keto and akadama-powder is what i know is used.

I wanted to use young tree's because this whole piece is trial and error/a practice piece. I the red lava rocks will not be staying i put them there to see how it would look.

Im open to any and all ideas and criticisms. I used a mix of clay powder, peat moss and soil. I would not be shocked if they die.

I do not actaully have a clue what i am doing.

I have been training two chinese elm which would be perfect for this if the shimpaku die.
 
Messages
1,654
Reaction score
2,536
Location
Belgium
For the first summer you can pack the muck with some sphagnum moss, i think they will live happily ever after. A Chinese elm might look good in the lowest cavity but less on the higher elevation. Is the place with red lava water logged or can you add some grasses or small ferns over there? Not sure if you want a rock out of the water look or a rock with a waterfall hiding in the mountains. I've looking around for a nice rock for a long time, but since they are expensive i never bought one when i saw it. Every time i see a good attempt passing by i just think whaw.
 

Beanwagon

Chumono
Messages
578
Reaction score
1,108
Location
Sydney, Australia
For the first summer you can pack the muck with some sphagnum moss, i think they will live happily ever after. A Chinese elm might look good in the lowest cavity but less on the higher elevation. Is the place with red lava water logged or can you add some grasses or small ferns over there? Not sure if you want a rock out of the water look or a rock with a waterfall hiding in the mountains. I've looking around for a nice rock for a long time, but since they are expensive i never bought one when i saw it. Every time i see a good attempt passing by i just think whaw.

Awesome cheers! The red lava is waterlogged atm but i was going remove all of it. Use some silicone to fill a whole so that section isnt connected to the water section. I will most likely put soil as you said grasses or ferns. I do not exactly have a planned look. I built this whole thing without a plan every step was completely random.

That is one of the reasons i want to make my own. Not to mention how much fun it is.
 
Last edited:

Beanwagon

Chumono
Messages
578
Reaction score
1,108
Location
Sydney, Australia
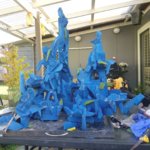
I have started building another rock formation/penjing. This one is a fair bit larger. Any suggestions on what colour to make this? I have a few ideas but am undecided.20180324_155457.jpg
 

_#1_

Omono
Messages
1,025
Reaction score
1,274
Location
Houston, TX
USDA Zone
9a
Are the rocks gonna have the same surface texture?

I'm sure you've already seen this, but for those who haven't these are some cool composition. I have a rock I'm gonna try on a smaller scale this season if I get a chance.
 

Beanwagon

Chumono
Messages
578
Reaction score
1,108
Location
Sydney, Australia
Are the rocks gonna have the same surface texture?

I'm sure you've already seen this, but for those who haven't these are some cool composition. I have a rock I'm gonna try on a smaller scale this season if I get a chance.

No they will have a similar surface texture to my previous rock i still have a bit of work to do on the foam still. Cheers ill check the video out
 
Top Bottom