Chinese Elm from supermarket

achtungluchs

Seedling
Messages
21
Reaction score
12
Location
PL
USDA Zone
7a
Hello everyone,

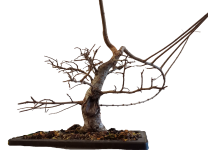
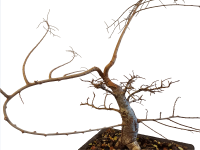
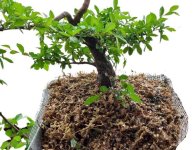
I recently purchased a Chinese Elm bonsai (Ulmus parvifolia) from the Obi supermarket back in June 2023. I'm excited to document its progress here as I work on developing it into a bonsai. I’m still a beginner, so any advice or feedback is more than welcome!

At the moment, I only have some low-quality photos, with the background removed by AI. I’ll be adding better-quality photos over time, but I thought this would be a good starting point.

I’ll keep updating this thread with photos and notes as I work on shaping, pruning, and caring for the tree.

Looking forward to any tips and thoughts!

Thanks!
 

Attachments

  • 02-07-2023.png
    02-07-2023.png
    221.8 KB · Views: 153
05-06-2023 first pruning and moved my Elm to a bigger pot. Visible is the big, horizontal cut on the trunk.
 

Attachments

  • 05-06-2023.png
    05-06-2023.png
    216.1 KB · Views: 137
27-06-2023 I’m refining the cut with a concave cutter, making it at a sharper angle. I’m also developing a sacrificial branch to help close the wound.
 

Attachments

  • 27-06-2023.png
    27-06-2023.png
    487 KB · Views: 107
10-10-2024 the cut is starting to heal over. I’m using two sacrificial branches to thicken the top of the stump. One of them was used for a thread graft to add a new branch on the lower part of the trunk.
 

Attachments

  • 10-10-2024.png
    10-10-2024.png
    429.2 KB · Views: 80
  • branch.png
    branch.png
    253.5 KB · Views: 70
06-11-2024 I’ve switched the wound sealant to a putty type.
The pot with the elm is placed in a large basket filled with soil (to encourage root growth and faster development), along with other plants, which makes it difficult to take a good photo. In the spring, I plan to do a ground layer to improve the currently very unattractive nebari.
 

Attachments

  • Cut.png
    Cut.png
    436.5 KB · Views: 89
  • 06-11-2024.png
    06-11-2024.png
    397.9 KB · Views: 84
Keep up what you doing.
Btw where your tree is in winter time?? You keeping it indoors?
 
I keep it on the balcony all year round, even during light frosts. It stands on the floor, sheltered from the wind. Last winter, the coldest it got was around -8°C at night, and only for a few days, during which I brought it inside for the night.

It drops its leaves in winter, but fairly late. Right now, most of the leaves are still green, with only a few starting to turn color.
 
I helped the tree a bit by removing all the autumn leaves. I will leave these two long branches for part of the season to support further healing of the wounds (there is also one large one in the middle of the trunk). Hopefully, this will also help the root flare (after ground layering) develop better... The nebari looks terrible at the moment. It's hard to capture it in photos, but the trunk seems to split into two thick roots.
Since I plan to create a ground layer next season, the trunk will be slightly shortened. I received a suggestion that the newly grafted first branch is probably placed a bit too low. Well, we'll see how everything looks once it's on the final roots. If necessary, it will only serve to thicken the trunk, and later it can be cut off or a new branch can be grafted in the correct position.
 

Attachments

  • 20241203_121152.png
    20241203_121152.png
    124.2 KB · Views: 69
  • 20241203_121009 (1) (2).png
    20241203_121009 (1) (2).png
    375.1 KB · Views: 64
  • 20241203_120833.png
    20241203_120833.png
    367.5 KB · Views: 56
  • 20241203_120906.png
    20241203_120906.png
    492.2 KB · Views: 77
24-04.2025 yesterday I started working on the ground layer. I removed the top layer of soil and made a cut around the bark. The two dividing roots are now clearly visible.
I hope I scraped off all of the cambium properly and that no bridging will occur. I applied clonex to the cut and covered it with sphagnum moss, vermiculite, and some other materials I had on hand.
I’ll check back in a few weeks to see if new roots begin to develop.
 

Attachments

  • before.jpg
    before.jpg
    51.5 KB · Views: 36
  • cut back.jpg
    cut back.jpg
    56 KB · Views: 35
  • cut front.png
    cut front.png
    152.1 KB · Views: 33
  • after.jpg
    after.jpg
    87.9 KB · Views: 61
Nice!
Way to do the necessary work early. How long did it take for the thread graft to take?
 
Unfortunately, the thread graft didn’t take.
I started it in early spring 2024, but I didn’t properly secure the base of the new branch with cut paste. Although the base was visibly swollen, it didn’t connect sufficiently to the bark. I should have waited longer or used proper cut paste.
20250219_112802.jpg

This (picture bellow) is the removed base of the unsuccessful branch. You can see that the swollen part is not green — it wasn’t connected to the trunk (maybe just a very small part did).
20250402_125508.jpg

I tried another graft this spring, just before the buds opened. I think it’s possible to fuse it with the trunk within one growing season. I’ll post an update on the progress.
 
Shoot, looks like it was just about to take.
A good trick is to wedge a toothpick in the hole to help press the cambiums together.
Love where you are going with this one.
 
Short update on the ground layer


A bit of a mixed result — kind of a success. Unfortunately, only one root has formed so far. I’ve trimmed the ends slightly and removed the original roots, hoping this will stimulate new root growth on the other sides of the nebari as well. I’ll check again in the spring during the next repotting.
Before:
before.jpg
After removing the old roots:
after.jpg
View of the trunk/nebari from the bottom:
bottom.jpg
 
Back
Top Bottom