Chinese Hackberry

JudyB

Queen of the Nuts
Messages
13,783
Reaction score
23,330
Location
South East of Cols. OH
USDA Zone
6a
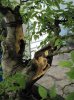
This is my Hackberry. I've been working hard on the left trunk branching, the branches were all straight out of the trunk, and all at the same angles. I was able to get some bending, the bottom left branch may get cut off, or moved to the back at some point. The next one up, I'd like to bend more, but that is all I can get this year, got a couple cracks as it is. I will probably cut these back as the interior branchlets on these branches get stronger.

My plans for this tree other than continuing to work the left trunk branches are to cut the rear apex down a bit, and grow it mostly to the left, while growing the front apex taller, and mostly to the right. This will hopefully give a nice layered natural look.

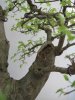
I'm at a standstill on the carving on this tree. I've been trying to figure out how to continue the right trunk carving. Every time I get my tools out, I have no clear vision on where to go. I think it needs to go somewhere else... Maybe middle top left needs to go around the corner??? I've thought about extending the lower right corner as well, but fear that it would make the branch over there, look like it's out in space. Any suggestions from those who carve?

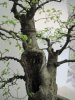
This second pic is from last year, the rest are after the current work.
 

Attachments

  • IMG_1157.jpg
    IMG_1157.jpg
    178.6 KB · Views: 451
  • IMG_1876.jpg
    IMG_1876.jpg
    188 KB · Views: 447
  • IMG_1877.jpg
    IMG_1877.jpg
    177 KB · Views: 379
  • IMG_1878.jpg
    IMG_1878.jpg
    153.8 KB · Views: 317
  • IMG_1886.jpg
    IMG_1886.jpg
    62.2 KB · Views: 342

JudyB

Queen of the Nuts
Messages
13,783
Reaction score
23,330
Location
South East of Cols. OH
USDA Zone
6a
Here are closeups of the area I'm needing carving advice on.
 

Attachments

  • IMG_1886.jpg
    IMG_1886.jpg
    62.2 KB · Views: 225
  • IMG_1887.jpg
    IMG_1887.jpg
    49.3 KB · Views: 247

Ang3lfir3

Omono
Messages
1,287
Reaction score
28
Location
Bremerton, WA
USDA Zone
8b
thats a really nice tree you gots there Judy!!!!

re: carving -- if you are think you just want to tidy it up a bit, then I suggest cutting the edges clean back to living tissue so that callous can form.... making the bottom portion a tappered

(what I am about to suggest might get some people up in arms... so be prepared) .... after that I would pack the area with cotton or some absorbant material (sphagnum moss) .... to hold moisture against that area of the wood... keep this moist and let it begin to rot the area.... once that begins to occur you can slowly just let it do its thing naturally ... in a few years you can pick out the rotted wood and have a very natural looking section.... just an idea ... and its not one that can or will work for everyone....

you might want to consider doing the same on the interior of the large hollow (that I LOVE!!!) ....
 

mcpesq817

Omono
Messages
1,810
Reaction score
499
Location
VA
USDA Zone
7
Wow, that's a really nice hackberry. Lots of character there!
 

rockm

Spuds Moyogi
Messages
14,263
Reaction score
22,434
Location
Fairfax Va.
USDA Zone
7
Very nice tree. Carving this can take a bit of finesse to keep the natural look.

"(what I am about to suggest might get some people up in arms... so be prepared) .... after that I would pack the area with cotton or some absorbant material (sphagnum moss) ..."

Not so much up in arms, but there is a risk the branch will begin air layering itself with such treatment. You would have to make sure the moss doesn't make much contact with living tissue.
 

JudyB

Queen of the Nuts
Messages
13,783
Reaction score
23,330
Location
South East of Cols. OH
USDA Zone
6a
Thanks everyone for the kind words and replies.

I don't want to tidy it, I want to expand on it. I did make the bottom one on the root base, and I think that is fitting, just want to be sure that what I do here fits in overall as well.

I'll start by pulling the bottom of the carving down, and to the right. I think the moss idea is a good one, never heard of it before. That branch is sooooo fat, I don't think it'll air layer itself, but I'll keep an eye out.

As for the large hollow, it is ready to work on now, it's pretty soft... So just pick pieces out of that one? I sort of like the rings that have formed... What do you suggest for the large area. I have been working slowly on this tree, so as not to ruin it in haste.
 

Ron Dennis

Shohin
Messages
399
Reaction score
74
Location
Birmingham, AL
USDA Zone
7B
I like this tree a lot! Totally out of my league on the carving, however. Will be anxious to see how you develop this. Did you collect this one?
 

JudyB

Queen of the Nuts
Messages
13,783
Reaction score
23,330
Location
South East of Cols. OH
USDA Zone
6a
A guy in Louisiana collected this one somewhere around 15 years or so ago. Bobby Burgett...(he sells on ebay, and has some nice stuff...) I got the tree from Don Blackmond (he has killer stuff) a couple years ago, who had made a trade for it. I've been mainly working on the branching, and editing slowly.
 

Ang3lfir3

Omono
Messages
1,287
Reaction score
28
Location
Bremerton, WA
USDA Zone
8b
Not so much up in arms, but there is a risk the branch will begin air layering itself with such treatment. You would have to make sure the moss doesn't make much contact with living tissue.
excellent point.... fabric might be the best option... a towel or something... it will dry and not provide the constant moisture that might encourage layering ... this should help the aging of the wood


@Judy -- depends on how punky the area gets... but I use dental tools when cleaning around rotten grain... on soft carvable wood I use a dremel... die grinders are for big trees and initial sculpting...
 

JudyB

Queen of the Nuts
Messages
13,783
Reaction score
23,330
Location
South East of Cols. OH
USDA Zone
6a
The big one will be easy with a dental tool or small dremel...
 

grouper52

Masterpiece
Messages
2,377
Reaction score
3,720
Location
Port Orchard, WA
USDA Zone
8
This is marvelous material, Judy. Something like this should be possible, and further work on the apex, and placing some of these branches more three dimensionally to the front or back should improve it even further. Great tree.

IMG_1876.jpg
 

JudyB

Queen of the Nuts
Messages
13,783
Reaction score
23,330
Location
South East of Cols. OH
USDA Zone
6a
Thank you Will, thanks for making that virt too. It helps to edit out some of that busyness.
I was lucky to stumble onto this one.... (seems to happen to me....):)
 

JudyB

Queen of the Nuts
Messages
13,783
Reaction score
23,330
Location
South East of Cols. OH
USDA Zone
6a
Okay, so I got out the carving tool and did the deed today... Sorry if the photos are redundant, it's hard to tell sometimes which ones will read better. Thanks for all the ideas, it did help me to have a direction.

I chopped the back apex down, but didn't remove it. I did take the large straight apex in front of the right trunk off. I did some minor branch adjustments, I'm sure more will happen before I'm happy with it, but it is a start.

I don't know what if anything more needs done to the large deadwood on the left. I did a bit of striating, but think nature did a pretty good job here by itself.

I was able to do this with my dremel no problem with a couple of roto chisel bits, only took an hour or so, along with some standing around staring at it time.

I'm still open to suggestions, and critique.
Thanks!
 

Attachments

  • IMG_1936.jpg
    IMG_1936.jpg
    180 KB · Views: 241
  • IMG_1937.jpg
    IMG_1937.jpg
    181.9 KB · Views: 226
  • IMG_1938.jpg
    IMG_1938.jpg
    176.9 KB · Views: 222
  • IMG_1939.jpg
    IMG_1939.jpg
    178.8 KB · Views: 227

JudyB

Queen of the Nuts
Messages
13,783
Reaction score
23,330
Location
South East of Cols. OH
USDA Zone
6a
The planting angle may change a bit as the photos above show, it may look a bit turned slightly counterclock.
Here are closeups of the carving.
 

Attachments

  • IMG_1940.jpg
    IMG_1940.jpg
    179.5 KB · Views: 227
  • IMG_1941.jpg
    IMG_1941.jpg
    170.9 KB · Views: 212
  • IMG_1942.jpg
    IMG_1942.jpg
    167.9 KB · Views: 214
  • IMG_1943.jpg
    IMG_1943.jpg
    175.6 KB · Views: 205
  • IMG_1944.jpg
    IMG_1944.jpg
    177.6 KB · Views: 222

discusmike

Omono
Messages
1,496
Reaction score
554
Location
elkton,MD
USDA Zone
7a
That looks like a tree i seen awhile back on Don's website.
 

JudyB

Queen of the Nuts
Messages
13,783
Reaction score
23,330
Location
South East of Cols. OH
USDA Zone
6a
yup, sure is. He's got the best material around that I know of, (and can actually afford). Can't say enough about Don, he really cares about his trees, and is intuitive about what you're looking for. Post #8 gives you that background as well as who collected it....
 

october

Masterpiece
Messages
3,444
Reaction score
326
Location
Massachusetts
This is a very nice tree. I think the carving looks natural. Also, there is always time to contemplate more carving in the future. If that is what you want. The great thing about carving is that it is not really a "have to be done by" task. You can stare at and study this tree for quite a while before you decide. Years if need be. That is unless rot becomes an issue.

Rob
 

JudyB

Queen of the Nuts
Messages
13,783
Reaction score
23,330
Location
South East of Cols. OH
USDA Zone
6a
Thank you Rob,
It took me long enough to pick up the dremel and point it at this tree, I'm never in a hurry.... I always need to look at stuff for a year (sometimes more)before I do anything (other than the obvious) to change things...

I think I'll wind up linking the left inside apex carving to the inside left trunk carving after the wire that is moving the branch angle is removed. I see right away that this will add to the story.

I'm glad you think it looks natural, that means a lot to hear.
:)
 

Brian Van Fleet

Pretty Fly for a Bonsai Guy
Messages
13,993
Reaction score
46,133
Location
B’ham, AL
USDA Zone
8A
Good job. Hackberry is definitely underused in bonsai. See that Aussie chillin in the sunshine, a familiar scene here too.
 
Top Bottom