markyscott
Imperial Masterpiece
Scott, thanks for putting so much time and effort into this thread. It answers a bunch of questions for this rookie bonsaier.
I’m glad you feel as though you got something out of it.
S
Scott, thanks for putting so much time and effort into this thread. It answers a bunch of questions for this rookie bonsaier.
I’m glad you feel as though you got something out of it.
First you guys are grafting shimpaku and ume... now maples and elms?? and why did you decide to cut off all the maple grafts that had taken?
First you guys are grafting shimpaku and ume... now maples and elms?? and why did you decide to cut off all the maple grafts that had taken?
Great progression thread! I am curious about one comment you made early on - about keeping a leader. Isn't the point of broom style to not have a leader? I thought you were trying to get the primary branches to all be more or less balanced(?)
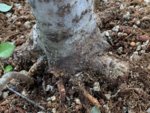
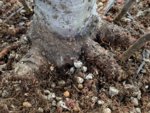
Thanks for taking time to share detail picture Mark. Taking into consideration how those types of trees are creating callus I think it will easily cover it in a few seasons.Hi Maros. Here’s a picture of what’s left of the wound from the original chop.
View attachment 200960
S
This is a great thread, looking forward to following the progress of this tree. I have a Chinese Elm I'm working on now...
What??? There’s a fall cutback??? What kind of witchcraft is this???Thanks Vin. I’ll post an update during fall cutback.
S
What??? There’s a fall cutback??? What kind of witchcraft is this???
Thinning that involves shiners seems contradictory! Perhaps the shiner preceded the event.Shhh. Ancient Japanese secret. Involves Shiner. I can’t say anything more.
S
Hi Maros. No grafting. When I chopped the trunk, tons of shoots grew from the exposed cambium at the cut site. It was just a matter of selection. I used no cut paste after the chop because I was worried that it might inhibit growth of the adventitious buds. Chinese elms easily bud at the cut site.
Scott

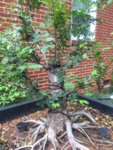
1) add about two inches of soil to cover those roots!
2) it looks like it was an angle chop. Find where the live wood starts at the low end of the chop. (Don’t angle chop in the future!). Find where the live wood is all around the chop. Carve out some of the dead wood right at the edge of the callous tissue.
3). Using a grafting knife (or exacto knife) reopen the callous wound around the edge of the chop.
4) cover with cut paste.
5). From time to time, remove the cut paste and examine the callous. Make sure it’s still growing over the chop. You may have to repeat steps 3 and 4 several times a year!
6). Let the branches grow! The fastest way to close wounds is via rank growth.
7) once the chop is closed, you will have to chop the branches you let grow! Hopefully, they will be smaller than the big chop.
8) Start over at step 2 on the new chops. Each iteration should require smaller chops. Which close faster than big ones.


