Harunobu
Chumono
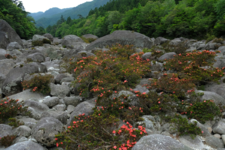
So the plan would be to use some of my seedlings and create a composition with rocks. The goal would be to make a forest while mimicking the way satsuki azaleas occur in nature.


So first is the rules thingy. I could potentially sow new seeds. But I have these seedlings sown on 14 October 2020. I see the rules state you can use seeds sown before 15 December (rule A), and that you may start germination on 15th of December (rule B)? These germinated well before the 15th of December. So can you use seeds that germinate before that date, yes or no?
The second 'hurdle', my idea is to put these seedlings on a type of rock or slab very early on. I noticed that azalea seedlings often grow their roots in the air, and that they harden off and become woody rather quickly. So the goal would be to set up the rocks, put some soil on top, have the roots grow down. And over the course of 6 or 8 years, lose more and more of the soil. So there will be no repotting. I have no experience with growing plants in or over rocks. All usual types of azalea potting mixes either compress (peat) or decompose (kanuma). And judging from the nature pictures, I need some rocks with pockets or reservoirs of soil in them for the roots to properly grow. Also, if I make a composition of rocks and they are not all attacked as one piece, then I can not really touch the soil at all and I even need the final bonsai pot or slab from early on. If the seedlings attach to several rocks, one cannot really move the rocks after one year, and rearrange them.
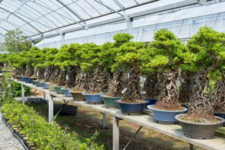
Another option would be to use a more traditional neagiri technique and grow long roots on the azalea seedlings:
Then extend the roots long the rock, guide the root tips to a soil pocket in(between) the rocks, and cover all the rocks with sphagnum moss for a year. Then finally expose the roots. I don't like this as much because to me the point of using seedlings is to let nature do the design. Put a bunch of seedlings on a rocky surface and let them struggle to survive. And in the end keep the strongest and best looking ones. And with time, the soil falls away, exposing more roots.
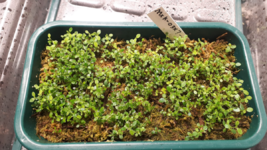
Not sure if that will work out, but seems worth trying something new, plus I have these seedlings to waste on it:

These were sowed 14th of October, they grow well, but I don't need them for my breeding programme.
If I can't use these but I can come up with a good plan, maybe with some advice and suggestions, I'l lconsider sowing some brand new seeds.
Main issue is to find some kind of rock to transplant these seedlings onto. I don't want to make a large piece. But I can't go to garden centers and see if I can find some ornamental value rocks, because they are all closed (covid19). I also don't know what type of mineral would be suitable. And I don't have power tools to create soil or drainage pockets. I think that ideally, the shapes of the rocks and the shapes of the final azalea seedling size would be somewhat in proportions.
Maybe someone has some ideas?
At this point maybe when spring comes and frost is over, I should just plant what is inside this tray in between two large rocks with peat and kanuma inbetween. And then just see what happens. Then since it is two rocks, I can move both at the same time to some future container (one rock in each hand).
If I can use these seedlings, I can post a seed to tray to germination follow up post.


So first is the rules thingy. I could potentially sow new seeds. But I have these seedlings sown on 14 October 2020. I see the rules state you can use seeds sown before 15 December (rule A), and that you may start germination on 15th of December (rule B)? These germinated well before the 15th of December. So can you use seeds that germinate before that date, yes or no?
The second 'hurdle', my idea is to put these seedlings on a type of rock or slab very early on. I noticed that azalea seedlings often grow their roots in the air, and that they harden off and become woody rather quickly. So the goal would be to set up the rocks, put some soil on top, have the roots grow down. And over the course of 6 or 8 years, lose more and more of the soil. So there will be no repotting. I have no experience with growing plants in or over rocks. All usual types of azalea potting mixes either compress (peat) or decompose (kanuma). And judging from the nature pictures, I need some rocks with pockets or reservoirs of soil in them for the roots to properly grow. Also, if I make a composition of rocks and they are not all attacked as one piece, then I can not really touch the soil at all and I even need the final bonsai pot or slab from early on. If the seedlings attach to several rocks, one cannot really move the rocks after one year, and rearrange them.
Another option would be to use a more traditional neagiri technique and grow long roots on the azalea seedlings:
Then extend the roots long the rock, guide the root tips to a soil pocket in(between) the rocks, and cover all the rocks with sphagnum moss for a year. Then finally expose the roots. I don't like this as much because to me the point of using seedlings is to let nature do the design. Put a bunch of seedlings on a rocky surface and let them struggle to survive. And in the end keep the strongest and best looking ones. And with time, the soil falls away, exposing more roots.
Not sure if that will work out, but seems worth trying something new, plus I have these seedlings to waste on it:

These were sowed 14th of October, they grow well, but I don't need them for my breeding programme.
If I can't use these but I can come up with a good plan, maybe with some advice and suggestions, I'l lconsider sowing some brand new seeds.
Main issue is to find some kind of rock to transplant these seedlings onto. I don't want to make a large piece. But I can't go to garden centers and see if I can find some ornamental value rocks, because they are all closed (covid19). I also don't know what type of mineral would be suitable. And I don't have power tools to create soil or drainage pockets. I think that ideally, the shapes of the rocks and the shapes of the final azalea seedling size would be somewhat in proportions.
Maybe someone has some ideas?
At this point maybe when spring comes and frost is over, I should just plant what is inside this tray in between two large rocks with peat and kanuma inbetween. And then just see what happens. Then since it is two rocks, I can move both at the same time to some future container (one rock in each hand).
If I can use these seedlings, I can post a seed to tray to germination follow up post.

