[Dingus] schefflera arboricola #1

LittleDingus

Omono
Messages
1,635
Reaction score
3,065
Location
Chicago, Illinois
USDA Zone
5
I just repotted this guy into a real pot so thought I'd start a progression out of it. I have some vague plans for this guy but mostly I'm just trying to learn more about how their arial roots grow for some larger trees I'm trying to grow out over the next few years.

I bought this schefflera aribicola in a 4" pot sometime in the early summer of 2019 for ~$15. I don't remember exactly when but likely early July. The earliest picture I could find of it is from when I repotted it into a 10" plastic drip pot in August of 2019.

20190830_162930.jpg

I was goofing around over the winter and made little straws of sphagnum moss to keep a couple of the arial roots humid enough to grow while in the house. They did! I managed to get two banyan roots off them (I only tried 2). Short ones...only about 2.5" long from branch to soil...but enough to prove the method works in a dry winter home!

In the spring, it went back outside and grew quite vigorously. So vigorously that a couple of weeks ago I trimmed 5 large cuttings off it Each cutting is larger than the original tree! Our local heat and humidity had me breaking of arial roots that were not where I wanted them about once a week! They tend to want to form closer in to the main trunk probably because that wood is older. I did manage to get one to grow and root further out from the trunk and there are a few more that haven't made it to the soil yet that are far enough out I let grow.

I came across a pot I liked so I broke down and bought a "real" pot to get this guy out of the plastic drip tray. The new pot arrived today, so I went right to work! Its a tropical and tends to grow all winter where I keep it, so I'm not worried about working it "out of season" or too close to when it was trimmed or whatever. These things are pretty robust. It's still warm enough for another week or three to keep it outside. That should be enough to recover before bringing it in for the winter.

20200925_153236.jpg20200925_153431.jpg20200925_155043.jpg

I combed out the roots really well...being careful of the delicate arial roots. Once combed, I trimmed about half the length of the long roots that were lapping the pot. That ended up being about 1/3 of the overall root mass. I pretty much left the rest alone. The new pot is slightly deeper than the drip tray so it fit pretty readily without having to cut back a lot of root mass.

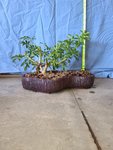
And here it is in the new pot.

20200925_160845.jpg

The long term plan is to keep it long and low. The only branch I didn't cut back for a cutting is the long one in the back on the right. It needs a little more length to reach where I'd like it. I will pull that branch lower and forward a bit and try to get some banyan roots next summer when the wood hardens enough to grow them. There are a few roots on the front branch to the right that can be seen in the picture that I'll also try and encourage to root in the soil. There are also 2 roots in the back that can't easily be seen. These will form the framework for the eventual canopy.

Once I have that initial set of low banyan roots, I'll try to raise the canopy a bit so they can be seen and then fill it in. I don't ever want the tree to be super tall. I'd rather emphasize the spreading nature the arial roots help support.

At the end of the day, this entire tree is just one large experiment to learn some things. It took me a year to get here from a stick in a 4" pot. The cuttings I took are that original stick in a pot times 5 so I should have plenty of new material to play with next year as well.

20200925_161038.jpg

The mass on the right in the picture are the 5 cuttings starting to root in a 1 gallon grow bag. If they root fine, I might try to root over rock one of those cuttings next season.
 

Attachments

  • 20200925_160827.jpg
    20200925_160827.jpg
    214.4 KB · Views: 121

LittleDingus

Omono
Messages
1,635
Reaction score
3,065
Location
Chicago, Illinois
USDA Zone
5
There is an aerial root that didn't complete over the summer that I broke part of and a new bud I wanted to try and turn into a root so today I did some work to try and build aerial roots that I thought I would document here. I've only done this a couple times thus far so keep that in mind ;)

My technique is to build "straws" where I want aerial roots. These were grown inside over last winter.

20201122_071015.jpg

The tangle on the left in the first picture was from a first attempt with just a mound of sphagnum. Height is only a couple of inches so building a mound wasn't difficult. The one on the right is from a "straw" I made out of napkins and sphagnum as a proof-of-concept.

These two are from over this past summer using napkins and sphagnum as "root guides".

20201122_071058.jpg

I'm trying to refine my technique based on those previous attempts so that I can start trying for longer and longer aerial roots. My long term plan for this tree is to raise the canopy some and have some roots drop from higher up as well.

I had one aerial root from the summer that didn't complete and a new root bud that I wanted to make a root from. I want one or two more roots from this tier, but the wood on those branches hasn't hardened off enough to form aerial roots yet. Maybe next year...

20201122_071337.jpg

The root on the left formed naturally in my humid summer. The one on the right was one I had a straw around but it hadn't fully rooted when brought the plant indoors and I wound up breaking about half of it off. I'm hoping I can get it to restart and finish. The root on the left is not where I want one so I broke it off.

For the root I wanted to finish growing, I took a napkin and wrapped some sphagnum in it and made a loose bundle around the root tip.

20201122_074206.jpg

The sphagnum bundle pokes about a 1/4" or more into the soil. The sphagnum will keep the root tip moist and hopefully restart growth from where I accidentally broke it. It's easy to cut off when the root has attached.

The other root I wanted to try and grow is from a small root bud.

20201122_072529.jpg

Since this one is at the branch, I'll need to have a fair amount of humidity on the branch itself. That may start additional buds which is what happened with that tangled root above! I want to try and avoid that here so I'm made the straw much smaller in diameter. I also made it out of a notecard so it would be stiffer and easier to work with. This root needs to drop only about 3 1/2".

To make the straw, I rolled up a notecard around an 1/8" dowel. Then I let the roll relax until it was the diameter I wanted and taped it to keep that shape. I then used the dowel to poke sphagnum into the straw.

20201122_073453.jpg

Since this root guide is going to but the branch, I split the top so that there would be flaps that I could use to help secure it in place.

20201122_073704.jpg

I didn't pack the sphagnum...I kept it as loose as I could and still get it the entire length of the tube. It's hard to tell from the picture, but I dug out a hole where I wanted the root to secure. I dug the hole deeper than I needed so that I could slide the root guide into the hole then raise it up to the branch. I don't want the root guide to support the branch in any way...I'd like to to hang from the branch. I also wanted the end of the guide at least 1/4" or more under the soil surface to tether that end of the root guide securely.

At the branch end, I brought the straw up so that the branch laid in the split I had made. Then secured it to the branch with a bit of tape.

20201122_074021.jpg

I then watered the sphagnum in both root guides to get it nice and damp. I'll try and keep the sphagnum from drying out completely for the rest of the winter now. I usually keep the soil for this this tree constantly damp. I'll let it dry out more between waterings now to encourage more growth through the damp sphagnum. I still won't let the try dry out...but I do tend to keep this one rather wet most of the time.

And here is how the tree sits after that work.

20201122_074328.jpg

The longer term plan is that I'd like one more root from the long branch on the right...probably very near the end, but it's too green yet. I intend to keep that right canopy fairly low. The left canopy I'm hoping to fill in and raise a level next summer. Then I'm hoping to drop a few roots from the upper canopy as well.

No pictures of the cuttings this time. Of the 5 cuttings, 4 struck and have new growth. The 5th probably would have struck had I given it more time, but it was showing signs of stress and, as fast as these grow in the summer here, I don't need it, so I yanked it. All of these are growing much slower now that they are inside...but they are growing!
 

Attachments

  • 20201122_072642.jpg
    20201122_072642.jpg
    128.1 KB · Views: 89

Michael P

Omono
Messages
1,213
Reaction score
1,849
Location
Dallas, Texas, AHS heat zone 9
USDA Zone
8a
Great technique with the root straws! I'm going to steal some of your ideas, LOL. The eccentric pot is also great and will show off the banyan style well.

It is probably obvious that I love this species and think it is under-rated as bonsai.
 

LittleDingus

Omono
Messages
1,635
Reaction score
3,065
Location
Chicago, Illinois
USDA Zone
5
Great technique with the root straws! I'm going to steal some of your ideas, LOL. The eccentric pot is also great and will show off the banyan style well.

It is probably obvious that I love this species and think it is under-rated as bonsai.

Thanks @Michael P!

The pot was custom made by Justine at Forest Inn Pottery. It was a prototype for a set of pots I've commissioned from her for some of my redwoods. After making this one she suggested going "mad scientist" with a different technique for the redwoods. She's working on that now. But, after seeing this pot completed, I did think it would pair great with what I was planning for this tree so I bought it anyway :D

This tree is my "experiment" tree. I really like where it's going thus far, but what I'm really after is a root over rock arboricola in a fantasy style. When the cuttings from this tree are rooted out enough I'll get started on that planting. I want that planting to be much taller. I'm hoping by the time these cuttings get as large as I'd like that tree that I've worked out the kinks to this technique and can drop roots a foot or more to where I want them.
 

Michael P

Omono
Messages
1,213
Reaction score
1,849
Location
Dallas, Texas, AHS heat zone 9
USDA Zone
8a
My root over rock schefflera is two years old. Interestingly, the ROR part was easy, but I am having trouble getting the top to do what I want. Next summer I will probably let it grow wild in a big pot, then do a serious cut back. Here are some bad flash photos, the top is very overgrown to keep it strong during the winter.
 

Attachments

  • IMG_7550.JPG
    IMG_7550.JPG
    149.4 KB · Views: 90
  • IMG_7551.JPG
    IMG_7551.JPG
    162 KB · Views: 108

LittleDingus

Omono
Messages
1,635
Reaction score
3,065
Location
Chicago, Illinois
USDA Zone
5
Love it! Two years? From a cutting? Or established plant? Hmmm...

I've got a similar sized rock but sodalite...sky bluish with white veins...that I was thinking to plant one on. I've also got a small, flat piece of purple granite that I picked up on vacation that I was thinking to plant another on.

What I really want to do is plant one on a piece of cathedral cut geode and have aerial roots partly obscure the opening to the crystals. That's the fantasy planting I'm heading towards. Probably upset some folks to call that one bonsai ;) But same techniques apply. I'll probably use ficus nerifolia for that one though because of the leaves. I'm hoping to try this technique for aerial roots on nerifolia this summer maybe. They're a little harder to coax aerial roots from in my climate.
 

Michael P

Omono
Messages
1,213
Reaction score
1,849
Location
Dallas, Texas, AHS heat zone 9
USDA Zone
8a
My ROR started as a cutting grown in a 14" tube pot for a year to develop long vertical roots. Then I placed it over the stone and secured the roots in place with vinyl grafting tape, and cut down a plastic pot to just fit over the rock and roots. The top and bottom of the plastic pot were open. I put the rock and tree in the shallow tray and spread the roots into the soil. The plastic post then went over the rock with the bottom resting on the soil in the shallow tray. The space between plastic pot and rock was filled with course soil.

It grew like that for another year. Last spring I took the plastic pot off to see how the roots looked. The placement was good and the roots were thick, so I left the pot and soil off and just made sure to keep the roots moist. It grew that way all spring and summer. So it spent one year as a cutting in the tube pot, and another year and a half mounted on the rock. Fast development is one reason why I like these so much.

The rock is dark gray basalt with fine white veins. I wanted the dark color to contrast with the light colored bark on the roots. I need to clean the soil debris off the rock, and maybe remove some of the small roots. Then figure out what to do with the top, LOL.
 

LittleDingus

Omono
Messages
1,635
Reaction score
3,065
Location
Chicago, Illinois
USDA Zone
5
This one has filled in nicely!

20210704_073214.jpg

Now that the rains have mostly gone away and the heat is turning on again, I expect lots of robust growth! I've been pinching back growth tips to keep it over the pot.

Unfortunately, I didn't get the new aerial roots I wanted. We'll see what decides to start over the next month or so. I really want one or two drops from that right hand wing.

The existing areal roots have thickened nicely! Maybe too nicely??

20210704_073404.jpg

I'm hoping to raise the canopy on the left into a mound this season while trying to keep the long branch extension off to the right lower.

It's getting dense enough in there that I'm tempted to defoliate to see the structure better. Probably I will just let it grow out this year. I still have all the cuttings I took off it last year growing out in various ways...
 

LittleDingus

Omono
Messages
1,635
Reaction score
3,065
Location
Chicago, Illinois
USDA Zone
5
It's too hot and humid to be outside today so I decided to bring this guy in for a quick trim :)

20210724_144736.jpg

There were lots of new areal roots starting. This one is the only one in a good position though :(

20210724_144552.jpg

If it lengthens enough to root, I'll go ahead and prune both those nearby roots. Neither of those two existing roots are vertical. This one root should be much nicer assuming it does root. We should have another couple of weeks of heat/humidity and it's _almost_ there!

I broke off about a dozen other areal roots that were sticking out every which way from where ever they pleased. The branch I'd really like a drop root or two from is still not barked over. I got a few nubs last year, but wasn't able to get them to grow. Nothing yet this year. Maybe next year??

I trimmed down the long right branch and put a guy wire on it to pull it into a better place: closer to horizontal and pulled forward so it's back over the pot. If it does drop a root...I want it to hit the pot ;)

The left canopy I mostly left alone. It's starting to mound as I've envisioned.

20210724_150451.jpg 20210724_150544.jpg

There's a lot of larger leaves with long petioles in there that still make it a messy looking tree. Hopefully I can start doing something about that next year. If it makes it through the winter strong, it might be worth defoliating next spring. It might also need a repot by then! I cut off several roots that were trailing across the soil surface.

Last fall I kept 4 nice sized cuttings from this guy. Two are growing out nicely outside on the deck. The other two are currently still in the basement window where I winter them. They're also doing fine. But, since I currently have an overabundance of schefflera cuttings, I just tossed the cuttings on the floor and swept them up when I was done :D

20210724_151039.jpg
 

LittleDingus

Omono
Messages
1,635
Reaction score
3,065
Location
Chicago, Illinois
USDA Zone
5
I had pinched the growth tips during the winter to slow down/stop the leggy indoor growth. It worked...the tree stopped extending those trunks. But the trunks forming the left canopy were already pretty leggy by the time I pinched them.

20220416_095009.jpg

This guy has been sitting under a makeshift light stand in the basement since we moved a few months ago. I've started doing the 2-step with some of my tropicals so I thought I'd give this guy a trim and add it into the group I've been 2-stepping...

20220416_095650.jpg

It's not a good "bonsai", but I do like the quirky laid back trunk it has :)

20220416_095737.jpg

I'm really hoping that right branch ages up enough to start throwing aerial roots this season. I'd still like to get one or two aerial roots dropping way out near the end of that branch.

The clippings I cut off aren't the best, but I'll pay these forward anyway. Schefflera grows fast. Putting these under some nice bright sun should create lots of growth with short internodes that can then be harvested for better clippings in a season or two...

20220416_100225.jpg
 

LittleDingus

Omono
Messages
1,635
Reaction score
3,065
Location
Chicago, Illinois
USDA Zone
5
This one has been inside for a while now...6 weeks maybe??

20221119_141339.jpg

It's cooler...especially at night...here in Chicago than in was in Kansas City. It didn't put on near as much growth here. I didn't take any cuttings this fall though I probably could.

Instead, I'm hoping to get it through the winter in good shape so I can repot it late spring. It's got some escaping roots through the drain holes and I think I have some fat roots developing that I might have to deal with.

I'd really like to fully defoliate it and work on some of the internal branch structure to get a good skeleton to raise that left canopy into a mound and to keep the right canopy in check. That might have to wait until it recovers from a repot first. Otherwise, I'm happy with where this one is going.
 
Top Bottom