Just told my girlfriend that I wish I had read this before I repotted then I look down and read your reply. Anyways agree that this is sometimes a recurring situation in this journey but thank God for patienceWow, I can't wait to try this this repotting season. I wish I would have learned of this technique earlier than this year!
Oh well, that happens a lot in the bonsai journey. Thanks so much for sharing with us. Post pics tomorrow with it on the board if you can!
Cheers!
You are using an out of date browser. It may not display this or other websites correctly.
You should upgrade or use an alternative browser.
You should upgrade or use an alternative browser.
Ebihara maples
- Thread starter markyscott
- Start date
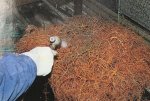
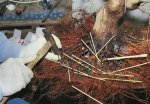
I've read about it before but this post shows how to do it where I'm comfortable I wont f it up. The part where I can see a possible mistake being made is if one does not have that base flat enough to sit on it's own so its flush with the board. Would hate to see rot because of pockets or cavities ( water pooling) and find that suprise when repoting.
bwaynef
Masterpiece
I took too long of a nap after a tornado warning yesterday afternoon, so couldn't sleep last night. Instead I read through this thread. All. 29. Pages. There were a couple of things that weren't exactly clear.Now in full leaf with strongly growing extensions.<snip>
This stage is perfect for spring work. Here are things to do:
- Thin the leaves.
- On the extending shoots that you want to thicken, remove both sets of older leaves on interior nodes. Keep both sets of young leaves on nodes close to the growing tips.
- On the puffs that haven't extended, thin each leaf pair to one. Generally there will be an upward leaf and a downward leaf - cut the upward growing leaf to let the light penetrate the canopy.
- If it's still too dark, cut the remaining leaf in 1/2
- Don't defoliate
- Don't cut off the weak interior shoots or cut off any of their leaves - weaken the strong and strengthen the weak - that's how we create balance. Balance means that every shoot grows with the same vigor and every leaf is the same size - no weak ones and no strong ones.
- Thin the shoots. Keep two shoots at each branch. If there are more than two, keep the side to side and cut off any downward growing shoots. Cut off any shoots growing back toward the interior of the plant. Keep any shoots growing close to the trunk - you want to promote the soft growth so that you can eliminate heavy branches. Keep some upward growing shoots - you'll wire these down to give your branches some depth. You don't want flat pads on a maple.
- Wire the branches while they're still green. The branches that you want to thicken leave long and don't cut off the growing tip. The branches that are getting too thick (on the apex), wire and cut back to two or three nodes.
1. On spring growth that is allowed to grow rampant, interior leaves are thinned as in the first bullet of your #1. In addition to allowing light into the interior and protecting/strengthening any weak interior shoots, does this also activate the latent buds under the leaves? Do these grow into leaves or proceed into shoots/branches?
2. You say that this work, if done at the appropriate time in the spring, can be done 2-3 times in a single season. (That makes me think the thinning of interior leaves mentioned above activates shoots/branches that are then necessarily thinned of their interior leaves.) Have you pictured any of the further-into-the-year work in this thread?
Thanks for documenting, answering questions about your work, and sharing your knowledge and training.
bwaynef
Masterpiece
markyscott
Imperial Masterpiece
1. On spring growth that is allowed to grow rampant, interior leaves are thinned as in the first bullet of your #1. In addition to allowing light into the interior and protecting/strengthening any weak interior shoots, does this also activate the latent buds under the leaves? Do these grow into leaves or proceed into shoots/branches?
Removing the interior leaves while leaving the growing tips encourages the shoots to extend while letting light and air to the interior. It doesn’t cause back budding by itself as far as I know.
2. You say that this work, if done at the appropriate time in the spring, can be done 2-3 times in a single season. (That makes me think the thinning of interior leaves mentioned above activates shoots/branches that are then necessarily thinned of their interior leaves.) Have you pictured any of the further-into-the-year work in this thread?
If not in this thread, you might check out any of my other threads on deciduous trees. I treat them all the same way.
S
one_bonsai
Shohin
- Messages
- 332
- Reaction score
- 214
Thinning to one leaf is a Japanese maple technique. Tridents are worked differently.
What would you do with a Trident?
markyscott
Imperial Masterpiece
What would you do with a Trident?
With tridents I might do a partial outer canopy defoliation, if appropriate and depending on the stage of development.
S
one_bonsai
Shohin
- Messages
- 332
- Reaction score
- 214
With tridents I might do a partial outer canopy defoliation, if appropriate and depending on the stage of development.
So you remove less leaves with Tridents?
Maloghurst
Chumono
Clearly GOD used clip and grow with this one.Also, a study in branch construction, if you’ll allow me to throw the thread back a couple pages...
MrWunderful
Omono
@markyscott are you repotting any this upcoming winter? Curious to see the root progress.
markyscott
Imperial Masterpiece
@markyscott are you repotting any this upcoming winter? Curious to see the root progress.
I haven’t totally decided yet, but I’m leaning toward waiting another year. I’ll evaluate in January for a final decision.
markyscott
Imperial Masterpiece
So you remove less leaves with Tridents?
All depends totally on the health of the tree and the stage of development. But for trees in refinement one can generally be more aggressive with leaf removal on a trident than a JM. For trees in development, I would tend to avoid removing leaves except where absolutely necessary.
kobusbonsainut
Seedling
What a fantastic thread! Thanks for all the info
BubblePopScott
Mame
Wow thank you for this thread. Really good.
AndyJ
Shohin
Been quiet this year Scott. Hope your Ebihara maple is still alive and thriving?
Bezalel Nebari
Sapling
- Messages
- 43
- Reaction score
- 23
Hey Scott, thanks for sharing these images. I have a couple questions about potting a tree on a slab of wood like this:
1) Since the roots have direct contact with the wood, is there ever an issue with the roots having no soil directly underneath them? It appears that they only get soil directly on top, and nowhere else.
2) Do the roots ever grow upward into the soil that's on top? I'm wondering, when it comes time to repot, do you find that the roots end up occupying the bulk of the top soil?
3) How does water not get trapped if there is a big plank of wood covering the entire bottom of the pot?
4) And lastly, when the roots reach the edge and grow downward, will those root tips be able to find water since water won't be evenly distributed throughout the bottom drainage layer? I imagine that since the wood covers most of the drainage layer, that water will only run over the edges and then out the drainage holes.
I've read through most of this thread, but I may have missed the answers to these questions. Thanks for your help.
I’ll answer this...Hey Scott, thanks for sharing these images. I have a couple questions about potting a tree on a slab of wood like this:
1) Since the roots have direct contact with the wood, is there ever an issue with the roots having no soil directly underneath them? It appears that they only get soil directly on top, and nowhere else.
2) Do the roots ever grow upward into the soil that's on top? I'm wondering, when it comes time to repot, do you find that the roots end up occupying the bulk of the top soil?
3) How does water not get trapped if there is a big plank of wood covering the entire bottom of the pot?
4) And lastly, when the roots reach the edge and grow downward, will those root tips be able to find water since water won't be evenly distributed throughout the bottom drainage layer? I imagine that since the wood covers most of the drainage layer, that water will only run over the edges and then out the drainage holes.
I've read through most of this thread, but I may have missed the answers to these questions. Thanks for your help.
1) They have soil all around them. They try to grow down, but the can’t, so they grow along the board. They have no issue.
2) Roots don’t tend to grow up, just down and out. Another non-issue. The soil on top prevents “bark” from forming, so the my retain their “root” characteristics. If they get exposed to light, and get dried out, they bark over and become more like part of the trunk and don’t fuse, which is important if you’re trying to make a “plate style” nebari.
3) water hits the board and runs off. Another non-issue.
4) after the roots grow down, they grow straight down until they Hit the bottom of the pot. Then, they go every which way, creating a mat of roots. Yet another non-issue.
I suggest you try it for yourself.
Bezalel Nebari
Sapling
- Messages
- 43
- Reaction score
- 23
I'll be giving this a try for the first time in spring. Thanks for the answersI’ll answer this...
1) They have soil all around them. They try to grow down, but the can’t, so they grow along the board. They have no issue.
2) Roots don’t tend to grow up, just down and out. Another non-issue. The soil on top prevents “bark” from forming, so the my retain their “root” characteristics. If they get exposed to light, and get dried out, they bark over and become more like part of the trunk and don’t fuse, which is important if you’re trying to make a “plate style” nebari.
3) water hits the board and runs off. Another non-issue.
4) after the roots grow down, they grow straight down until they Hit the bottom of the pot. Then, they go every which way, creating a mat of roots. Yet another non-issue.
I suggest you try it for yourself.
Pine. Preferably NOT pressure treated.Thank you for a great thread!
What kind of wood are you using for the board?
Sorry if the question has been placed before.
Similar threads
- Replies
- 0
- Views
- 190
- Replies
- 17
- Views
- 1K
- Replies
- 25
- Views
- 3K

