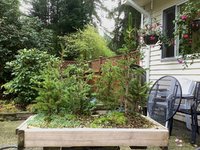
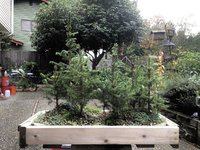
Ezo Wars - Ezo Spruce Forest construction and development

Deep Sea Diver

Masterpiece
Messages
4,530
Reaction score
9,480
Location
Bothell, WA
USDA Zone
8b
Over the past two years I’ve been picking up Ezo Spruce seedlings from Bill V and doing a review dive on creation of forests.
Key readings, but not the only ones, for those who are interested were.
  • Forest, Rock Planting and Ezo Spruce Bonsai, Saburo Kato (Luckily I scored a loaner!)
  • Int’l Bonsai 5 1993 #1, Creating Group Planting from Established Bonsai, Hatsuji Kato (Saburo Kato’s eldest son)
  • Man Lung Artistic Potted Plants, Wu Yee-sun 1979 pp 65-69
  • Forest Bonsai - Considerations for creating forest bonsai, Bill Valvanis, 2019 (handout from a lecture.)
As one can see, sometimes I love a deep dive!

I’ve been inspired over the years by viewing and helping maintain some interesting examples of forests. Not that my little starter forest will ever achieve these levels, but here’s one of my very favorite, just for eye candy, shown at the National in 2021. Styled by Aarin Packard of PBM.
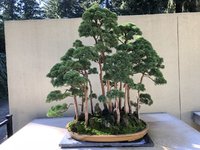
IMG_7928.jpeg

Anyways, these are the basics.

Research done, internal inspiration firing up this hobbyist, I’m faced with the reality of turning a group of little baby dwarfish species of spruce into something that may someday be the core of a decent forest.

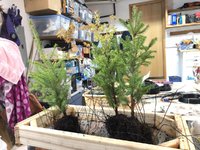
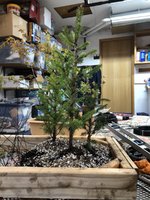
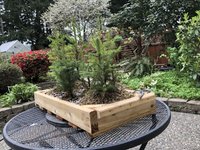
Here they are, 8 Ezo spruce seedlings huddled together in the cold Seattle rain. I realize there is an overwhelming need for another tree, but there’s no trees at the inn. Looks like I’ll have to improvise.

IMG_8468.jpeg

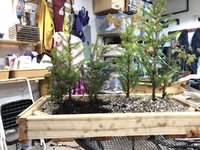
The trees again, this time a bit more spread out. Note two different color variations of the same species. Not great, but this is the hand I’m dealt with. One can’t go to the big box or online and get Ezo stock easily…. Maybe with luck, as other stock is added, I can make some replacements… maybe not. Luckily three of the trees have a larger trunk width/height and a fourth almost the same. This will help later.

IMG_8504.jpeg

So that’s the challenge… to discover a way to create a convincing forest with small trees, or not. Well… at least something we can live with for now.

Next phase - build and prep the container.

Cheers
DSD sends
 

Deep Sea Diver

Masterpiece
Messages
4,530
Reaction score
9,480
Location
Bothell, WA
USDA Zone
8b
Build Out

The first thing that was needed was to determine what size box would fit the proposed design. That means I actually needed to decide what the design would look like. There were a couple considerations.

1. Adding trees in the future. There needed to be a way to build into the design a relatively easy way to add in more trees.

2. Creating a forest group was out. Jamming these little guys together in a group wasn’t going to answer. Doing a test run just looked like a bunch of small trees stuck together. No clustering meant the design had to consist of two or more groups.

3. Spacing. After trying a bunch of two and three group derivations another issue became obvious. The vertical spacing wasn’t enough to be convincing even with cutdowns…. and severe cutdowns are not desirable as this would impair the growth of slow growing trees. That meant there had to be some way to build in a change of height

With these ideas in mind I decided to create the core of a forest design showing the junction of two streams a mountain stream. Three trees on one side, Four on another. One at the junction. Sort of of a penjing design.

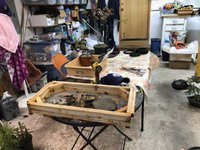
Approximating the spacing of the trees gave me the initial size of the box I needed. 24 x 12 would contain the core of the design. Luckily I had just built 20 maple boxes so, off to saw, drill, power drive and staple!

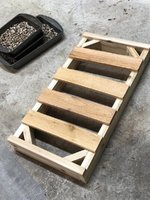
Building the basic box, then adding in diagonals to make the design more durable… also has the added attraction of lowering the amount of weight by using less media.

IMG_8460.jpeg …. IMG_8462.jpeg

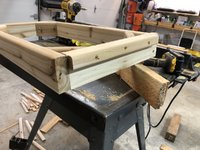
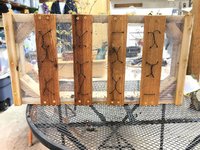
Testing the spacing of cross supports, then adding side handles
IMG_8463.jpeg ….IMG_8465.jpeg

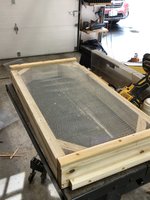
Stapling in screening and adding outside supports/spacers
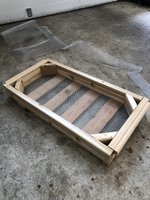
IMG_8469.jpeg….IMG_8472.jpeg

Final spacers added and preparing to drill holes for wires.
IMG_8473.jpeg

Quick test fit. Figured if the trees I’ll all fit now, all will be well when I go ahead with planting the groups.
IMG_8478.jpeg

Next trying out various rock supports to help change vertical heights of each group.
IMG_8503.jpeg


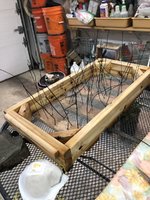
Adding lots of tie down wires
IMG_8506.jpeg….IMG_8505.jpeg

That’s all for today folks! Looks like things are ready to go for the next days planting!

Tomorrow - Planting an Ezo forest.
 

Deep Sea Diver

Masterpiece
Messages
4,530
Reaction score
9,480
Location
Bothell, WA
USDA Zone
8b
Part One: Final preparations….Making the actual design plan.

I’d formed a hazy image of what the design would be. Now’s the moment to finalize the plan. I find doing this for complicated projects makes the actual work go faster and smoother.

For those unfamiliar with forest construction, there are historical guidelines for setting up the individual forest trees. Here’s my basic take on these:

1. Plant tree groups in a scalene triangle with all trees off the major centerline.

2. For near view forests, the largest 2 trees should be forward of the major centerline. The largest 1/3 forward, the smallest of the three 1/3 back, the middle forward of the centerline. Reverse for far view forests. (See Saburo Kate’s book for all sorts of variations on these themes.)

3. All trunks should be visible from the front

… add in DSD’s One Rule of Bonsai

All trees must be able to survive and grow strongly after I mess with them!
(Sans actual experiments, of course. After all, being of an inquisitive nature means there is always deliberate experimenting!)

Them’s the rules, reality is it somewhat difficult to do with living things. Especially with trees balanced atop of rocks!

Testing groups and developing the final planting plan.

That said, time to get these trees sorted and do test fit groupings with the actual rocks and the box with wires.

Getting trees ready for test fit by removing most of the soil
IMG_8507.jpeg …..IMG_8508.jpeg

Trying out trees to make a group.
IMG_8509.jpeg

It took a good deal of time to get the tree groups and rocks sorted. After a number of trial we did some preliminary cutbacks, wiring and final groupings. This created a mental image of what the entire planting plan would look like. I put it down on paper to so I could check on it while working.

Here it is.…

IMG_8649.jpeg

Part Two - Planting the forest.

Back soon with the the plant out!

cheers
DSD sends
 

Deep Sea Diver

Masterpiece
Messages
4,530
Reaction score
9,480
Location
Bothell, WA
USDA Zone
8b
Awesome. You are most welcome to post a photo of it here if you wish!

I meant this to be a resource thread for other interested in forest design and Ezo Spruce.

cheers
DSD sends
 

KiwiPlantGuy

Omono
Messages
1,051
Reaction score
1,353
Location
New Zealand
USDA Zone
9a
Hi DSD,
Are you planning on taking cuttings or more seedlings to give girth changes etc.
I am looking forward to seeing this planted out.
Charles
 

Deep Sea Diver

Masterpiece
Messages
4,530
Reaction score
9,480
Location
Bothell, WA
USDA Zone
8b
Part Two- Planting the Ezo Forest

When first starting out working with bonsai, I always wanted to “Just do things”. As I discovered later, these things mainly involved the 2P’s, Potting and Pruning (with special emphasis of pruning…lots of it!). I learned, after working for years as a volunteer at the local bonsai museum, there’s an awful lot more to bonsai than just the 2P’s. Today started with the 2P’s and finished with a build up, followed by detail work.

Step one: Tying down the base rocks (to give elevation to each group) & planting each group.

The rocks selected were flattish, triangular chunks of rock. Each was tied down in position and the tree groups tied down to the rocks and the frame. Then media was chopsticked around, into & under the roots to create a solid base for every tree. This is key - each Ezo has to be plated straight upright in the core design.

Which were the base rocks? - Looking from right to center, the basalt triangle on the far right in the box formed the base for the right ”mountain slope” and the rock on the bottom middle pile, Silverstrike Quartzite, formed the base of the left “mountain slope”. The small flat rock forming the base for slope in the junction of the two smaller streams is not shown.

IMG_8503.jpeg

Pruning -Each tree was then pruned to fit together with its group mates. This wasn’t styling pruning, just enough to fit together, leaving as much as possible to give maximum strength to each tree help build girth. (It was hard not to just go whole hog and attempt to style the forest at this stage. Imho this would make the forest look contrived & have a negative effect on tree health and growth. I decided to wait until I felt pruning was absolutely necessary. My trees, my call. 😉)

Group Tie down - Finally, each group was tied down & together… then stabilized with media.

Right side group tied in, being stabilized.

IMG_8510.jpegIMG_8511.jpeg

Left group… also pre-positioning the center tree in back. At this point the lowest branch of the tree on the back left was wired over & down under the media to form a much smaller 9th tree and held down with a tiedown wire.

IMG_8512.jpeg

Looking carefully at the image above, one can see only the minimum amount of field soil was retained, but larger amounts of roots were kept untouched. Two reasons: for quick recovery/health of the tree, also add maximum stability to the trees.

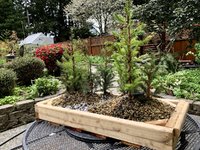
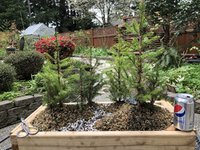
Step One Final - All trees are in place with media stabilizing the trees. The entire works was chopsticked and watered down. Note “new tree” on the left side of right hand image.
IMG_8514.jpeg…….IMG_8546.jpeg …. IMG_8547.jpeg

The base design is complete. I waited a day for everything to settle in.

Step Two - The Build Up.

Folks do build ups a number of ways. The method I use involves creating a layer of crosshatched NZ Sphagnum moss with media added within the matrix. Then repeat with another layer and another until the desired height is achieved.… lightly chopstick, then add more moss/media as needed to create stability.

Initial height.

IMG_8557.jpeg ….IMG_8548.jpeg

Finally getting some realistic relief! But not enough. I watered on and off for a day to let the media settle. Then added a few more moss/media layers on the top to create a realistic base layer. This method takes a good deal of time to do right.

Step Three - Adding Mountain Moss (Yamagoke)

Folks use all kinds of products for mossing. I normally use mountain moss, sometimes coupled with chopped NZ Sphagnum, as a final layer. Perhaps it’s my azalea background. It’s just a thing, so use whatever you desire. In the PacNW moss spores are constantly floating around, adding to whatever is used. The end result is often a menagerie or mosses, carpeting the media. This holds moisture in and improves health imho. Others may differ.

After soaking the moss, it’s tucked into the edges and around each tree to provide an edge to build off of. The rest is jammed into the media, starting with the edges and trees. The carpet eventually builds out over the entire surface, adding another layer of stability to each structure. Here’s the result after missing….

IMG_1428.jpeg

Much better! Happy with this as an initial stopping point, knowing there is more to do down the line, I’m taking a victory lap. (Shortly thereafter amassing a new work list! 🤣)

Running out of image room…. I’ll post some images around the forest so folks can get a better look.

cheers
DSD sends
 

Deep Sea Diver

Masterpiece
Messages
4,530
Reaction score
9,480
Location
Bothell, WA
USDA Zone
8b
360 Photos of core Ezo Spruce forest design.

As promised, here are the images taken “around the clock” so folks can get a better view of the design.

Turning counter clockwise:

Front to front
IMG_8660.jpeg …. IMG_8659.jpegIMG_8658.jpegIMG_8657.jpeg….IMG_8656.jpegIMG_8661.jpegIMG_8654.jpeg

Hi DSD,
Are you planning on taking cuttings or more seedlings to give girth changes etc.
I am looking forward to seeing this planted out.
Charles

Great timing Charles!

The plan is to acquire more Ezo spruce over time…. Say a total of somewhere between 15-19 total, adding depth and a bit of width. Presently the plan is to see how things do this year…. But, since you asked, these 24 cuttings were struck after the trees were wired down.

IMG_8550.jpeg

Haven’t grown these before, so it’s going to be a good experiment!

cheers
DSD sends
 

Deep Sea Diver

Masterpiece
Messages
4,530
Reaction score
9,480
Location
Bothell, WA
USDA Zone
8b
Late Summer update.


The forest has grown well all year, taking the heavy root reduction and pruning needed to put the design together without a hitch. Think the heavy moss-media build up around the trunks that was used to create relief below helped retain moisture and spurred growth

IMG_9823.jpeg IMG_9824.jpeg
The number 1 and number 3 tree took off. This called for a trim back of the number 3 tree. Now the number 3 tree is a shade smaller then and the number 2 (left side) and 4 (middle back).

The low branch I wired down on the far left to create the 9th tree is coming along fine. Had to prune around it to give it some light.

The layers of moss really helped spur ground level branch growth on three of the Ezo trunks. These branches were pinned down into the media to root as trunks to see how they look after a year of growing out

Of the 3 dozen Ezo cuttings 6 took so far. Given these make it through the winter, they may be added to the design. Its likely I will strike more next year.

IMG_9825.jpeg

cheers
DSD sends

PS Next time I post hope to have a better backdrop!
 
Messages
343
Reaction score
1,043
Location
Tokyo Japan
USDA Zone
9b
Ohhh, nice. I'll be following along.
I love ezo spruce. Especially in forests.
I built one in 2021 out of 11 small trees (smaller than yours), in a mountainside sort of rock composition. I was inspired by Kato Saburo's book too.

Wondering if you could share your secrets for successful cuttings? I've had a 0% success rate so far..

Pictures of mine from last Autumn. It's filled in quite a bit this year.2022 10 29 (3).jpg2022 10 29 (4).jpg
I'll be following along.
 

Deep Sea Diver

Masterpiece
Messages
4,530
Reaction score
9,480
Location
Bothell, WA
USDA Zone
8b
Nice! I really like your angled planting.

Sure, I basically used Saburo Kato’s method in the Spring, with a -1/8” media of 2/3 pumice and 1/3 akadama and composted manure.

Then used a heat mat for 3 months and led light until the weather was settled enough to bring the remaining cuttings outside.

If you don’t have access to Saburo Kato’s book anymore, please PM me.

Cheers
DSD sends
 

Nybonsai12

Masterpiece
Messages
3,824
Reaction score
7,637
Location
NY
USDA Zone
7a
Cool project. I picked up 3 from Bill this spring and put in the ground. will be watching this thread for sure!
 
Messages
343
Reaction score
1,043
Location
Tokyo Japan
USDA Zone
9b
Nice! I really like your angled planting.

Sure, I basically used Saburo Kato’s method in the Spring, with a -1/8” media of 2/3 pumice and 1/3 akadama and composted manure.

Then used a heat mat for 3 months and led light until the weather was settled enough to bring the remaining cuttings outside.

If you don’t have access to Saburo Kato’s book anymore, please PM me.

Cheers
DSD sends
I actually have an original Japanese one from the 1950's :)
I don't remember seeing anything about cuttings, but I'll have a second look.

Thanks!
 

Maros

Chumono
Messages
568
Reaction score
2,999
Location
Slovakia
Nice! I really like your angled planting.

Sure, I basically used Saburo Kato’s method in the Spring, with a -1/8” media of 2/3 pumice and 1/3 akadama and composted manure.

Then used a heat mat for 3 months and led light until the weather was settled enough to bring the remaining cuttings outside.

If you don’t have access to Saburo Kato’s book anymore, please PM me.

Cheers
DSD sends
Do you think they need extra humidity like in a bag or covered in polytunnel, or do they do well outside?
 

Deep Sea Diver

Masterpiece
Messages
4,530
Reaction score
9,480
Location
Bothell, WA
USDA Zone
8b
Do you think they need extra humidity like in a bag or covered in polytunnel, or do they do well outside?

Good question.

It’s entirely possible to do. In fact Saburo Kato put his cuttings outside in the full shade. We only strike cuttings outside for those taken in late May/early July when the weather is more settled. (Placing cuttings inside also allows more control.)

His timing was late March to Mid April. (As one can see we were late due other project work!)

The area where our cuttings were placed in this case gets indirect light. (If that's not totally possible due to the sun movement, screening is put atop the tray cover… sometimes two screens.) Saburo Kato recommends using a reed screen during the day when outside for the first month, off at night to get the dew.

We always use a propagation cutting tray with clear plastic top slightly ajar to allow airflow when striking all cuttings. Misting 3-4x/day the first month as needed to prevent drying out. Note: Remove any failed cuttings as these turn brown to protect potential disease spread.

Inside, as time passes. the top opening gets larger and the misting less frequent to harden the cuttings off for placement outside. These were placed outside on July in morning partial sun and afternoon bright shade. The cover was used for about two weeks to help the cuttings acclimate.

btw: The heat mat was set to 60F/15.5C

Hoping to get these safely through the winter and possibly try another batch next sprIng.
I actually have an original Japanese one from the 1950's :)
I don't remember seeing anything about cuttings, but I'll have a second look.

Thanks!

The section on cuttings was around p150ish in the book I borrowed. If you still can’t find these please let me know.

I hope this helps!

Cheers
DSD sends
 

Deep Sea Diver

Masterpiece
Messages
4,530
Reaction score
9,480
Location
Bothell, WA
USDA Zone
8b
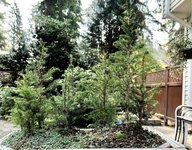
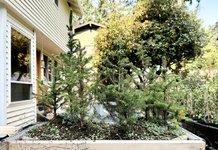
October ‘23 update

All trees are growing well. Added a few more ‘trees’ using lower branches left to grow. Will wait 3 years and see if these can stand separation. Meanwhile the 6 grown from cuttings continue to do well too. Likely look at transplanting these if rooted next spring.

Will look at trimming back branches and the #1 trunk top to a lower branch in a bit.

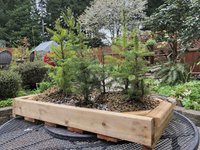
Front
IMG_1881.jpeg


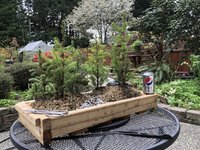
Backside
IMG_1882.jpeg

Best
DSD sends
 
Top Bottom