You are using an out of date browser. It may not display this or other websites correctly.
You should upgrade or use an alternative browser.
You should upgrade or use an alternative browser.
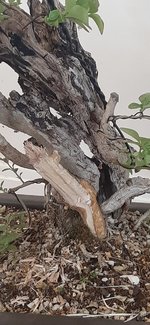
First attempt at deadwood
- Thread starter RoadManDenDron
- Start date
Paradox
Marine Bonsologist
Good first attempt.
The key to convincing dead wood is to hide any indication of tool marks if possible.
The key to convincing dead wood is to hide any indication of tool marks if possible.
Tieball
Masterpiece
Excellent start. Some natural weathering will be helpful.
I tried the mini-torch path, however, I really like the natural weathering and color change better. I often use a brass brush for cleanup which also provides nice grain groves…when I brush in the right direction. Patience helps. A brass brush will help eliminate a majority of the flaws. I also use tools from my old woodblock carving for block prints. I have to constantly be careful with what I do. There are no quick shortcuts. A quick out-of-control tool move usually results in me stabbing my lefthand somewhere (I’m right handed with the tool). A stab usually follows a quick internal reminder that I shouldn't be carving this way. Sometimes I listen to my mind. Sometimes I don’t and just act to quick. And then shake my head to deal with another cut.
I tried the mini-torch path, however, I really like the natural weathering and color change better. I often use a brass brush for cleanup which also provides nice grain groves…when I brush in the right direction. Patience helps. A brass brush will help eliminate a majority of the flaws. I also use tools from my old woodblock carving for block prints. I have to constantly be careful with what I do. There are no quick shortcuts. A quick out-of-control tool move usually results in me stabbing my lefthand somewhere (I’m right handed with the tool). A stab usually follows a quick internal reminder that I shouldn't be carving this way. Sometimes I listen to my mind. Sometimes I don’t and just act to quick. And then shake my head to deal with another cut.
RoadManDenDron
Chumono
Thank you both! Really appreciate the tips and feedback.
@Paradox To my untrained eye I thought I had hid the tool marks! Haha! up top by the old branch stub there appears to be a very straight slice but that turned out to be a splinter.
I did end up making quite a groove just under that stub when I was trying to do it by hand, it was really tricky to work between the deadwood on the tree side (not enough room) eventually I gave up and decided to use the power tools haha.
@Tieball i planned to torch to get a lot of the fluffy stuff off but haven't got round to it yet, we have had rain pretty much every day since I did this and I noticed black dots all over the dead wood so I think its starting to weather naturally now
One trick that I find works really well for creating natural looking deadwood is to tear fiber bundles off slowly by grabbing them with pliers and pulling. For a jin, you can just crush the tip with the pliers to separate the fibers, then grab a small bundle and pull slowly to tear along the grain. For shari, you can use a pick to dig in and lift the end of a small fiber bundle. Then, grab it with the pliers and pull along the grain to tear it off.
Working this way produces a result that doesn’t show tool marks. It takes longer to do though.
Working this way produces a result that doesn’t show tool marks. It takes longer to do though.
Tieball
Masterpiece
I like the “a little at a time” method of pulling away fibers. It’s a deadwood area. Nothing that I pull away will regrow to patch up mistakes I make. Taking it slowly gives me the time needed to evaluate what I’m doing, offers a level of control, see the overall effect I’m producing, how much more I want to pull and often eventually results in an adjacent area needing work while I’m pulling. I think I appreciate the overall result of my work in stages while I’m working.One trick that I find works really well for creating natural looking deadwood is to tear fiber bundles off slowly by grabbing them with pliers and pulling. For a jin, you can just crush the tip with the pliers to separate the fibers, then grab a small bundle and pull slowly to tear along the grain. For shari, you can use a pick to dig in and lift the end of a small fiber bundle. Then, grab it with the pliers and pull along the grain to tear it off.
Working this way produces a result that doesn’t show tool marks. It takes longer to do though.
Tieball
Masterpiece
I sometimes torch an area with my mini-sized butane torch once I know I’ve done all of the fiber pulling I need to accomplish. Pulling more usually means I need to torch more. Torching, in my slower pace method at least, usually results in areas I might want to change more once I see the dimensional qualities that torching produced. There’s also a point in weathering when I want to relax, examine what I did and let the natural effects of rain, watering, sun and wind take control. I’ve seen a lot of trees over-torched…it looks like fake weathering…too burned-out to be considered realistic. The area looks like a toasted marshmallow that was burned beyond recognition…unless that burn stage is the desired effect targeted. I’m usually trying to achieve weathering and not fire damage.
RoadManDenDron
Chumono
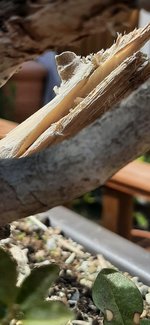
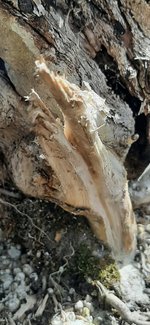
I started out peeling with pliers (second pic) I found this very difficult on the inner side but it seemed to work pretty well on the outersides
A lot of the marks I see where deliberate attempts to match these grains with either a brass brush bit on the dremel or a very fine carving bit
I can see a 'fold' inside the cutout from the wheel, at first i thought this looked like an uneven snap but now I see it looks pretty artificial
And I left the top small branch stub flat on top despite carving holes in it and i can see this also looks artificial
Any other bits I am missing? Hoping to develop my understanding as well as the tree as its one of my better pieces! Is it too late to carve when the wood gets harder?
A little at a time is exactly what I was advocating.I like the “a little at a time” method of pulling away fibers. It’s a deadwood area. Nothing that I pull away will regrow to patch up mistakes I make. Taking it slowly gives me the time needed to evaluate what I’m doing, offers a level of control, see the overall effect I’m producing, how much more I want to pull and often eventually results in an adjacent area needing work while I’m pulling. I think I appreciate the overall result of my work in stages while I’m working.
Similar threads
- Replies
- 4
- Views
- 2K
- Replies
- 0
- Views
- 111
- Replies
- 11
- Views
- 237


