home made concrete bonsai pots/forest slabs

Messages
4
Reaction score
1
is there a specific curing time for new concrete bonsai pots? will the concrete harm the plant if it is used to soon? any help would be appreciated . thanks
 

Leo in N E Illinois

The Professor
Messages
11,339
Reaction score
23,278
Location
on the IL-WI border, a mile from ''da Lake''
USDA Zone
5b
Keep concrete pots wrapped in loose plastic, to keep high humidity around them for 48 to 72 hours. If the surface dries out too soon, spalling can occur.

"Plain old fashioned" concrete, after being allowed to set for 5 or so days, can be submerged in a bucket of water for a month. Change water every week, this will leach out excess hydroxides.

If you use a modern polymer-cementitious composite, the polymer will make the concrete water proof. No need for soaking.

Applying a concrete sealer will also reduce the need for soaking.
 

kale

Shohin
Messages
282
Reaction score
367
Location
Colorado, USA
USDA Zone
5b
Keep concrete pots wrapped in loose plastic, to keep high humidity around them for 48 to 72 hours. If the surface dries out too soon, spalling can occur.

"Plain old fashioned" concrete, after being allowed to set for 5 or so days, can be submerged in a bucket of water for a month. Change water every week, this will leach out excess hydroxides.

If you use a modern polymer-cementitious composite, the polymer will make the concrete water proof. No need for soaking.

Applying a concrete sealer will also reduce the need for soaking.
Thanks for the info! Do you think a bag of Quickrete needs to be soaked? I was planning on trying to make some pots too, had no clue this was an issue!
 
Messages
4
Reaction score
1
Keep concrete pots wrapped in loose plastic, to keep high humidity around them for 48 to 72 hours. If the surface dries out too soon, spalling can occur.

"Plain old fashioned" concrete, after being allowed to set for 5 or so days, can be submerged in a bucket of water for a month. Change water every week, this will leach out excess hydroxides.

If you use a modern polymer-cementitious composite, the polymer will make the concrete water proof. No need for soaking.

Applying a concrete sealer will also reduce the need for soaking.
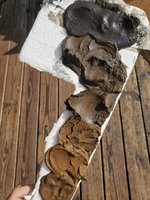
thanks for the quick response .will be doing several types of sand castings . half moon ,forest slabs ,etc .
 

JoeR

Masterpiece
Messages
3,949
Reaction score
3,452
Location
Sandhills of North Carolina
USDA Zone
8a
I've made quite a few free form cement pots, posted a thread about a forest one here recently. I recommend the use of dyes, fibers for strength especially for larger pieces, quick Crete is good just make sure you're 100% ready before you add the water. You can do sand castings but carving in pieces of foam or other materials allow better detail, just depends on the look you're going for
 
Messages
4
Reaction score
1
I've made quite a few free form cement pots, posted a thread about a forest one here recently. I recommend the use of dyes, fibers for strength especially for larger pieces, quick Crete is good just make sure you're 100% ready before you add the water. You can do sand castings but carving in pieces of foam or other materials allow better detail, just depends on the look you're going for
i'll be using hardware cloth for support .just a plain old portland cement/sand mix .worked well for the first slab . see how creative i can get .,thanks again. saw a u-tube video where they used a wet sheet for the perimeter . came out nice.
 

Leo in N E Illinois

The Professor
Messages
11,339
Reaction score
23,278
Location
on the IL-WI border, a mile from ''da Lake''
USDA Zone
5b
The extended soaking in water is info originally from making concrete fish ponds. Plants are not as sensitive as the gills of a fish. You can probably get away with fairly short soak time.

Any use of concrete less than 4 inches or 10 cm, is considered a thin application. The use of fibers, the plastic "bow ties" added to the cement mix to help hold it together. Fiberglass mesh, chicken wire, and or any sort of support you embed in the concrete will help hold it together. Just remember concrete does not do " thin " very well. It has no flexural strength. Concrete has great compressive strength, but does not bend or flex.

Sanding after the concrete is set will knock off and smooth out any fibers sticking out of the surface after it's set.

For smaller pots, just sand and cement to make a mortar mix will work.

Color tints meant for coloring concrete are a great way to get natural colors other than gray.
 

JoeR

Masterpiece
Messages
3,949
Reaction score
3,452
Location
Sandhills of North Carolina
USDA Zone
8a
The extended soaking in water is info originally from making concrete fish ponds. Plants are not as sensitive as the gills of a fish. You can probably get away with fairly short soak time.

Any use of concrete less than 4 inches or 10 cm, is considered a thin application. The use of fibers, the plastic "bow ties" added to the cement mix to help hold it together. Fiberglass mesh, chicken wire, and or any sort of support you embed in the concrete will help hold it together. Just remember concrete does not do " thin " very well. It has no flexural strength. Concrete has great compressive strength, but does not bend or flex.

Sanding after the concrete is set will knock off and smooth out any fibers sticking out of the surface after it's set.

For smaller pots, just sand and cement to make a mortar mix will work.

Color tints meant for coloring concrete are a great way to get natural colors other than gray.
Agreed, and will add that I actually used a propane Torch to burn off any of the concrete fibers that stuck out so I could keep the rough texture.

If you get two or three different dyes you can make a pretty decent palette of colors to work with
 

Attachments

  • 20210228_150510.jpg
    20210228_150510.jpg
    234.5 KB · Views: 218

sorce

Nonsense Rascal
Messages
32,912
Reaction score
45,593
Location
Berwyn, Il
USDA Zone
6.2
Welcome to Crazy!

Sorce
 

Rowbow

Sapling
Messages
26
Reaction score
25
Location
Leicestershire UK
Has anyone tried adding peat to the mix to add texture and weathers quicker, I think it's called tuffer rock?
 

penumbra

Imperial Masterpiece
Messages
9,420
Reaction score
16,031
Location
Front Royal, VA
USDA Zone
6
Some years back a friend and myself made a lot of hypertuffa pots for a large nursery. It was a mix of peat moss, perlite and Portland cement. We also used fiber mesh and concrete stains. Most of the pieces were cast in large beds within a growers mix. Some were cast in the ground and some were specifically made with a thicker mix for modeling and carving. We learned the hard way that the most important ingredient was the portland. If you go too heavy with the peat, the obvious result was a pot that didn't hold up. These had a benefit of being lighter but they only lasted a few years. Most of the pots held up very well and some I have are about 15 years old. Use of a professional concrete dye was encouraged but too much was artificial looking. Fiber mesh was a somewhat newish product at the time and it was integral to out success. We used it generously. Fiber mesh comes in either fiber glass or nylon fiber. Using a propane touch, played over the surface of the dried pot, took care of the fibers protruding. Our pots dried rapidly due to the porous nature imbued by the peat and perlite, so we hosed them down for a few days. The lager the project, the more we watered it. Smaller pots were soaked in a big pond created for the project but many large pots were just left out in the weather and watered from time to time over about a month.
I have often thought about those pots and was talking to my friend just the other day about trying it again.
 

Tibor

Mame
Messages
118
Reaction score
127
Location
Magyarország
Some years back a friend and myself made a lot of hypertuffa pots for a large nursery. It was a mix of peat moss, perlite and Portland cement. We also used fiber mesh and concrete stains. Most of the pieces were cast in large beds within a growers mix. Some were cast in the ground and some were specifically made with a thicker mix for modeling and carving. We learned the hard way that the most important ingredient was the portland. If you go too heavy with the peat, the obvious result was a pot that didn't hold up. These had a benefit of being lighter but they only lasted a few years. Most of the pots held up very well and some I have are about 15 years old. Use of a professional concrete dye was encouraged but too much was artificial looking. Fiber mesh was a somewhat newish product at the time and it was integral to out success. We used it generously. Fiber mesh comes in either fiber glass or nylon fiber. Using a propane touch, played over the surface of the dried pot, took care of the fibers protruding. Our pots dried rapidly due to the porous nature imbued by the peat and perlite, so we hosed them down for a few days. The lager the project, the more we watered it. Smaller pots were soaked in a big pond created for the project but many large pots were just left out in the weather and watered from time to time over about a month.
I have often thought about those pots and was talking to my friend just the other day about trying it again.

hypertufa
 

ShadyStump

Imperial Masterpiece
Messages
5,978
Reaction score
9,974
Location
Southern Colorado, USA
USDA Zone
6a
Some years back a friend and myself made a lot of hypertuffa pots for a large nursery. It was a mix of peat moss, perlite and Portland cement. We also used fiber mesh and concrete stains. Most of the pieces were cast in large beds within a growers mix. Some were cast in the ground and some were specifically made with a thicker mix for modeling and carving. We learned the hard way that the most important ingredient was the portland. If you go too heavy with the peat, the obvious result was a pot that didn't hold up. These had a benefit of being lighter but they only lasted a few years. Most of the pots held up very well and some I have are about 15 years old. Use of a professional concrete dye was encouraged but too much was artificial looking. Fiber mesh was a somewhat newish product at the time and it was integral to out success. We used it generously. Fiber mesh comes in either fiber glass or nylon fiber. Using a propane touch, played over the surface of the dried pot, took care of the fibers protruding. Our pots dried rapidly due to the porous nature imbued by the peat and perlite, so we hosed them down for a few days. The lager the project, the more we watered it. Smaller pots were soaked in a big pond created for the project but many large pots were just left out in the weather and watered from time to time over about a month.
I have often thought about those pots and was talking to my friend just the other day about trying it again.
Think I'll be trying this once I get the resources.
Thank you for the knowledge!
 

penumbra

Imperial Masterpiece
Messages
9,420
Reaction score
16,031
Location
Front Royal, VA
USDA Zone
6
BTW, to avoid that awful poured look in the Lowes video, take a stiff brush to the outside of the pot before it is fully hardened. I have used a wire brush and a scrub brush, but anything that alters the surface will help. This will give the look of stone. There are other ways to alter the final finish that almost anyone can come up with. The texture pots from the Lowes video look nice but the other pots look horrible. They look molded, not carved.
I just bought another 4 cu ft bag of perlite today. Have the peat but also have coco chor which I think I will use next time. Just need the Portland and temperatures above freezing.
 
Messages
395
Reaction score
691
Location
Idaho
USDA Zone
7-8
David Joyce’s book has a good tutorial on using wire, fiberglass & concrete pots.
 

ghues

Omono
Messages
1,554
Reaction score
3,141
Location
Campbell River BC Canada
USDA Zone
7b
Our club members have been using Portland Expanding Grout with added fibreglass fibres, armature is a must and some use a fine cloth fabric over the frame. I’ve made dozens and many were made over many days. Once finished we leave them and leave them over the winter before using in spring. Make some wire anchors (loops) and insert well before it dries out too much. Good luck.
 

TinyArt

Chumono
Messages
874
Reaction score
1,650
Location
Central Florida
USDA Zone
9
Moke posted a hypertufa recipe back in September, I believe -- I'm not sure which thread, though
 

ghues

Omono
Messages
1,554
Reaction score
3,141
Location
Campbell River BC Canada
USDA Zone
7b
Here are some example of the Portland expanding grout slabs/pots. All Painted.
 

Attachments

  • 2A8D101A-D9D2-4933-9F44-2D66114B6D0E.jpeg
    2A8D101A-D9D2-4933-9F44-2D66114B6D0E.jpeg
    276 KB · Views: 167
  • 0BF873AA-2FC3-4A83-A849-DA7BA6B07872.jpeg
    0BF873AA-2FC3-4A83-A849-DA7BA6B07872.jpeg
    366.2 KB · Views: 143
  • 5839A1ED-F046-480E-A46E-D34F9F00241E.jpeg
    5839A1ED-F046-480E-A46E-D34F9F00241E.jpeg
    276.4 KB · Views: 131
  • 97269390-6E4C-44AA-B5C0-A71F0B7D842D.jpeg
    97269390-6E4C-44AA-B5C0-A71F0B7D842D.jpeg
    384.1 KB · Views: 164
Top Bottom