JBP initial styling help

skjohnson37

Sapling
Messages
28
Reaction score
15
Location
Virginia, USA
USDA Zone
7a
Hi, all,

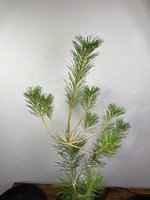
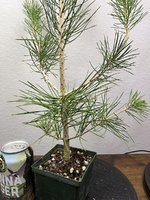
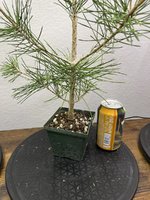
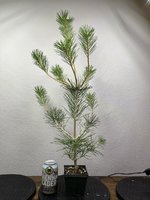
I'm new to the crazy, and am currently staring at my JBP (from seedling) which I believe I may have let get too big to style. In my head, I see an informal upright, but have no idea what I'm talking about. I don't even know what I don't know, though I've spent countless hours reading and watching videos in an attempt to learn before I start cutting and wiring. I live in an apartment and do not have access to outside growing. I know and understand that my conditions aren't preferable, but I'm doing my best with grow lights and letting the tree sit on my balcony getting what sun it can, though that's only a few hours per day.

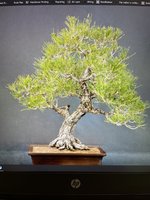
In my head, I see a tree like the one in the other picture, but like I said, I have no idea what I'm talking about.

What I know is that I find bonsai relaxing and enjoyable. I know that the trees talk to me, though I have no idea what they're saying.

My plan, which I've created entirely on my own, is to repot the tree this fall into a much larger growing pot, and let it keep getting thicker, hopefully after getting some motion into the trunk. I have a few branches down low on the trunk which I believe are preferable, and would like to encourage their growth. Do I prune or pluck? Do I wire and attempt to impart motion to the trunk, or go for a formal upright?

What would be my best (not fastest, but best) paths forward in either case?

Thanks.
IMG_3064.JPGIMG_3065.JPGIMG_3066.JPGIMG_3067.JPGIMG_3060.JPG
 

Paradox

Imperial Masterpiece
Messages
9,434
Reaction score
11,642
Location
Long Island, NY
USDA Zone
7a
Not sure how bendable that trunk is. I would look up bending techniques using raffia wrapped around the trunk. You use some heavier guage wire as a "backbone" along the trunk. Wrap that with wet raffia. The overlay wire coiled on the trunk and carefully bend some shape into it. Also wire some shape into the lower branches.

Do that in the fall. Next spring, plant the tree in the ground and let the main trunk grow as a sacrifice leader. It will grow much faster in the ground. Trench around the trunk every spring to keep the roots in check.

There are threads here about developing black pines. One good one in particular is something like "developing JBP in 6 years". Another thread show JBP being grown for bonsai in the ground at Telperion farm in Oregon. They have sacrifice leaders that are 6 or 7 feet tall. Do a search and learn how it's done.. it's too long for me to type all out here.
 

Shibui

Imperial Masterpiece
Messages
7,643
Reaction score
15,428
Location
Yackandandah, Australia
USDA Zone
9?
Notice that the template pine has branches that are closer together as you move up the tree.
Now look at the seedling trunk and you'll see that the nodes get further apart going up. That will make it really difficult to get branches like the ideal pic. The only way I know to get that sort of result with pines is to chop and grow new trunk with shorter internodes. Chop and grow will also give some taper to the trunk. It will also give the trunk some bends.
I suspect that the bare necks on the second pair of branches will also be too long to be useful in most designs except maybe very large pine bonsai so that may even limit your options to teh lowest branches which still have needles closer to the base of the branches.
Most good pines are grown from the lowest 2 or 3 branches of a seedling. The rest of the trunk is sacrifice growth to get fast thickening.
Wiring movement into a young trunk can work to some extent but usually still only useful in the first or second trunk section. Anything above that being sacrifice and will eventually be chopped off.

Given that this one is only 4 years old you probably have another year or maybe 2 to work out how to move forward. After that the older needles will have fallen leaving bare trunk which will further limit the possibilities as pines don't bud reliably on bare wood.
 

Brian Van Fleet

Pretty Fly for a Bonsai Guy
Messages
13,994
Reaction score
46,150
Location
B’ham, AL
USDA Zone
8A
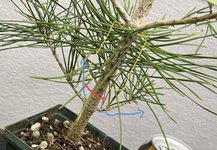
Read more on other threads as @Paradox recommended. Here is a quick and dirty:

1. Now: pull all the needles on the trunk section in the yellow bracket, to allow sunlight into the two shoots below.
2. Fall: chop at the red line. Right branch becomes your first branch, left branch becomes your next trunk section, shown in blue.
3. Spring, repot, tilting the tree at the angle shown to establish some movement in the trunk.

Feed heavily and check back in a year.
0E69AD89-4B20-41BF-A462-56BFC33EEA7A.jpeg
 

skjohnson37

Sapling
Messages
28
Reaction score
15
Location
Virginia, USA
USDA Zone
7a
Read more on other threads as @Paradox recommended. Here is a quick and dirty:

1. Now: pull all the needles on the trunk section in the yellow bracket, to allow sunlight into the two shoots below.
2. Fall: chop at the red line. Right branch becomes your first branch, left branch becomes your next trunk section, shown in blue.
3. Spring, repot, tilting the tree at the angle shown to establish some movement in the trunk.

Feed heavily and check back in a year.
This reply was particularly helpful with the drawings on the photo - thank you.

In making the chop, should it be perpendicular to the trunk or made at an angle to help the new leader blend into the eventual tree?
 

skjohnson37

Sapling
Messages
28
Reaction score
15
Location
Virginia, USA
USDA Zone
7a
Notice that the template pine has branches that are closer together as you move up the tree.
Now look at the seedling trunk and you'll see that the nodes get further apart going up. That will make it really difficult to get branches like the ideal pic. The only way I know to get that sort of result with pines is to chop and grow new trunk with shorter internodes. Chop and grow will also give some taper to the trunk. It will also give the trunk some bends.
I suspect that the bare necks on the second pair of branches will also be too long to be useful in most designs except maybe very large pine bonsai so that may even limit your options to teh lowest branches which still have needles closer to the base of the branches.
Most good pines are grown from the lowest 2 or 3 branches of a seedling. The rest of the trunk is sacrifice growth to get fast thickening.
Wiring movement into a young trunk can work to some extent but usually still only useful in the first or second trunk section. Anything above that being sacrifice and will eventually be chopped off.

Given that this one is only 4 years old you probably have another year or maybe 2 to work out how to move forward. After that the older needles will have fallen leaving bare trunk which will further limit the possibilities as pines don't bud reliably on bare wood.
Thank you for the notes the chop and on the time I have left to figure something out.
 

skjohnson37

Sapling
Messages
28
Reaction score
15
Location
Virginia, USA
USDA Zone
7a
Not sure how bendable that trunk is. I would look up bending techniques using raffia wrapped around the trunk. You use some heavier guage wire as a "backbone" along the trunk. Wrap that with wet raffia. The overlay wire coiled on the trunk and carefully bend some shape into it. Also wire some shape into the lower branches.

Do that in the fall. Next spring, plant the tree in the ground and let the main trunk grow as a sacrifice leader. It will grow much faster in the ground. Trench around the trunk every spring to keep the roots in check.

There are threads here about developing black pines. One good one in particular is something like "developing JBP in 6 years". Another thread show JBP being grown for bonsai in the ground at Telperion farm in Oregon. They have sacrifice leaders that are 6 or 7 feet tall. Do a search and learn how it's done.. it's too long for me to type all out here.
I found the threads you suggested - they are very helpful, particularly for perspective on time. Thank you.
 

Brian Van Fleet

Pretty Fly for a Bonsai Guy
Messages
13,994
Reaction score
46,150
Location
B’ham, AL
USDA Zone
8A
This reply was particularly helpful with the drawings on the photo - thank you.

In making the chop, should it be perpendicular to the trunk or made at an angle to help the new leader blend into the eventual tree?
Cut it flush, it won’t matter. When the growth takes off next year, the scar will be gone.
 
Top Bottom