Learning how to Shape Pads on my Nana Procumbens

Esolin

Shohin
Messages
404
Reaction score
641
Location
So Cal
USDA Zone
10b
Since I have a number of Nana Junipers, I need to learn how to prune them to best maintain their shape and vitality. I recently 'pinched' one of my larger Nanas, but I'm never really happy with the results of this method, since it leaves brown tips and if aggressive pinching is needed to maintain a shape, most if not all of the new growth is removed by just shortening the ends.

@Japonicus has suggested a different way to prune Nana pads which he learned from BVF, so today I trimmed two pads in this method to see how it goes. Hope I did it correctly.

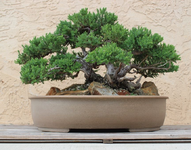
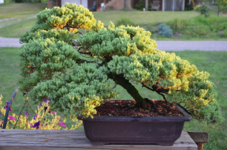
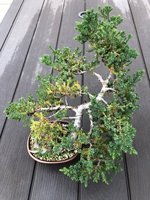
The specimen:

Nanaclump.jpg

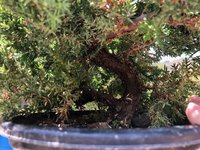
I love this tree's twists and turns, but you really have to get in close to see the details.
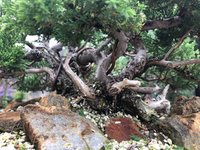
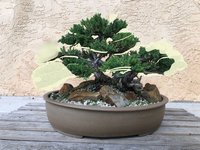
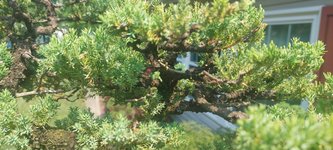
NanaClump2.jpg

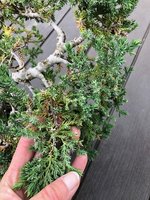
First pad. Note the brown tips from pinching the week before.

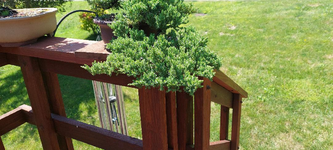
nanclump3.jpg

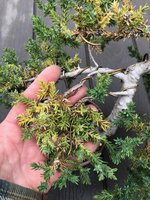
Picture taken after applying the new trimming method. Forgive the clumsy wiring. I'll probably remove the top crossing branch if the side shoots near it do well, but I didn't want to take off any more woody branches than absolutely necessary.
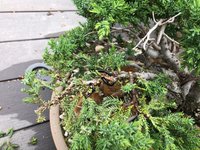
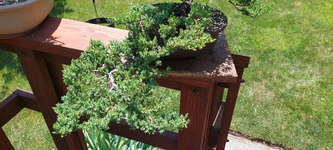
nanaclump5.jpg

Second pad. Its branches have a very weird structure, but I like how cleaning off the top let more light down onto the trunks.
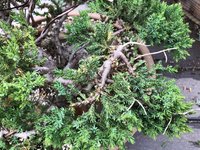
nanclump4.jpg

Now to see how it responds to being pruned this way.

nanaclump6.jpg
 

Japonicus

Masterpiece
Messages
4,959
Reaction score
7,780
Location
Western West Virginia AHS heat zone 6
USDA Zone
6b
1685796239156.png1685796254479.png
I really like this specimen. The potential is great.
I understand you're trying this on a couple of branches before moving on to the entire tree.
I like the pot too, but as you move forwards with this dynamic duo
I think it will benefit from the clip and grow method, allowing you room for
tightening up the profile some and working the roots down to a little bit smaller pot eventually.
It is perfect for training.
Could you give some background on this juniper? Do you have a day 1 picture when you acquired it?

Brians method was using a shimpaku which I just adapted over to the procumbens.
Opening up the bones to let light in will cause the interior of the area to fill in with new growth.
One note on that is to leave enough foliage to carry the size of branch you're working on.

These guys respond well to fish emulsion, so don't hesitate to feed it well to capitalize on your efforts.

You'll see you still get some brown from your efforts, but it will be more discreet than just pinching
across the tops of the pads if done right. Leaving growing tips means no brown tip can occur, but when we
cut between needles in the middle of a shoot, the new tip will turn brown down to where it has dormant
buds that will pop if not cut too closely to the base.

The method I'm using is a correctional method for the stage I have let mine grow to over the years
utilizing pinching as the main method to maintain pad and tree silhouette. Which yours will benefit from.
Once a new refined profile is established, keeping the profile will be a much simpler task, and will be
almost immediately rewarded. You will be able to cut back foliage to the base of each shoot flush
and browning needles from shaping will be scarce.
 

Japonicus

Masterpiece
Messages
4,959
Reaction score
7,780
Location
Western West Virginia AHS heat zone 6
USDA Zone
6b
So where is this method described?
Brians blog got me started in this direction. What I'm trying to show Esolin is how
I've adapted what I've learned in his blog to my own trees. Of course Brian is a well refined artist
which I am not, but I've had great returns on how I'm referring to a clip and grow method, or how I'm thinning.
I leave a bit more in places and take a bit more than what Esolin did. But I also cautioned him to be skeptical at the same time.
So he's trying this out in a couple of places before fully committing to it.
I've lost 2 very nice trees taking the advice of a couple of folks on this forum, but in the end, I am to blame.

I'm not good at illustrating in pics, and a video would be best for that, but hands on trial and error is best.

1685806711970.png
Here's one that needs thinning

1685806850592.png

1685806879344.png
You could stop here, and it will fill in quickly, so it's not really thinned so to say.
Rather, it is a starting point from zero, not to stop here unless you're cutting back to near here.
This is where some brown would have occurred till it heals and the remaining needles down to the juncture
will die off. It would be fine in a couple of months. However I continued on down to the main branch.
1685806711970.png 1685807413165.png
So here's a before and after of the same branch, before taking it inside and putting 2 or 3 pieces
of wire on it.
Bit of a different angle, but you get the idea.
You should be able to view the floor between the foliage from above some.
1685807894714.png
I will reassess vigor in July for any further cutting back. Dealing with spider mites this year
but not thinning any makes it harder to get a good kill and control.
 

bwaynef

Masterpiece
Messages
2,012
Reaction score
2,400
Location
Clemson SC
USDA Zone
8a
A couple cautions: you applied a sound technique to a tree that's had another (stressful) technique applied, so results are going to be less than they might otherwise have been. Also, with only applying this technique to 2 branches of a tree, you're weakening those two branches. At some point, trees will abandon branches like that if other branches are allowed to grow unchecked. Here again, the results will be skewed against what could be.
 

Japonicus

Masterpiece
Messages
4,959
Reaction score
7,780
Location
Western West Virginia AHS heat zone 6
USDA Zone
6b
A couple cautions: you applied a sound technique to a tree that's had another (stressful) technique applied, so results are going to be less than they might otherwise have been. Also, with only applying this technique to 2 branches of a tree, you're weakening those two branches. At some point, trees will abandon branches like that if other branches are allowed to grow unchecked. Here again, the results will be skewed against what could be.
Good advice. I've thought about the weakening situation, but have had really good results
cutting back junipers in July, or after the Summer solstice. So, this should give him some
time, if he waits say 6-8 weeks and observes new growth habits, then proceeding with the remainder.
Do you think that would be a safe approach? Yes the entire juniper needs thinning.
I thin another cascade in alternating halves. Upper half one year, a year or two later, the lower half.
Cascades are different though I understand, as the lower half is weaker than the upper, but rarely
have I ever thinned it top to bottom in the same year. Last time I did, I repotted the following year
and nearly lost the entire tree. So I caution wholeheartedly, never thin a juniper late in the year, (August may be pushing it))
the year before it will be repotted.

The 2 techniques, are you referring to the pinching, then thinning?
1685810656132.png
Yes, you're correct, this brown tipped pad will be short in auxin.
Energy diverted away in favor of healthier growth next door.
It would be better to practice this method on a healthy auxin producing pad.
At this point, this pad is in the minus going into the technique.
@Esolin how long since you pinched this pad until the brown tips occurred?
Your before and after shots of this pad are remarkable, in that not much energy
will be here. This is what I meant by saying I leave more. It is certainly in the minus now.
Refer back to my last post and notice the amount of foliage that is left in the last picture, and compare this
to your after shot.
 

Esolin

Shohin
Messages
404
Reaction score
641
Location
So Cal
USDA Zone
10b
View attachment 491802 View attachment 491803
You still have some under growth and defining to do before you can call it a year on this one.
Then maybe next couple of years start shortening the profile and in a smaller pot in 4 years maybe?
View attachment 491805
I like your idea about shortening that lowest branch. Design wise, it's been a bit of a thorn in my side and I've been trying to raise it up a little for better trunk visibility, but the design may benefit from jinning most of it at some point. I want it to look like a wild copse of trees that has grown amongst boulders on a small windy knoll. And yes, it needs a shallower pot someday. It's been in this pot less than a year and came out of a taller, narrower grow box, so I wanted to ease it into a more horizontal root form without slowing it's growth too much.

@Esolin how long since you pinched this pad until the brown tips occurred?
Your before and after shots of this pad are remarkable, in that not much energy
will be here. This is what I meant by saying I leave more. It is certainly in the minus now.
Refer back to my last post and notice the amount of foliage that is left in the last picture, and compare this
to your after shot.
It's only been a week since I pinched those pads, so I don't think I've made it waste too much extra energy than if I'd trimmed hard from the start. Good to know that I went a little strong. 70% of the growth was straight up, so I assumed that it all needed to go, and I'd already taken the strong auxin tips off of that growth anyway in pinching. But this was why I only did two pads; practice and learn without doing too much damage hopefully. If this slowed it down too much, I'll know to take off less in the future.

A couple cautions: you applied a sound technique to a tree that's had another (stressful) technique applied, so results are going to be less than they might otherwise have been. Also, with only applying this technique to 2 branches of a tree, you're weakening those two branches. At some point, trees will abandon branches like that if other branches are allowed to grow unchecked. Here again, the results will be skewed against what could be.
Good points and I'll keep them in mind. Yeah, I did unbalance the energy in the branches. So far, this tree has shown a strong propensity to back bud (most of the larger jins have tried to regrow from the trunk callouses multiple times) so I'm not worried that the tree will discard these branches after one severe pruning. After another, maybe. I'll watch it closely.

Given the fact that this tree was repotted less than a year ago and it's June already, I don't want to take off any more folliage for now. Once the July/August heat hits, summer dormancy is more of a thing here where plants don't put on as much new growth. Just going to fertilize heavily while the weather's still cool and let it recover for the next 6-8 weeks it has before the heat hits.
 

Japonicus

Masterpiece
Messages
4,959
Reaction score
7,780
Location
Western West Virginia AHS heat zone 6
USDA Zone
6b
70% of the growth was straight up, so I assumed that it all needed to go,
Sometimes you’ll need to select an upper growing shoot to cut back to when
this is the case, but I see points along the way that should back bud.
Then too, often Times I simply reduce the upper shoot and it will back bud
or simply keep a bigger percentage growing and producing interiorly.
You kept the apical shoot at the branches tip like Brian shows, and you kept that 90
degree bend pretty full. That is a buffer, and back up plan all wrapped up in one.
I would keep that branch at 90 degrees to cut back to if the rest fails. It will not.
My older procumbens take me multiple years to thin down, so I doubt you’re going
to lose this branch.
I love this juniper. It is a special acquisition. When did you get it?
OP said you have a number of nanas. Pick one out and thin the entire thing if it’s healthy.
You don’t have to wire it yet, but minor wiring is fine is you want.
Take before and after pics, and aerial pics before and after.
BTW I don’t follow Brian’s bare branch technique just inside the apical branch shoots.
 

Esolin

Shohin
Messages
404
Reaction score
641
Location
So Cal
USDA Zone
10b
I got
I love this juniper. It is a special acquisition. When did you get it?
I got lucky. A local wholesale nursery had some old stock junipers when I was first starting off in bonsai. They had about twelve of these in 5 gallon pots for $15 a piece. If I had known at the time how incredibly hard it is to find material that old for such a price, I would've bought the whole lot. I count myself fortunate to have at least bought this one. The rest were gone by the time I understood what I'd found and went back, but hopefully that means some other bonsai artists are enjoying them.

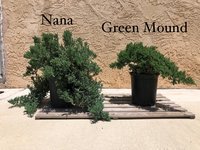
But that brings to mind. I called this juniper a Nana, because I tend to think of all Procumbens as Nanas, but technically it's a Green Mound, and I have noticed subtle genetic differences between the Green Mounds I've bought from this particular nursery, and the Nanas I find at all the other chain stores. For one, they're a bit greener than the bluish Nanas. Second, when they run, the growth is far less coarse and naturally more compact. I don't think I'll buy many more Procumbens unless they are Green Mound. I just like their look better for bonsai.


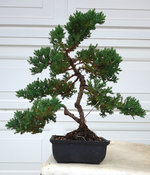
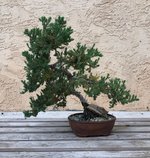
Photo:Procumbens_Types.jpg
OP said you have a number of nanas. Pick one out and thin the entire thing if it’s healthy.

The two trees pictured above are the only other Procumbens which are strong enough for work right now. Both have 5/8" trunks. The Green Mound has never been worked--came from the nursery just as it is. The Nana has been in training for a few years a la Bjorn Bjornholm's video on making interesting shohin junipers by twisting the branches with wire, then letting them run for a few years to bulk up. Not sure which one I should thin. Maybe the Nana to inspect its progress and reshape some branches?

The Green Mound up close:
GM2.jpg

The Nana up close:

Nana2.jpg
 

Japonicus

Masterpiece
Messages
4,959
Reaction score
7,780
Location
Western West Virginia AHS heat zone 6
USDA Zone
6b
For one, they're a bit greener than the bluish Nanas. Second, when they run, the growth is far less coarse and naturally more compact.
Coarse? I was thinking nana just meant it was a smaller variety.
Still, you have a nice one to work with.
Not sure which one I should thin.
They both are in desperate need of thinning.
I would be Leary of reshaping with wire now, but I hear wire in Summer, and I hear wire in Fall.
Adair cautioned me not to twist the trunk on one before Fall, so I typically wire then, but
little corrections with wire is fine of course.
I guess I would start with one that had not been worked on yet if I had to choose.

So I got to thinking about your recent thinning and 70% upwards growth, vs the example I gave.
Mine had been previously styled and that may have lead to a more full branch after thinning.
I had thick pads, and extra shoots growing upward, but getting back into the bones maybe
was more of an instant gratification?
As you’ve experienced, back budding occurs post cut back. Perhaps, this is a difference.
Prior styling, but not thinning completely. Once you’ve thinned, it will be more of an immediate reward after futrue thinning. So be patient. It’s a process.
 

Thomas J.

Chumono
Messages
595
Reaction score
1,444
Location
DFW area
USDA Zone
7
Very easy to shape pads, clean up the inside to open it up, shape yourself some pads and finish by continually pinching to shape. Not sure how you got so many brown tips but no brown tips here. :) First pic is April 2021, second is Nov. 2022 and 3rd is April 2023. :cool: 175923875_1378828819160709_7213485065148468699_n.jpgDSC03519_pe.jpgIMG_3344_pe.jpg
 

Esolin

Shohin
Messages
404
Reaction score
641
Location
So Cal
USDA Zone
10b
Those are very nice trees! The amount of scale foliage you've generated is especially impressive. You make it look easy, but for some reason shaping Procumbens just hasn't been easy for me. Call it a weakness the same way some people naturally find certain bonsai species easier to keep alive and thriving than their neighbor does. Managing growth on Nanas seems to be a skill I've yet to develop and find a method that keeps pads small and dense long term without weakening my trees. Maybe I don't prune often enough. Maybe I prune the wrong parts. Trying to figure it out so I can get nice trees like yours. 😁
I would thin down the Nana.
I think I will. It's way overgrown and while the Green Mound needs thinning too, it grows a little slower so it can wait another year if need be. Don't think I have enough time to do both before the weather shifts, but provided I have time this weekend, I'll give thinning another try with the Nana.
 

Japonicus

Masterpiece
Messages
4,959
Reaction score
7,780
Location
Western West Virginia AHS heat zone 6
USDA Zone
6b
Using sharp scissors with a sharp point is most accurate.
Where you do not clean it all the way down to a branch
(possibly in the apex or a branch with no side shoots)
cut down to a bifurcation or juncture leaving a growing tip.
If no side shoots, you may need to wire and rotate the branch
but that puts all the growth on one side usually.
BTW, when I used to shape by pinching, I never got the brown tips either
to that extent. You’re so very limited by pinching alone.
It takes years of pinching alone to promote poor pad traits.
These poor traits or flaws, are because you can only pinch smaller younger
tips just so far into the shoot till you hit lignified material and strip the green
growth. Then you reach for your scissors to “fix” the chewed up mess.
This encourages strong upwards growth, which you will discover forces
your pads to be thicker and thicker with each passing yea. By the time 15 years
have passed, to fix the issue takes upwards growing branches that used to be shoots
out with pruning, and can deform a pad altogether. I’ve been since 2018 or 19 correcting these
flaws on trees from 15 to 24 years in my care. Younger trees are easier to correct
where shoots have not become branches you. You don’t want upwards growing branches.
Once a pad is developed, return to pinching if you like for control.
But soon enough you’ll be rotating both practices if you like pinching to maintan.
 

Japonicus

Masterpiece
Messages
4,959
Reaction score
7,780
Location
Western West Virginia AHS heat zone 6
USDA Zone
6b
1686230669618.png
2001

1686230451292.png
2009
Got here by mostly pinching

1686231300729.png
2018
I'm not at home right now but will post some pics later of a couple of remaining flaws. I have removed several since 2018 that I'm either learning to live with or still pondering how to correct if I don't remove the upper half of this tree.
Side note, notice how the ground hugging tendency of procumbens is pulling the tree over. Another necessary correction. They all have this tendancy when styling upright.
 

Japonicus

Masterpiece
Messages
4,959
Reaction score
7,780
Location
Western West Virginia AHS heat zone 6
USDA Zone
6b
20230608_105127.jpg
Right about middle of this pic there's a well lignified shoot that has become an upwards growing branch really.20230608_105211.jpg
This one has been growing so long that it has become its own little tree. I will leave it be as it has so much character.
20230608_112227.jpg

20230608_112254.jpg
Different tree, but I've had it long enough that some of the same flaws have developed.
You either wire it down and cut back to it, remove it or live with it, but it is a flaw that was avoidable.
 

Esolin

Shohin
Messages
404
Reaction score
641
Location
So Cal
USDA Zone
10b
Beautiful trees! And I appreciate all the guidance and examples. I still hope to thin my overgrown Nana, this weekend, but it occurred to me I should put up an example of what I've done wrong and seek advice on future handling of a tree.

I've been training this shohin Nana for a few years now. This is a pic from 2017 when it was healthier.
nana01.jpg

I've since repotted it twice, and eventually it got too bushy, so I tried to pinch it back into shape a couple times. This is the tree today:

Sad Nana1.jpg

It looks unruly and in need of a trim, but I don't dare take off anything more until it produces some healthy interior growth.
A top view is more telling:

Sad Nana2.jpg

Pinching never produces any good backbudding. It only encourages the branch ends to run harder. I must be doing something wrong. I just don't know what.

Sad Nana3.jpg
Sad nana4.jpg

Obviously the tree is too weak to work for a while, but how should I handle a tree like this going forward?
 

Japonicus

Masterpiece
Messages
4,959
Reaction score
7,780
Location
Western West Virginia AHS heat zone 6
USDA Zone
6b
If it were my tree, I would check for mites. Feed with Alaskan Fish emulsion 5:1:1
and Neptunes Harvest seaweed fertilizer. Then follow through with Mancozeb just in case there's a blight
you're dealing with, and let the tree run.
I noticed that in the 2nd picture, there's this yellowing beginning already.
Sorry, a little confused on the timeline here. The 2nd and 3rd pics are today?
The under growth is unkempt in the 2nd picture. That is where you always start and keep with
at any time of the year. It simply does not belong. Just the under growth removed would lighten the
pads up and give some separation. Plus it uses more energy than it provides.
On the terribly yellowed pad, leave everything ATM if it can get any Sun. If not remove it.
This may be what I was talking about when I said if you don't thin the tree will decide what foliage
is removed for you. That's almost always the interior, and it begins by losing colour. Once it has
it probably won't correct itself, and yellow turns to brown. If we thin before this, light gets in and we have decided
what foliage goes, and what remains.

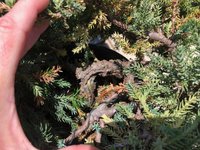
Your last picture, with your left index finger under a yellow shoot, I expect that shoot to separate with the slightest
pull. Take a pair of tweezers and remove all dead brown foliage that remains. It can only breed pests and disease.

Check for mites using the paper method. If you're unsure how this is done just holler. Treat if necessary.
If not, treat with Mancozeb per label instructions, fertilize with fish emulsion weekly, and remove under growth.
 

Attachments

  • 1686334469369.png
    1686334469369.png
    44 KB · Views: 8
  • 1686335303586.png
    1686335303586.png
    69.4 KB · Views: 9
Top Bottom