Maple group adjustment?

MichaelS

Masterpiece
Messages
2,013
Reaction score
4,746
Location
Australia
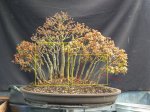
A trident group which is maturing nicely now, but I'm a bit unsatisfied with it.

P1100336.JPG

Beside the pot being wrong, I quite like area #1 but area #2 looks a bit crappy to me. Too even, too contrived, just too something.
Too late this season but I'm thinking of moving tree (A) to the left to add some density to that area. Maybe 3 trees?
Do you think this may improve the composition?
Any other ideas welcome!
P1100335.JPG
 
I think there are too many trees. Maybe think about eliminating some of them and keeping ones that are different in size. You need some that are larger in size. Most appear to be close in size
 
I agree too even. I actually thing the primary tree could be a bit less straight up. Maybe less trees in area 2 and a bit more differentiation in the angles would solve that area as well. I would say not to be afraid of having the outside trees really lean ooooouuuut. That's what trees in this tight conformation actually do in nature. Nice forest .
 
Its a pretty cool forest, @MichaelS, but I agree that its not quite there.
  • On the left (or area 1) you have trees of different sizes and thicknesses. This area also has trees clearly in front of other trees = sense of depth.
  • On the right (or area 2) trees seem uniform in thickness and height and doesn't have any sense of depth (bases of all the trees seem to be on the same line like @barrosinc said.
Adding an even bigger and thicker tree in front, but to the right of center would help a lot. There are many other things that could be done, but this is possibly the simplest change with maximal impact IMHO. This would also make the trees in area 2 seem more like background trees, so I think I would also 'chop' some of the trees on the right to get them branching lower and appearing to be even further in back (depth). If there is any possibility of bending any of those little trunks so they aren't all so straight, it would help to selectively do so too.

... just something to consider.
 
What I see is one main tree significantly thicker than the rest, but not significantly taller. If it were a good bit taller, it would then look like maybe it survived the forest fire, and all the smaller trunks grew from its seeds. That would be one option.

Usually, forests are designed in triangles. With three primary trees forming the points of the triangles. Other than the main tree, none of the others are prominent enough to act as tree 2 or tree 3. And it appears that there are some thinner secondary trees that are taller than the thicker secondary trees. Ideally, the thicker trees would be taller.

I'm thinking your best solution is to let the main tree grow substantially taller than the rest. Perhaps you could shorten the others at the same time.

It is a nice forest. We're just picking at nuts here!

Oh... It appears in the photo that the right side, area 2, doesn't appear to have the depth that area 1 has. In the photo, the trees appear to be lined up in a row. I know photos can deceive, but the addition of more trees in back might solve this. I'd choose really small ones.
 
Thanks for the replies. Lot's of things to consider.... I don't have any bigger trees of this age to add so that's probably out. Bending the thinner trunks is doable as is adding smaller trees at the back or front. (or removing some is also a possibility) I like to call this a group rather than a forest. I wanted to capture a copse of trees on a hilltop. I'm not particularly fussed by the fan shape but to get it right - or better - I can see that I may have to pull the whole thing apart. That might end up being the easiest and quickest way!? Definitely needs more depth in area #2...
 
Michael S...

You got a good eye...so I'm not gonna try to point out specific trees other than the ones somewhat noted already.

I think if you pulled the whole composition forward in the pot, to around where your bottom yellow line is....

Took out tree A..and the 2 trees around its ? New position...
And a few more "boring trees"...
The "same sizers"....

And create a third back grouping with them, in the hole where ? Is....

You'd be on your way.
Just use depth to change the "thickness" of the new back trees.

Roughly.
aviary-image-1473156602310.jpeg


Sorce
 
Can we see this planting from the side? In a 2d photo it looks amazingly 2d if that makes sense?? Very linear... Even where the arrangements shows some depth, it still appears very shallow. Perhaps it is just the pic, but the number 2 tree seems to be a problem...nearly as thick as #1 but where is the top? I think the trees look to be very well cared for but the design of the composition has a very hand of man feel to it...
 
Hey Michael,
Your forest took me back to my childhood where I spent many days with my brother and friends exploring a local "forest ring"..we lived a short hike away. Your "copse forest" idea on a hill........Google Chanctonbury ring (before hurricane) to see images similar to your forest.... The trees are/were Beech planted in 1760.
Looking forward to seeing the changes you make.
Cheers Graham
Edit https://en.m.wikipedia.org/wiki/Chanctonbury_Ring
 
Last edited:
I agree with barrosinc and johng, the trees look like they are in a line. There isn't any depth to the composition.
 
I agree I think you need three things, less trees, different trunk sizes and planted a little more randomness(depth)
 
Here is my other, younger, taller group. This was put together with the 1-2-3 triangle method. It's more of a forest I guess. The small one above was inspired from one of Takayama's (the forest master) groups where he had a line of trees coming away from the main group. It obviously was not successful. I will rearrange it at the end of summer.

tmg.PNG

Sorce, I like what you're saying. I'll keep that in mind..
Graham, That is interesting. I will check that out.
 

Attachments

  • tmg.PNG
    tmg.PNG
    387.4 KB · Views: 5
There are other ways to work the first planting without completely pulling it apart.
Visually, you just need to break up the lines... Not saying to necessarily use or add stones, but hiding some of the roots of the trees, helps to add depth to the piece... and rid it of the straight line.

I did remove one tree...

P1100336.JPG
 
Last edited:
There are other ways to work the first planting without completely pulling it apart.
Visually, you just need to break up the lines... Not saying to necessarily use or add stones, but hiding some of the roots of the trees, helps to add depth to the piece... and rid it of the straight line.

I did remove one tree...

View attachment 116399

What a nice and simple solution without dismantling all the composition! Something that can see everyone.
 
There are other ways to work the first planting without completely pulling it apart.
Visually, you just need to break up the lines... Not saying to necessarily use or add stones, but hiding some of the roots of the trees, helps to add depth to the piece... and rid it of the straight line.

I did remove one tree...

View attachment 116399
How did you get over here so quickly and do that without me seeing? :p I like it.
 
What a nice and simple solution without dismantling all the composition! Something that can see everyone.
...Sure wanted to say...cannot see all of us.:)
 
Back
Top Bottom