My biggest black pine.

Nybonsai12

Masterpiece
Messages
3,819
Reaction score
7,624
Location
NY
USDA Zone
7a
Many of you saw my thread on my kashima with help from @MACH5 . Well I have one for @Brian Van Fleet too!
I Picked this up almost two years ago from Muranaka. Any progress is owed to Brian who has helped me tremendously through communication and his excellent book on how to develop JBP. I think it's coming along. I hope I can keep it moving forward and do it justice. Thanks Brian.

As received. Forgive the stove top pic.
image.jpeg

I wired in fall and here it is last spring as needles emerge. Tough to get branches down.
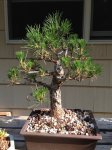
image.jpeg

From a few weeks ago.
image.jpeg

I will decandle this summer as long as it appears healthy enough. And wire branches further down next winter.

I will continue to update with progress.
 

Adair M

Pinus Envy
Messages
14,402
Reaction score
34,885
Location
NEGeorgia
USDA Zone
7a
Many of you saw my thread on my kashima with help from @MACH5 . Well I have one for @Brian Van Fleet too!
I Picked this up almost two years ago from Muranaka. Any progress is owed to Brian who has helped me tremendously through communication and his excellent book on how to develop JBP. I think it's coming along. I hope I can keep it moving forward and do it justice. Thanks Brian.

As received. Forgive the stove top pic.
View attachment 103412

I wired in fall and here it is last spring as needles emerge. Tough to get branches down.
View attachment 103414

From a few weeks ago.
View attachment 103415

I will decandle this summer as long as it appears healthy enough. And wire branches further down next winter.

I will continue to update with progress.
Are you sure this is the best front? It shows the chop, and the apex appears to be moving towards the back. This picture looks like a "back" to me.
 

Nybonsai12

Masterpiece
Messages
3,819
Reaction score
7,624
Location
NY
USDA Zone
7a
Are you sure this is the best front? It shows the chop, and the apex appears to be moving towards the back. This picture looks like a "back" to me.

I'm content with the plan in place. The chop section is moving toward the viewer. The apex will be brought down and forward.
 

Adair M

Pinus Envy
Messages
14,402
Reaction score
34,885
Location
NEGeorgia
USDA Zone
7a
I'm content with the plan in place. The chop section is moving toward the viewer. The apex will be brought down and forward.
Ok... To my eye, it looks like I'm looking directly at the chop, and the branch that was turned up to become the new apex was on the far side, which makes it look like it's moving away.

Can you post all 4 sides?

This is one of the nicer Muranaka pines I've seen in a while.

About the chop... Can you also post a close up of it, too? It looks like you're getting some callousing up at the top, but along the sides, it appears the bark is pulling away. You need to find where the live portion is, where it's starting to callous on the sides, and carve away the sharp edge so the callous can roll over it. Especially if this is going to be the front. And then use some clay style cut paste. This keeps the callous "soft" and active. If it builds a lot of bark, it slows down. You want it to bark over eventually, but you want it to cover over as quickly as possible.

And one more thing: to get it to callous over, it really helps to let a sacrifice run up in the apex. Find a branch on the back side (so the scar it creates won't be as obvious!) and let it run. Don't decandle it. Decandling really slows the callous down.
 

Adair M

Pinus Envy
Messages
14,402
Reaction score
34,885
Location
NEGeorgia
USDA Zone
7a
NY, got another question for you...

You stated that you were having some difficulty getting the branches "down". I think I can help:

It appears there is a piece of wire, 12 gauge? Maybe 10?, that wires the branch on the left, then runs around the back if the trunk, then comes out above the branch that is coming out pretty much straight at the camera, and you've moved it to the right a bit.

You've almost got it right, going around the back of the trunk is good, but the reason it's not working well is that you started ABOVE the branches you want to pull down.

You should have started BELOW the branch, so that the wire comes up from below to make that first wrap. On both branches. When you make that first wrap up and around, keep the wire snug up against the trunk, and don't start going out the limb until you've wrapped the wire over the top, and you're on the back side of the branch. Both branches.

Do it this way, and the wire is much, much stronger and gives you better leverage. I think you'll find it will hold your branches down.

I think Colin mentions it in his Craftsy tutorial.

Sorry, the wiring Nazi in me can't help it! Lol!!! But these little things do make a difference! Really!
 

Tim.E

Mame
Messages
145
Reaction score
110
Location
Barrie, ON
USDA Zone
5a
NY, got another question for you...

You stated that you were having some difficulty getting the branches "down". I think I can help:

It appears there is a piece of wire, 12 gauge? Maybe 10?, that wires the branch on the left, then runs around the back if the trunk, then comes out above the branch that is coming out pretty much straight at the camera, and you've moved it to the right a bit.

You've almost got it right, going around the back of the trunk is good, but the reason it's not working well is that you started ABOVE the branches you want to pull down.

You should have started BELOW the branch, so that the wire comes up from below to make that first wrap. On both branches. When you make that first wrap up and around, keep the wire snug up against the trunk, and don't start going out the limb until you've wrapped the wire over the top, and you're on the back side of the branch. Both branches.

Do it this way, and the wire is much, much stronger and gives you better leverage. I think you'll find it will hold your branches down.

I think Colin mentions it in his Craftsy tutorial.

Sorry, the wiring Nazi in me can't help it! Lol!!! But these little things do make a difference! Really!
I love when you post man, I always learn from your advice. Just need to get a black pine now lol!
 

Thomas J.

Chumono
Messages
595
Reaction score
1,444
Location
DFW area
USDA Zone
7
I would have to agree with Adair that the front should be what is now looking to be the back of the tree. The apex should always be leaning toward the viewer. :)

The very first pic shows this to be the case and would for sure hide the chop scar something that now catches the eye before anything else when first viewed. :)
 

Nybonsai12

Masterpiece
Messages
3,819
Reaction score
7,624
Location
NY
USDA Zone
7a
Thanks for the comments/thoughts, I'll update the thread later in the season.
 

YukiShiro

Chumono
Messages
558
Reaction score
773
Location
Hennops River Valley,Gauteng,South Africa
USDA Zone
8b
I'm content with the plan in place. The chop section is moving toward the viewer. The apex will be brought down and forward.

that will be challenging, wouldn't it be better just to find a new angle?

also that branch exiting the middle of the trunk and then sweeping right, doesn't look right to me

there must be a better angle. maybe with the current left(tree's right) being the front, there's that nice little branch next to the chop and the continuation of the trunk into the apex that will help you fill in the chop space if viewed from that side. the other side might be a bit bare. I don't know how the trunk line or nebari looks from those sides though.

lovely material though :)

wish we had such material here in South Africa

Best regards
Herman
 

Nybonsai12

Masterpiece
Messages
3,819
Reaction score
7,624
Location
NY
USDA Zone
7a
Discussion in my other thread of my newish weak JBP got my thinking about this trees strength. This is without question the healthiest I think it has been since it has been in my possession. It looked bare when I got it, and had a small bought with root aphids, but this is the best it's looked(or at least that is my baseless opinion). I don't know however if that means it's strong, or maybe in the back of my mind I know it could be stronger. I'm coming into decandling season and am on the fence whether to go for it or let it build steam another year. Thoughts?

I think the candles look balanced, but aren't huge in length like others trees i see. I have younger pines in my garden that of course have much longer candles and I attributed that to the stage/age they're at.

Here are some pics from about two weeks ago. Front and back or maybe eventually the old front and new front. There is a slight taper issue that can't really be seen from the pics but there is a thin spot in the trunk a few inches above the nebari that can't be seen from the side with the chop, but is more apparent from the side without the scar. I anticipate everyone likes the non-chop side more here.
 

Attachments

  • bp1.JPG
    bp1.JPG
    234.7 KB · Views: 266
  • BP2.JPG
    BP2.JPG
    214 KB · Views: 264

Adair M

Pinus Envy
Messages
14,402
Reaction score
34,885
Location
NEGeorgia
USDA Zone
7a
Discussion in my other thread of my newish weak JBP got my thinking about this trees strength. This is without question the healthiest I think it has been since it has been in my possession. It looked bare when I got it, and had a small bought with root aphids, but this is the best it's looked(or at least that is my baseless opinion). I don't know however if that means it's strong, or maybe in the back of my mind I know it could be stronger. I'm coming into decandling season and am on the fence whether to go for it or let it build steam another year. Thoughts?

I think the candles look balanced, but aren't huge in length like others trees i see. I have younger pines in my garden that of course have much longer candles and I attributed that to the stage/age they're at.

Here are some pics from about two weeks ago. Front and back or maybe eventually the old front and new front. There is a slight taper issue that can't really be seen from the pics but there is a thin spot in the trunk a few inches above the nebari that can't be seen from the side with the chop, but is more apparent from the side without the scar. I anticipate everyone likes the non-chop side more here.
It it looks strong enough to decandle. Now is the time.

I have a question for you: what root work have you done? I'm familiar with the Munanaka trees. Has it been half bare rooted?
 

Nybonsai12

Masterpiece
Messages
3,819
Reaction score
7,624
Location
NY
USDA Zone
7a
As for root work, I repotted in Spring 2015. I did not half bare root at that time, just a normal repot.

I have another pine from Muranaka that came to me in December looking in worse health than this one did in the first pic of this thread. The soil in the newer tree is more coarse than this one was. It doesn't appear to be the same turface-style mix that I think most of his trees are or were in.
 

Nybonsai12

Masterpiece
Messages
3,819
Reaction score
7,624
Location
NY
USDA Zone
7a
Pulled old needles with the exception of really weak buds that were not decandled, hence the sporadic long needles. Will start wiring now. Been looking at angles and as previously suggested to me in this thread, this angle will become the back of the tree.

Had to snap a photo with new phone to see how resolution compares. Not bad Iphone7!
JBP.jpg
 

Adair M

Pinus Envy
Messages
14,402
Reaction score
34,885
Location
NEGeorgia
USDA Zone
7a
When you wire, use one gauge heavier than you think you need. Then, to bend the branches down, grab the wire right at the spot where the branch attaches to the trunk with a pair of Jin pliers. Hold the wire firm with the pliers. Then bend the branch down, concentrating the bend right at the joint. Bend carefully, but firmly. Concentrate on bending the WIRE, not the branch. I think you'll be more successful with those changes.
 
Top Bottom