You are using an out of date browser. It may not display this or other websites correctly.
You should upgrade or use an alternative browser.
You should upgrade or use an alternative browser.
New to Satsuki Azalea
- Thread starter diana73
- Start date


Tele
Yamadori
I am no expert but.
I would repot and use Kanuma end of summer or next spring. Better wait when it is new.
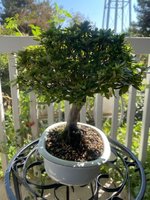
You get reverse taper at the first branch. Think about making that branch your new top and cut of the top.
It´s a very nice plant but it lacks bit movement and you have to do something about the reverse taper at least.
I would repot and use Kanuma end of summer or next spring. Better wait when it is new.
You get reverse taper at the first branch. Think about making that branch your new top and cut of the top.
It´s a very nice plant but it lacks bit movement and you have to do something about the reverse taper at least.
Deep Sea Diver
Masterpiece
Whoa on the repotting now!
That’s something you’ll want to do in the late winter early spring, depending where in California your reside. This allows the tree the entire year to recover.
(BTW: Please amend your loacation data to say approximately where in California your are - it makes a big difference on how this azalea needs to be treated. The zone data is helpful, but not entirely in your case.)
A couple observations
Whomever repotted last time seems to have shifted the tree upright. This put the roots on the right of the photos out of the media. That’s not good. They also potted the tree a bit too high. Both should be corrected in your repot. If you can’t exactly match the media (bonsai soil) a complete root wash should be done then too. (Personally I’d root wash and put the tree in straight Kanuma.)
This will put the tree back on a bit more of a slant.
Something you can do right now is try to reduce the branches in the top hamper…. this will help the tree get sun into its interior. Yet I’m not comfortable walking you through this by message. In this case I’d recommend finding a nearby club satsuki person or a professional to help walk you through this procedure.
In the meantime there is something else you can do to help set the roots right yourself and build up the health of the tree. You’ll need some New Zealand long fiber spaghnum moss. One Popular brand is Besgrow. You will also need some media. In this case small kanuma would work. Next:
Here’s an example tree of mine that was done a couple weeks ago that needs the root area built up as it’s planted too high.

The tree will end up looking sort of like this photo where the satsuki roots built up with packed cross wise Sphagnum

One can see the area by right where the mass is being slowly built up to match where the new surface level is going to be on the next repot. The front area still needs work.
Here’s the steps:

… and that’s that! If this is too much for you, show these instructions to a bonsaiclub member. Good Luck!
cheers
DSD sends
That’s something you’ll want to do in the late winter early spring, depending where in California your reside. This allows the tree the entire year to recover.
(BTW: Please amend your loacation data to say approximately where in California your are - it makes a big difference on how this azalea needs to be treated. The zone data is helpful, but not entirely in your case.)
A couple observations
Whomever repotted last time seems to have shifted the tree upright. This put the roots on the right of the photos out of the media. That’s not good. They also potted the tree a bit too high. Both should be corrected in your repot. If you can’t exactly match the media (bonsai soil) a complete root wash should be done then too. (Personally I’d root wash and put the tree in straight Kanuma.)
This will put the tree back on a bit more of a slant.
Something you can do right now is try to reduce the branches in the top hamper…. this will help the tree get sun into its interior. Yet I’m not comfortable walking you through this by message. In this case I’d recommend finding a nearby club satsuki person or a professional to help walk you through this procedure.
In the meantime there is something else you can do to help set the roots right yourself and build up the health of the tree. You’ll need some New Zealand long fiber spaghnum moss. One Popular brand is Besgrow. You will also need some media. In this case small kanuma would work. Next:
The job is to bring up the surface all around the tree roots, especially the uptilted side, to a new level. Also to ‘activate’ the roots so they push more new roots. This will spur growth and help the tree acclimate to the new angle well before the repot is done. Then when the repot is done the tree will be already used to the new level..
Here’s an example tree of mine that was done a couple weeks ago that needs the root area built up as it’s planted too high.
The tree will end up looking sort of like this photo where the satsuki roots built up with packed cross wise Sphagnum
One can see the area by right where the mass is being slowly built up to match where the new surface level is going to be on the next repot. The front area still needs work.
Here’s the steps:
Soak the moss overnight. You’ll need a goodly amount on the high side and others. Better too much then too little. One can always dry out the excess and reuse later. When that’s done…
Take a knife and lightly scratch the sides and underside of the roots all around where the new surface level will be. The scratches should show green inside the bark. Once you do this you’ll need to get right to work.
1. Scratch the surface of the soil in the area you will be working.
2. Lay long fibers of moss to make the first build up layer all around the tree.
3. Next, cut more long fibers into short pieces. Lay these short fibers cross wise to interlace over the long pieces already laid.
4. Then,y if you have media push it in between the fibers to help build up the layer. This looks like the below example.
5. Repeat steps 2-4 until the root area all around the tree is built up to the level desired.
6. Keep moist. I mist this area between watering until the moss turns solid green, then water normally.
7. A final step that would help is to cover the entire moss and soil surface with Yamagoke - Mountain Moss. That’s the really green moss on the example tree. Bonsai Tonight sells this (you need one bag only) and Kanuma. Just wet it overnight before applying and use tweezers to tuck the moss into the side of the pot and then backfill over the media and Sphagnum.
… and that’s that! If this is too much for you, show these instructions to a bonsaiclub member. Good Luck!
cheers
DSD sends
fcrdaddy
Seedling
Hi diana73,
Welcome to the wonderful world of satsuki! Because you are new to the species, I'd be happy to schedule a brief phone discussion and walk you through these initial considerations. If this is something that sounds interesting to you, please feel free to contact me through my website's contact page (https://nasbc.com/pages/contact-us-1) and reference this thread.
Also, something that may be of interest, in August I published a book focused on the care and maintenance of satsuki azaleas called "Satsuki Azalea Bonsai: A Fundamental Study" which may also be purchased on my web site.
RG
Bonsai Nut
Nuttier than your average Nut
Deep Sea Diver
Masterpiece
Glad to see you aboard Rick!
cheers
DSD sends
cheers
DSD sends
fcrdaddy
Seedling
Thank you for the latitude. Much appreciated![Admin Note] Normally I would not allow people to post links in their first post on the site, but since the above person ^^^ is Rick Garcia, I have approved it [/Admin note]
@fcrdaddy Welcome to the site!! Looking forward to reading your posts!
Bonsai Nut
Nuttier than your average Nut
I didn't want people to see your low post count and get nervous about clicking on a linkThank you for the latitude. Much appreciated!
") You come pre-approved!
You come pre-approved!Deep Sea Diver
Masterpiece
@diana73Hi diana73,
Welcome to the wonderful world of satsuki! Because you are new to the species, I'd be happy to schedule a brief phone discussion and walk you through these initial considerations. If this is something that sounds interesting to you, please feel free to contact me through my website's contact page (https://nasbc.com/pages/contact-us-1) and reference this thread.
Also, something that may be of interest, in August I published a book focused on the care and maintenance of satsuki azaleas called "Satsuki Azalea Bonsai: A Fundamental Study" which may also be purchased on my web site.
RG
I just ordered your book today. I appreciated the personal email concerning my address. Can't wait to get it.Thank you for the latitude. Much appreciated!
FreshAirSunshine
Shohin
@Deep Sea Diver when you discuss bringing the soil level up to the correct height I’m curious where the lines are drawn between “bad” exposed roots and good ones like in an intentional exposed-root azalea. Is it basically the presence of the feeder roots mixed in with the larger roots? I believe for exposed roots you usually use a layer of larger media/rocks under the topsoil/fine media containing some feeder roots. Then the roots need to grow past the larger rocks before they can establish feeders in a smaller media? Also @fcrdaddy - someone posted about your book on here as it was coming out and I got a copy then so thank you! It’s been very helpful as a beginner learning azaleas.
Deep Sea Diver
Masterpiece
Good questions!
Wouldn’t one think these ‘lines’ have to do with intentional styling’…?
In this example was this tree designed to be an exposed root tree? …if not would having sky roots rising out of the nebari be considered desirable?
Hope that helps.
Cheers
DSD sends
Wouldn’t one think these ‘lines’ have to do with intentional styling’…?
In this example was this tree designed to be an exposed root tree? …if not would having sky roots rising out of the nebari be considered desirable?
Hope that helps.
Cheers
DSD sends
FreshAirSunshine
Shohin
Fair - my mind jumped to unhealthy versus not desirable artistically. Thanks!
fcrdaddy
Seedling
Thank you so much @FreshAirSunshine for ordering the book.