You are using an out of date browser. It may not display this or other websites correctly.
You should upgrade or use an alternative browser.
You should upgrade or use an alternative browser.
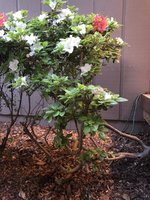
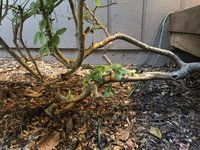
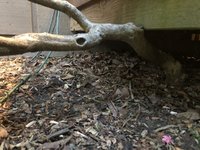
Old Azalea under the Porch
- Thread starter Dundee
- Start date
-
- Tags
- azalea in ground
Forsoothe!
Imperial Masterpiece
Dig it, keeping as many roots as possible and put it up for auction!
sorce
Nonsense Rascal
Welcome to Crazy!
Sorce
Sorce
Shibui
Imperial Masterpiece
That azalea has a very good trunk for bonsai. Normally many straight sticks so a nice bendy single trunk is not so common.
Azaleas transplant really well at almost any time of year. They do not need a lot of root to survive transplant. They also shoot very well from bare, older wood so they can also be chopped down to a stump and still grow so gardens are a great source for potential azalea bonsai.
Not sure if the red flowers are from a branch on the white flower plant or from another plant nearby but different colored flowers on a single azalea is relatively common. A number of Satsuki varieties are cultivated because they have different color or different pattern flowers.
Dundee
Seedling
Hi Shibui, thanks for the vote of confidence with this plant and the prospect for it to be something special.That azalea has a very good trunk for bonsai. Normally many straight sticks so a nice bendy single trunk is not so common.
Azaleas transplant really well at almost any time of year. They do not need a lot of root to survive transplant. They also shoot very well from bare, older wood so they can also be chopped down to a stump and still grow so gardens are a great source for potential azalea bonsai.
Not sure if the red flowers are from a branch on the white flower plant or from another plant nearby but different colored flowers on a single azalea is relatively common. A number of Satsuki varieties are cultivated because they have different color
If you were to say there are somethings to be done now, to it prepare it for a future in a pot could you highlight some of those things? I am not prepared to excavate it now and I definitely not prepared with where to begin once it’s out of the ground. I just though since she shape and size is so interesting and the potential style could be magnificent, what can I do now to shape it or prune it or prepare the ground before I dug it up, might be a good question to ask you.
Thank you for your words
Shibui
Imperial Masterpiece
Any potential bonsai is likely to be in the lower part of the trunk. The long branches that are great for a garden plant don't usually make a good tree shape for a bonsai.
I would be looking at the section inside the blue circle I have drawn for possible trunk line and shape.
To start with I'd chop at the red lines and wait for it to respond with new growth. Azaleas pruned hard usually erupt with new shoots all over the remaining stump.
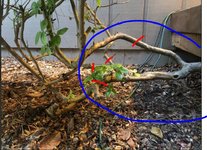
It is too hard to predict the final style/shape of a bonsai still in the ground and before trunk chop gives new shoots. Decisions are made after assessing the options of all the new shoots as well as trunk shape and inclination after it is in a pot and has survived the ordeal.
I usually chop and transplant azaleas in a single operation but there's no reason you can't do it in stages - chop now and then transplant sometime down the track.
I don't usually seal cuts when pruning garden azaleas but there is quite a lot of advice to always seal large cuts for azalea bonsai to reduce die back so to be safe it might pay to apply some sort of sealant to the cut ends as you prune.
I would be looking at the section inside the blue circle I have drawn for possible trunk line and shape.
To start with I'd chop at the red lines and wait for it to respond with new growth. Azaleas pruned hard usually erupt with new shoots all over the remaining stump.

It is too hard to predict the final style/shape of a bonsai still in the ground and before trunk chop gives new shoots. Decisions are made after assessing the options of all the new shoots as well as trunk shape and inclination after it is in a pot and has survived the ordeal.
I usually chop and transplant azaleas in a single operation but there's no reason you can't do it in stages - chop now and then transplant sometime down the track.
I don't usually seal cuts when pruning garden azaleas but there is quite a lot of advice to always seal large cuts for azalea bonsai to reduce die back so to be safe it might pay to apply some sort of sealant to the cut ends as you prune.
River's Edge
Masterpiece
Here is an example of what is being discussed. a picture of Azalea as dug out of landscape by my son. A follow up picture showing the azalea developed by myself over the past seven years . The first picture shows the portion chosen to develop the tree. The black lines indicate where the tree was eventually pruned down to and its current height! Development was primarily thread grafting with a small amount of back budding. Development was slow and staged, not chop and hope for results. Note the second picture is the reverse front from the first picture.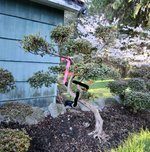
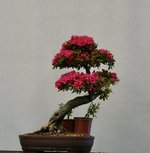


Dundee
Seedling
Dundee
Seedling
@River's Edge beautiful example. I feel the pictures example is a great example of what I hope to one day display. Your grafts, can you point out where they are in the photos?
RJG2
Omono
Very rarely is the first cut your last cut, so the first cut is normally straight across. Once you get and choose your new buds/branches and line, you can re-chop, and/or clean your chops. This is when you can try and hide the wounds.When considering angle of a large branch cut such as what I’ll be doing here. Is the point, in part, to determine the viewing direction and cut in such a way that the wound cannot be seen? @Shibui are your suggested lines of cut also suggestive of the angle of the cuts?
Shibui
Imperial Masterpiece
Agreed. Unless there is a useful side branch to cut back to I just chop about where I want the new shoots then sit back, cross fingers and wait for the shoots. After they have grown and strengthened I can assess for desired location and angle and trim the excess trunk back with an angled cut or sometimes make the surplus trunk into dead wood features. either way you cannot do final cuts until you have something to cut to and it is almost impossible to predict where those shoots will erupt.
Pitoon
Imperial Masterpiece
Air layer the larger branches, don't cut and toss. You can make several nice bonsai of different sizes from the azalea.
River's Edge
Masterpiece
Difficult with this picture. Essentially all but two pads are built from thread grafts. I was fortunate to have the sole original branch on top to work with and one bud back on an outside curve to form a pad. From there it was progressive with two or three grafts at a time. This photo shows the last two thread grafts still in place this spring. I will clean up after flowering and thin out some areas when time allows and repost to show the position of the last two lower down. It is time to remove some foliage and let some light in so should be able to get that over the next week or so.@River's Edge beautiful example. I feel the pictures example is a great example of what I hope to one day display. Your grafts, can you point out where they are in the photos?
River's Edge
Masterpiece
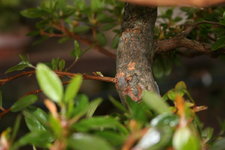
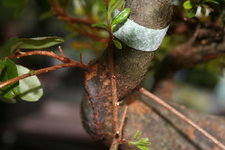
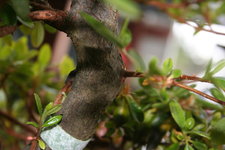
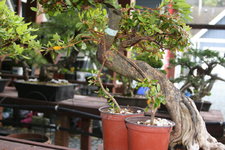
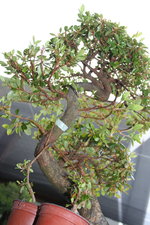
These photos will help to understand the positioning of the last wo grafts in particular. Also give a view of previous branches grafted to form the primary branching for pad development.@River's Edge beautiful example. I feel the pictures example is a great example of what I hope to one day display. Your grafts, can you point out where they are in the photos?
To aid in analysis the following comments.
1.Entry of thread graft is typically lower than exit, this helps create the upward movement of the branch on exit for deciduous design.
2.At this point the exit portion is slightly thicker than the entry portion.
3. I remove most of the leaves on the entry portion to create an imbalance with more draw for the extension rather than the lateral growth below on the thread graft.
Deep Sea Diver
Masterpiece
Nice photo explanation Frank!
Cheers
DSD sends
Cheers
DSD sends
Dundee
Seedling
@Pitoon thank you for that idea. With the air layering idea... I presume if these survive and work, they could eventually be used to for grafting later? Is that what you did @River's Edge?
Pitoon
Imperial Masterpiece
Yes, you could use their growth to do the thread grafts later on. Some of those branches are thick enough to make mame/shohin sized bonsai on their own as well...of course after some training.@Pitoon thank you for that idea. With the air layering idea... I presume if these survive and work, they could eventually be used to for grafting later? Is that what you did @River's Edge?
River's Edge
Masterpiece
I did not choose to air layer off the upper portion in my case due to the shape and condition of the tops. I simply produced cuttings from the remaining portion of the original plant. Thread grafting requires very young and specifically grown style of cuttings for the best results. Young slender growth with lateral buds and lengthy internodes work best.@Pitoon thank you for that idea. With the air layering idea... I presume if these survive and work, they could eventually be used to for grafting later? Is that what you did @River's Edge?
Air layering can produce some nice smaller trees with faster overall progress when the portion chosen is appropriate.

