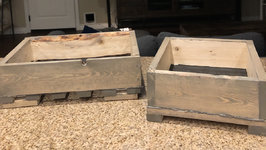
Pilot pot for wood grow boxes

Hbhaska

Chumono
Messages
505
Reaction score
752
Location
Oceanside California
USDA Zone
10a
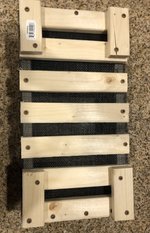
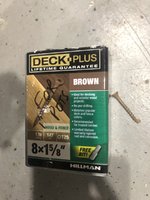
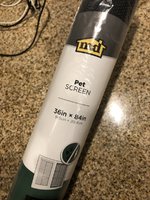
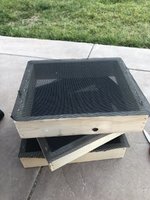
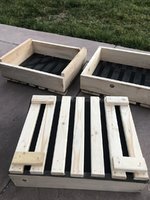
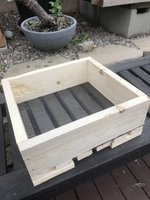
This is my first attempted wood growing pot from 1x4 fir boards and 1x2 spf (spruce-pine-fir) furring strips from Lowe’s. It’s kind of a pilot pot for me. It turned out sturdy and I will make larger grow boxes in the future. Here are additional materials I used, all purchased from Lowe’s - Deck screws (8x15/8), M-D extra heavy duty mesh (pet screen). That’s pretty much it.

I first made a rectangle with pilot holes on cut (14 inch and 8 inch) boards (2 for each side) and screwd them together. Then I cut out mesh to size and stapled to the bottom. Bottom was then reinforced with 1x2’s cut to size, leaving a reasonable amount of space in-between. Finally, I finished off the pot with legs using short 1x2’s.

please let me know what you think. I didn’t invent these and I got ideas from several sources. I believe @Vance Wood was the brainchild behind these pots.

thank you2F2D9B9E-873E-4464-8B1F-65C7FDD74D69.jpeg14E1B2BF-4C7F-441F-AA54-FDFEF93AC584.jpegA2DD6554-7DED-4BFE-8188-59855F02211D.jpeg5173E1BA-746E-46BF-BA39-2499E94F8707.jpeg3E1F9157-8CE3-4E98-96EE-7DE784EA9417.jpegA4032B07-48D3-4566-8997-043875DBBEBB.jpeg
 

Wires_Guy_wires

Imperial Masterpiece
Messages
6,459
Reaction score
10,728
Location
Netherlands
Looking good!
Heck, carpentry words in English aren't my best, so bear with me. The only thing I'd do differently is the side boards. I would make them fit in between the front and back board instead of fitting the back and front in between the sides.
Why?
I like picking up pots and placing my fingers on the bottom and my thumb over the sides. Or I add handles to the sides. Over time the wood will go a little soft - especially on the bottom - and I've had the sides fall off when lifting pots.

Your construction will likely be strong enough to hold up for a long time. So this might be a bit over-careful, but it doesn't hurt to build in some extra security.
See the example below of what happened to my pots and how I think it could be prevented to some extent.

eggsample.jpg
 

Bonsai Nut

Nuttier than your average Nut
Messages
12,477
Reaction score
28,121
Location
Charlotte area, North Carolina
USDA Zone
8a
Nice work! In fact... maybe too nice :)

The thing about grow boxes is that they usually don't last. Untreated wood in direct contact with wet soil is going to start breaking down pretty quickly. Don't spend too much time and effort on a grow box that might only last three years and one tree.

Additionally I would recommend skipping the wood screws and get yourself a nail gun to speed up your assembly and avoid the problems of splitting wood associated with wood screws in 1" boards. Currently you are constructing your frame using a butt joint. If you really wanted to strengthen everything dramatically, just run a rabbet joint on all the ends of your box frame boards, apply waterproof wood glue, and then nail it up (depending if you had access to a small router table or a table saw with a rabbeting blade). A good wood glue joint will be stronger than the wood itself.
 

Brian Van Fleet

Pretty Fly for a Bonsai Guy
Messages
13,996
Reaction score
46,166
Location
B’ham, AL
USDA Zone
8A
I use 1x4 or fence slats for the sides and plywood for the bottoms. 1x2 for “feet” just so I can get under it and pick it up, and to slow down the rot of the plywood. I drill a bunch of holes in the bottom for drainage.

Greg is 100% right, grow boxes aren’t meant to last, so no point in over engineering. If you get 3 years, you likely accomplished the goal. But I do use deck screws.

Also remember, wider and not deeper, especially for D-tree nebari development.
 

ABCarve

Masterpiece
Messages
2,686
Reaction score
11,552
Location
Girard, PA
USDA Zone
5a
There is a method of preserving wood that uses flame treating (scorching) coupled with linseed oil. I have a pal that used this for creating a raised growing bed with pine boards five years ago and has showed no signs of decay. I think this method has a Japanese name that I can’t remember.
 

Hbhaska

Chumono
Messages
505
Reaction score
752
Location
Oceanside California
USDA Zone
10a
Looking good!
Heck, carpentry words in English aren't my best, so bear with me. The only thing I'd do differently is the side boards. I would make them fit in between the front and back board instead of fitting the back and front in between the sides.
Why?
I like picking up pots and placing my fingers on the bottom and my thumb over the sides. Or I add handles to the sides. Over time the wood will go a little soft - especially on the bottom - and I've had the sides fall off when lifting pots.

Your construction will likely be strong enough to hold up for a long time. So this might be a bit over-careful, but it doesn't hurt to build in some extra security.
See the example below of what happened to my pots and how I think it could be prevented to some extent.

View attachment 347390
Thank you. That makes sense.
 

Hbhaska

Chumono
Messages
505
Reaction score
752
Location
Oceanside California
USDA Zone
10a
Nice work! In fact... maybe too nice :)

The thing about grow boxes is that they usually don't last. Untreated wood in direct contact with wet soil is going to start breaking down pretty quickly. Don't spend too much time and effort on a grow box that might only last three years and one tree.

Additionally I would recommend skipping the wood screws and get yourself a nail gun to speed up your assembly and avoid the problems of splitting wood associated with wood screws in 1" boards. Currently you are constructing your frame using a butt joint. If you really wanted to strengthen everything dramatically, just run a rabbet joint on all the ends of your box frame boards, apply waterproof wood glue, and then nail it up (depending if you had access to a small router table or a table saw with a rabbeting blade). A good wood glue joint will be stronger than the wood itself.
Thank you. Will do!
 

Hbhaska

Chumono
Messages
505
Reaction score
752
Location
Oceanside California
USDA Zone
10a
I use 1x4 or fence slats for the sides and plywood for the bottoms. 1x2 for “feet” just so I can get under it and pick it up, and to slow down the rot of the plywood. I drill a bunch of holes in the bottom for drainage.

Greg is 100% right, grow boxes aren’t meant to last, so no point in over engineering. If you get 3 years, you likely accomplished the goal. But I do use deck screws.

Also remember, wider and not deeper, especially for D-tree nebari development.
Thank you, Brian.
 
Messages
171
Reaction score
268
Location
Portland, Oregon
USDA Zone
8b
There is a method of preserving wood that uses flame treating (scorching) coupled with linseed oil. I have a pal that used this for creating a raised growing bed with pine boards five years ago and has showed no signs of decay. I think this method has a Japanese name that I can’t remember.
Yakisugi or shou sugi ban.
 

Newish in Oregon

Yamadori
Messages
68
Reaction score
43
Location
Portland, OR
Seems like someone's always trying to get rid of pallets around here. Deconstructed several in early spring and made a couple of boxes using a similar design. We'll see if I get 3 years out of them.
 

Potawatomi13

Imperial Masterpiece
Messages
6,173
Reaction score
4,404
Location
Eugene, OR
USDA Zone
8
Good work. Personal discovery that after 2-3 years needed to semi dissasemble box to remove tree. Just forewarning.
 

Hbhaska

Chumono
Messages
505
Reaction score
752
Location
Oceanside California
USDA Zone
10a
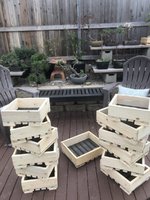
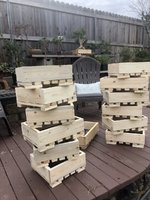
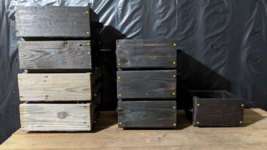
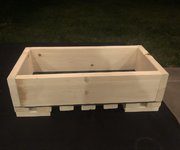
Thanks to @Wires_Guy_wires, @Bonsai Nut and @Brian Van Fleet, I think I’m getting much better at making these boxes. The following changes were made this time.

1) screws were replaced by 18 gauge brad nails or staples using nail gun - so much faster!
2) short sides were stapled with their ends inside for better stability.

The biggest advantage of using a nail gun/staple gun is speed. I made three boxes in the time it took me to make one! Here’s the result. Thank you 45B43C5E-8598-447A-82C9-CC5FECF56ADC.jpegACD158ED-4C7E-4D5F-ACF6-991180865DE6.jpeg061BB4DD-CC36-4A3A-8549-CCC72E5C581E.jpegBE9A29A9-3E9F-40A8-B803-87178B251B9B.jpegC86CAFDB-B422-4AF3-BD6D-56986022A363.jpeg
 

Hbhaska

Chumono
Messages
505
Reaction score
752
Location
Oceanside California
USDA Zone
10a
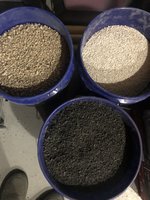
Here’s my substrate. Pumice, lava and 8822 - all sifted.
 

Attachments

  • AE61C113-8CC6-45B0-BA40-09F7E5112318.jpeg
    AE61C113-8CC6-45B0-BA40-09F7E5112318.jpeg
    217.1 KB · Views: 16

Hbhaska

Chumono
Messages
505
Reaction score
752
Location
Oceanside California
USDA Zone
10a
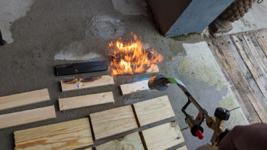
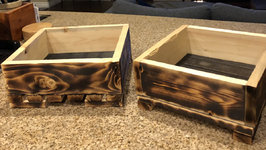
I did a little experiment. I didn’t like the pale wood color so I was exploring quick methods to darken the outside of these grow pots. Granted these are not supposed to last but what’s bonsai without a little flair? I think I like the idea of lightly burning the outside of the Doug fir wood so that it gives a nice pattern with the grain. Not so sure about staining.A177AF06-ED98-4A62-BDFC-224E3449F280.jpegC9148F65-34DA-4EC2-A41C-28CC0CDD5F52.jpeg
 

W3rk

Chumono
Messages
606
Reaction score
901
Location
MD
USDA Zone
7a
I did a little experiment. I didn’t like the pale wood color so I was exploring quick methods to darken the outside of these grow pots. Granted these are not supposed to last but what’s bonsai without a little flair? I think I like the idea of lightly burning the outside of the Doug fir wood so that it gives a nice pattern with the grain. Not so sure about staining.View attachment 352836View attachment 352837
Wouldn't you want the burnt sides on the insides to slow rot? Unless it's just for the aesthetics.
 
Top Bottom