Pinus Nigra Hornibrookianna

WNC Bonsai

Omono
Messages
1,900
Reaction score
2,160
Location
Western NC
USDA Zone
7b
It Depends! LOL i love that line.
First off, of course you can wait till spring, not a bad idea.
Second, depending on the branch and the condition of the tree you will likely choose different buds as in side to side or apical plus one side.
Third, it would be great for me to see what you are working with as there are a lot of other situations to consider. IE: Is the branch thick enough? how much foliage has already been removed? Will any of the current foliage be kept in the final design? How much room is left for progressive cutback? Do some areas need to grow out?
It is fun asking questions!
On a serious note many of the techniques that involve reduction of needles, candles etc. Are often staged to maintain more vigour for the tree over the winter and then the remaining amounts removed in the spring. For example it is common practice to leave more needles on fall cleanup and then finish balancing with more needle removal in the spring.
One article I read on developing pines suggests that it is appropriate to remove excess buds in fall to late winter. However the author points out that if they are removed in the fall it will help produce new buds for the following spring whereas if you wait until late winter the new buds will form that growing season and not pop until the following spring so you lose a year in the development process. Excelent article by Julian Adams in Intl Bonsai.
 

Ali Raza

Shohin
Messages
370
Reaction score
187
Location
Islamabad, Pakistan
USDA Zone
9b
Thanks for your observation. When I purchased the tree it was a big bush with heavy foliage everywhere as a result of the nursery production methods—it was a beautiful shrub. However I am hoping that removing a lot of that extra foliage will allow a lot of light to reach the bare areas of the branches and help the dormant buds there to pop—at least that’s the plan.
You will get the desired result, right now the plant is in more dormant state and start to bud out in spring. So have patience because through patience great things are accomplished.
Look at my pine plant i was also in the same situation, just after growing season got result. I pruned this last year and got new buds popping back on the branch. I will share more with you
 

Attachments

  • IMG_0827.JPG
    IMG_0827.JPG
    174.9 KB · Views: 103

Ali Raza

Shohin
Messages
370
Reaction score
187
Location
Islamabad, Pakistan
USDA Zone
9b
Thanks for your observation. When I purchased the tree it was a big bush with heavy foliage everywhere as a result of the nursery production methods—it was a beautiful shrub. However I am hoping that removing a lot of that extra foliage will allow a lot of light to reach the bare areas of the branches and help the dormant buds there to pop—at least that’s the plan.
this is the presesnt result with last year pruning you will get the vivid idea the effect of back budding when you prune the candle.
 

River's Edge

Masterpiece
Messages
4,749
Reaction score
12,763
Location
Vancouver Island, British Columbia
USDA Zone
8b
You will get the desired result, right now the plant is in more dormant state and start to bud out in spring. So have patience because through patience great things are accomplished.
Look at my pine plant i was also in the same situation, just after growing season got result. I pruned this last year and got new buds popping back on the branch. I will share more with you
Your approach is a bit different from the one i chose. I prefer to retain more foliage, keep the tree stronger and vigorous for development. At the same time opening up the interior for development. I like to think of it as a slower approach for a faster result. My approach focuses on developing and maintaining a very healthy root system. I use a very free draining medium particle substrate for pines. As the basis for future development. Here are the pictures to illustrate the subtle difference. The new growth is easy to identify. When i removed the excess foliage i did so in 3 stages This tree was an overgrown shrub obtained from a nursery in march of this year. 2018. I expect to see considerable new interior budding next season. One approach is to always cut back to a pair of needle clumps if possible. Another approach is to reduce the size of needles to allow light into the interior. Another method involves reducing the number of needle pairs rather than removing the whole thing. Each of these approach allows light into the interior at the same time as retaining more foliage for photosynthesis to support new growth.
Please note: this is an experimental nursery tree to learn how this variety responds. I am particularily interested in the color and needle length of this variety.
 

Attachments

  • IMG_1250.JPG
    IMG_1250.JPG
    117.6 KB · Views: 93
  • IMG_1254.JPG
    IMG_1254.JPG
    208.6 KB · Views: 54
  • IMG_1255.JPG
    IMG_1255.JPG
    197.5 KB · Views: 50
  • IMG_1256.JPG
    IMG_1256.JPG
    145.4 KB · Views: 65

River's Edge

Masterpiece
Messages
4,749
Reaction score
12,763
Location
Vancouver Island, British Columbia
USDA Zone
8b
I forgot to include a phot of the first stage of reduction on April 26 this year. It was at the same time that i repotted the tree from the nursery soil to my inorganic bonsai mix. Retaining the extra foliage at this time aided the root recovery while still beginning to allow some light into the interior. The gradual process also ensured that any new needles or buds in the interior did not get adversely afffected by too much sunlight at once. Hope all this makes sense the way i worded it.
 

Attachments

  • IMG_0890.JPG
    IMG_0890.JPG
    29.1 KB · Views: 99

WNC Bonsai

Omono
Messages
1,900
Reaction score
2,160
Location
Western NC
USDA Zone
7b
I noticed you repotted it into an Anderson flat, wish I could find those out east without having to buy a bunch and ship them across county. I just cobble together wooden boxes. Anyway, how did you handle the roots? HBR, or just comb them out and keep as much as possible? What mix did you use? I generally use a pumice and hadite mix with varying amounts of bark chips. I was thinking of repotting mine next spring but may wait until late summer as that would be almost a one year rest period since I did the intial pruning. I have yet to pull it out of the nursry pot for a look see but given the heavy foliar growth I bet it is full of roots. BTW, since it ws 65 F today I got busy and snipped off all but two terminal buds on each branch. I want to limit supression of back budding as much as possible. Wish I had snipped them when I bought the tree as it might have made a few buds then. Hopefully I’ll get a bunch of back buds this coming year and then in spring 2020 there with be a massive flush of new growth.
 

River's Edge

Masterpiece
Messages
4,749
Reaction score
12,763
Location
Vancouver Island, British Columbia
USDA Zone
8b
I noticed you repotted it into an Anderson flat, wish I could find those out east without having to buy a bunch and ship them across county. I just cobble together wooden boxes. Anyway, how did you handle the roots? HBR, or just comb them out and keep as much as possible? What mix did you use? I generally use a pumice and hadite mix with varying amounts of bark chips. I was thinking of repotting mine next spring but may wait until late summer as that would be almost a one year rest period since I did the intial pruning. I have yet to pull it out of the nursry pot for a look see but given the heavy foliar growth I bet it is full of roots. BTW, since it ws 65 F today I got busy and snipped off all but two terminal buds on each branch. I want to limit supression of back budding as much as possible. Wish I had snipped them when I bought the tree as it might have made a few buds then. Hopefully I’ll get a bunch of back buds this coming year and then in spring 2020 there with be a massive flush of new growth.
As usual the approach i used was dictated by what i found. This tree had been slip potted up a size several years ago. So the center was congested with old soil and lots of tangled roots in the core. The outside circle was compacted and circling the large container but not as congested. The bottom was sparsely populated with roots. The soil was mostly perlite, peatmoss, sand and fir bark. That is typical for most nurseries in this area.
The first thing i did was remove the bottom half of the root ball with an old saw. I then excavated the center core upwards and inwards, removing large roots and old soil. Next i combed out the sides of old soil and cut back most roots, removing old and or all dead material as well as the nursery mix. The end result was a smaller compact root ball with the old soil removed underneath in the centre.
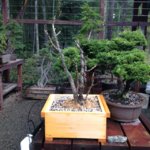
I prepared the anderson flat with approximately 3/4 inch deep drainage layer of coarse pumice, then added my usual Bonsai mix for pines, mounding some in the centre to fill the excavated area under the root ball. Used bamboo sticks in either side of the root ball for anchoring , the wire which i brought up through the bottom grid then tied down each side. next carefully worked the soil between exposed roots and settled the soil into the container. Thorough watering to wash out any remaining fines and thoroughly water initially. Back in the sun and wait 3 or 4 weeks for root recovery before fertilizing.
My usual mix is 1 part black lava, 2 parts pumice, 1 part granite and 1 part akadama. All components are sifted and similar in particle size. The drainage layer is slightly larger particle pumice but not a big enough difference to create issues with drainage and water retention. Anderson flats do not have feet and the extra drainage layer is important unless they are elevated in some way. Mine always sit on a bench with air spaced between slats or on a gravel bed that allows air movement in the bottom.
With this approach the next repot will be a 1/2 HBR, and the following repot will complete the change out of the remaining nursery soil. I typically choose this approach on nursery stock to allow me to continue developing the tree while also working on repotting and developing the root ball. Particularity with older nursery stock. I do not use this approach with Hemlock or Spruce. Rather a slower approach with them, more segmented and taking an extra repot or two to complete the change out. The highest priority in my mind is the centre core from underneath as it usually hides the most chronic root issues in common nursery stock due to the regular slip pot routine often used.
 
Messages
584
Reaction score
3,247
Location
Rochester, NY USA
USDA Zone
5-6
I've trained a couple of Dwarf Austrian pine, Pines nigra 'Hornibrook' from young $5 grafts for nearly 50 years. This cultivar originated as a witch's broom, here in Rochester, New York in 1932. This cultivar needs to be thinned out a couple times of the year because it has so many buds. And, it buds back on older wood. Many decades are necessary to develop the thick dark plated bark which is characteristic to Austrain pines.

AUSTRIAN ITV.JPG
AUSTRIAN ITV OLD.JPG

Here is another specimen I trained.
AUSTRIAN.jpgAUSTRIAN NVV OLD.JPG
 

River's Edge

Masterpiece
Messages
4,749
Reaction score
12,763
Location
Vancouver Island, British Columbia
USDA Zone
8b
I've trained a couple of Dwarf Austrian pine, Pines nigra 'Hornibrook' from young $5 grafts for nearly 50 years. This cultivar originated as a witch's broom, here in Rochester, New York in 1932. This cultivar needs to be thinned out a couple times of the year because it has so many buds. And, it buds back on older wood. Many decades are necessary to develop the thick dark plated bark which is characteristic to Austrain pines.

View attachment 221858
View attachment 221861

Here is another specimen I trained.
View attachment 221859View attachment 221860
Thanks for posting these! So very true about the bark characteristics and slower time line compared to JBP and JRP. It is encouraging to hear about the more prolific back budding. On the second example I appreciate the repositioning of that middle left branch coming from the the other side. A great example of the benefits of proper application of wiring technique.
There must also be some amazing Austrian pine yamadori out there in the Bonsai world.
 

Potawatomi13

Imperial Masterpiece
Messages
6,173
Reaction score
4,404
Location
Eugene, OR
USDA Zone
8
You will get the desired result, right now the plant is in more dormant state and start to bud out in spring. So have patience because through patience great things are accomplished.
Look at my pine plant i was also in the same situation, just after growing season got result. I pruned this last year and got new buds popping back on the branch. I will share more with you

Not positive however looking at bark/needles believe this one Chir pine(P. roxburghii) very similar to Canary Is. pine. If so will develop bark quicker than most pines;).
 

River's Edge

Masterpiece
Messages
4,749
Reaction score
12,763
Location
Vancouver Island, British Columbia
USDA Zone
8b
Not positive however looking at bark/needles believe this one Chir pine(P. roxburghii) very similar to Canary Is. pine. If so will develop bark quicker than most pines;).
I agree the pine does not appear to be the same species, different needles and whorl pattern of development as well as bark characteristics. Pinus Nigra Hornibrookiana have thicker shorter needles.
 

WNC Bonsai

Omono
Messages
1,900
Reaction score
2,160
Location
Western NC
USDA Zone
7b
Ok, I am torn on what to do this spring and it appears the buds on my new P. nigra pictured above are starting to swell so I need to make a decision fast. So,last fall when Imbought it I did some thinning of excess branches and removed excess terminal buds to encourage back budding. For one thing I need to get this tree out of the nursery pot and i to a grow box. However, I don’t want to stress the tree while it may still be recovering fro he initial work I did last fall. On the other hand it is a very steong tree that had as many as 8 terminal bids on many branch tips. If I hold off on repotting this spring, then I would want to do it in late summer but that also would be when I would need to be cutting back the newly extended growth. I habe not pulled it out of thenpot yet so I really don’t know how mich of the roots needs to be removed and then do HBR in subsequent years.

My current thinking is to:
1. Go ahead and repot this spring since it is such a healthy tree.
2. Let it extend its new growth and prune back once it has hardened off.

Any suggestions?
 

River's Edge

Masterpiece
Messages
4,749
Reaction score
12,763
Location
Vancouver Island, British Columbia
USDA Zone
8b
Ok, I am torn on what to do this spring and it appears the buds on my new P. nigra pictured above are starting to swell so I need to make a decision fast. So,last fall when Imbought it I did some thinning of excess branches and removed excess terminal buds to encourage back budding. For one thing I need to get this tree out of the nursery pot and i to a grow box. However, I don’t want to stress the tree while it may still be recovering fro he initial work I did last fall. On the other hand it is a very steong tree that had as many as 8 terminal bids on many branch tips. If I hold off on repotting this spring, then I would want to do it in late summer but that also would be when I would need to be cutting back the newly extended growth. I habe not pulled it out of thenpot yet so I really don’t know how mich of the roots needs to be removed and then do HBR in subsequent years.

My current thinking is to:
1. Go ahead and repot this spring since it is such a healthy tree.
2. Let it extend its new growth and prune back once it has hardened off.

Any suggestions?
First off, if the current amount of foliage is consistent with the picture posted Nov 16/18 then i would repot this spring. if you have removed more foliage or done other work then i would give it a season to recover.
The extent of repot will depend on what you find during the repot in terms of soil conditions and root structure/health etc. The safe approach would be to clean out the bottom centre of old soil , dead roots etc., choose the weakest side and clean out old soil, remove large downward roots, retain healthy smaller roots. Essentially a 1/2 HBR with focus on lower center portion of the root ball. Be sure to fill all cavities and between roots carefully with ne soil and secure the tree in the pot well.
If you are unsure of the root condition then do the centre portion and outside edges all around about 2 inches. Then begin the 1/2 HBR process in the fall after a season of recovery. The other 1/2 HBR could come the following spring if the tree is responding well.

PS: do not be concerned about the need to continue refining techniques at this point. Let it grow while you establish the proper root ball and vigour in the new container. The process will be much faster in the long run.
 
Last edited:

WNC Bonsai

Omono
Messages
1,900
Reaction score
2,160
Location
Western NC
USDA Zone
7b
Thanks Frank, I was hoping you’d reply. Yes, it still has all those branches and foliage so I am glad you concur with my approach. I bought some lumber today to make a flat for it, no one out here seems to know what an Anderson flat is much less sell one.
 

River's Edge

Masterpiece
Messages
4,749
Reaction score
12,763
Location
Vancouver Island, British Columbia
USDA Zone
8b
Thanks Frank, I was hoping you’d reply. Yes, it still has all those branches and foliage so I am glad you concur with my approach. I bought some lumber today to make a flat for it, no one out here seems to know what an Anderson flat is much less sell one.
With the wood flat, be sure to put slats under to allow air movement and drainage underneath. Also make it a bit deeper for this stage, say six inches. If you need a visual i can post a style that works well for me with pines. Just adjust size to your requirements.
 

River's Edge

Masterpiece
Messages
4,749
Reaction score
12,763
Location
Vancouver Island, British Columbia
USDA Zone
8b
Here is a quick snapshot of my typical build for grow box or collection box. Note bottom rails and side rails. Ventilation and drainage from bottom rails. Easy handling and extra anchor points from side handles.
I use waterproof glue, deck screws in the corners and handles. Prefer cedar boards but also use whatever is on hand. Hope it helps.
 

Attachments

  • IMG_0889.JPG
    IMG_0889.JPG
    125.3 KB · Views: 82

WNC Bonsai

Omono
Messages
1,900
Reaction score
2,160
Location
Western NC
USDA Zone
7b
That is similar to boxes I have built in the past although without the feet and hand rails. I use exterior deck screws and PT wood for durability then add aluminum screen to the bottom followed by widely spaced slats for drainage. I considered adding feet but since they ae sitting on old bricks I figure that provides enough drainage. The hand rails are a good idea as these can get pretty heavy after watering. The wood I just bought are 1x8 although I now think that 1x6 might be sufficient in most cases.
 

River's Edge

Masterpiece
Messages
4,749
Reaction score
12,763
Location
Vancouver Island, British Columbia
USDA Zone
8b
That is similar to boxes I have built in the past although without the feet and hand rails. I use exterior deck screws and PT wood for durability then add aluminum screen to the bottom followed by widely spaced slats for drainage. I considered adding feet but since they ae sitting on old bricks I figure that provides enough drainage. The hand rails are a good idea as these can get pretty heavy after watering. The wood I just bought are 1x8 although I now think that 1x6 might be sufficient in most cases.
I have used either size but prefer the 1 by 6 usually. I do not use PT wood out of concern for the chemical additives and the possible affect on the trees. I have stopped using screen. Instead i leave a 1/4 inch gap between the bottom boards for drainage. I always use a shallow drainage layer of coarser material that will not fit through the gap.Just some additional info to consider.
 

WNC Bonsai

Omono
Messages
1,900
Reaction score
2,160
Location
Western NC
USDA Zone
7b
Well since the pine’s candles are starting to move I got busy today and built some boxes—sort of an amalgam of your design and mine. I kept the screen and added the feet and handholds. I initially made three since I had the saw set up—one 18” sq and two 24” sq. Then I took a look at them and decided there is no way I would ever be able to move one of those 24” devils let alone pick it up, so I pulled out the screws and cut them down to 18” too! Tomorrow I need to sift some more pumice, hadite, and composted bark, then I’ll be ready for the real work. The two extra will be used for the yews in my neighbor’s yard that he wants gone in the next couple months. I’m really looking forward to that job!
 
Top Bottom