Pottery beginnings

CodeMonkey

Mame
Messages
169
Reaction score
276
Location
UK
USDA Zone
9a
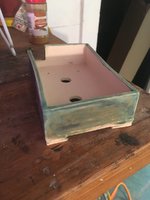
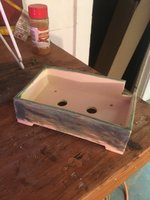
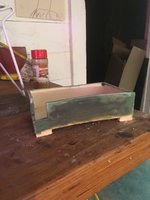
I've finally taken the plunge and started playing around with clay to make pots.

After a few years of being inspired by all the talented people on here I thought I'd give it a try, and I love it! It's like being a kid again, except with chemicals and a kiln...

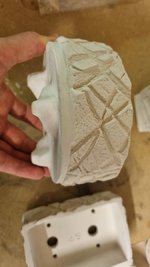
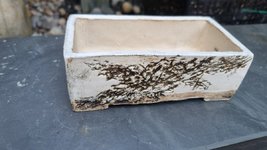
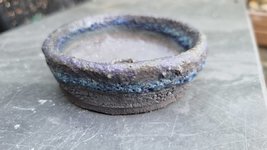
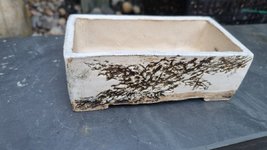
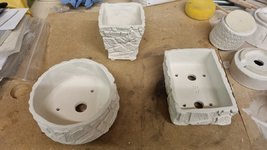
Here's a few pics of my first attempts.
The amount you learn from a single firing is incredible.

If anyone has good resources for inspiration or techniques, please fire away!

20210902_204550.jpg
20210902_204624.jpg
20210902_204727.jpg20210906_174435.jpg20210906_174453.jpg20210906_174506.jpg20210906_174542.jpg20210906_174613.jpg20210906_174637.jpg
 

HorseloverFat

Squarepants with Conkers
Messages
11,356
Reaction score
16,221
Location
Northeast Wisconsin
USDA Zone
5a
Good stuff!

I like your style.. texture heavy..

deep texture... looks chunky BUT intentional... so “Chunky done right”

My only piece of advice is...

The clay is NEVER “done”.. until you fire it... I slowly work my edges THROUGHOUT the drying process... brushing on more slip if i “grog out”

Can’t wait to see more from you.
 

sorce

Nonsense Rascal
Messages
32,912
Reaction score
45,593
Location
Berwyn, Il
USDA Zone
6.2
I like em too, original.

(Deleted anti white clay rant).
It'd be the only time I'm pro stain, to hide that white privilege.🤣
That white one is my fave though!

I think I'm really upset with that yellow one, cuz it's so dope, but so white. I feel like you should hear this thing about .... Trying new glazes on test tiles, using whole pots with glazes you are sure of. I have a lot of regret due to this. I'm assuming you were worried about it running off that pot? I been using a 1mm wide 45 bevel on the feet, and even the runniest combos find it hard to drip passed. Too much glaze can run over, but identifying too much is easier, shouldn't happen but once.

I look forward to this progression.


Morce.
 

Gaea's listener

Yamadori
Messages
92
Reaction score
161
Location
Ontario, Canada
USDA Zone
5b
well done, beautiful pots! Looks like you have your technique down for the geometric shapes. For inspiration, my go to is Greg-ceramics on youtube. Few videos, but each one excellent. Here's the channel:
keep on learning and experimenting! If you can imagine it, you can make it.
 

sorce

Nonsense Rascal
Messages
32,912
Reaction score
45,593
Location
Berwyn, Il
USDA Zone
6.2
Unfortunately, Phil from Washington Street Studios passed recently. ☝️ So that series of excellent knowledge has come to a...well changing hopefully, but end for now.


Morce?
Morce.
 

CodeMonkey

Mame
Messages
169
Reaction score
276
Location
UK
USDA Zone
9a
Thanks for all the replies, advice and resources to look at. That'll keep me busy!

@sorce, you are right about the white clay! I also really dislike it. It was the first clay I tried, but it's such a great clay to work with I'll probably keep using it but stain any bare areas. And yes I was expecting the glaze to run. I did about 30 test tiles in this first fire so I know where I stand a bit more now.

The cascade pot turned out too glossy so that's something to work on.

Great stuff, I really like this oneView attachment 396364what are the measurements of it
thanks! It's a bit of an odd size and it's warped a lot (more before it was fired than during). It was my first attempt! I'm planning to make a couple more similar ones but better executed in my next batch.
 

HorseloverFat

Squarepants with Conkers
Messages
11,356
Reaction score
16,221
Location
Northeast Wisconsin
USDA Zone
5a
Thanks for all the replies, advice and resources to look at. That'll keep me busy!

@sorce, you are right about the white clay! I also really dislike it. It was the first clay I tried, but it's such a great clay to work with I'll probably keep using it but stain any bare areas. And yes I was expecting the glaze to run. I did about 30 test tiles in this first fire so I know where I stand a bit more now.

The cascade pot turned out too glossy so that's something to work on.


thanks! It's a bit of an odd size and it's warped a lot (more before it was fired than during). It was my first attempt! I'm planning to make a couple more similar ones but better executed in my next batch.
Those Bentonite-based, fine-grogged, white bastards’ll do that... let THAT particular clay “sit” longer AFTER cutting and BEFORE construction.. also, after construction.. once significantly past-leather hard.. Rotate your piece as it dries.. changing gravity’s pull during drying.
 

CodeMonkey

Mame
Messages
169
Reaction score
276
Location
UK
USDA Zone
9a
Those Bentonite-based, fine-grogged, white bastards’ll do that... let THAT particular clay “sit” longer AFTER cutting and BEFORE construction.. also, after construction.. once significantly past-leather hard.. Rotate your piece as it dries.. changing gravity’s pull during drying.
Thanks for the tip!
I've found some success in slowing the dry time down. Plastic bags seem to do the trick for now.

I'm trying out some different bodies at the minute. I have a heavy grogged black and it's unbelievably sticky. Both a blessing and a curse!
 

HorseloverFat

Squarepants with Conkers
Messages
11,356
Reaction score
16,221
Location
Northeast Wisconsin
USDA Zone
5a
Thanks for the tip!
I've found some success in slowing the dry time down. Plastic bags seem to do the trick for now.

I'm trying out some different bodies at the minute. I have a heavy grogged black and it's unbelievably sticky. Both a blessing and a curse!
I’m becoming a fan of this “unpulpable grog” I just got some black stoneware from Spain.. the company uses that grog alot. SIO.


unbelievably sticky.
It’s cool! I get to help you out MAJORLY right here! I remember being helped THIS EXACT SAME WAY (Thanks @sorce ;) )

You gotta let the clay dry longer before working, I PROMISE.. If the clay is STICKING to anything... it’s NOT ready. It’s gotta be “plastic” (look it up if you don’t know) before i’ll cut/score my pieces.. and “leather” (look it up again ;) ) before I will assemble.

This ONE thing.. will help you IMMENSELY... I just know it..

I believe Sorce said, to me, “Clay ON the hands is a waste of time.. Clay IN the hands is money”. (Or SOMETHING like that)

Also, because we are “here”, already, let’s talk compression... how are you Rolling/wedging?

Just slab or are you gonna try wheel?
 

CodeMonkey

Mame
Messages
169
Reaction score
276
Location
UK
USDA Zone
9a
You gotta let the clay dry longer before working, I PROMISE.. If the clay is STICKING to anything... it’s NOT ready. It’s gotta be “plastic” (look it up if you don’t know) before i’ll cut/score my pieces.. and “leather” (look it up again ;) ) before I will assemble.
I had kind of come to that conclusion after first attempting to use the clay. It was difficult to roll it was so sticky! I ended up leaving a block under a damp towel overnight and it was much better the next day. I guess I need to add a bit more drying time BEFORE I attempt to make my slabs. Thanks for the tip!

Also, because we are “here”, already, let’s talk compression... how are you Rolling/wedging?

Just slab or are you gonna try wheel?

Currently I've been rolling all my slabs between wood slats, but I have just purchased a bow harp to give that a go (purely because I like texturing the clay via drying/stretching, which is hard to do after rolling).
I need to get better at wedging! It's lucky the clay I get has been pretty great out of the bag.

Only slabs for now, although a wheel is tempting for the future!
 

HorseloverFat

Squarepants with Conkers
Messages
11,356
Reaction score
16,221
Location
Northeast Wisconsin
USDA Zone
5a
Groovy!

Gotta learn that.. “dry enough to cut” doesn’t necessarily mean “dry enough to fabricate”

Try: Cut all your pieces.. (put ones intended for stretching under a mixing bowl/tupperware/whatever) wait until those pieces AREN’t bent by gravity alone, before construction... clay has a memory.. and continues to “settle” after it is VISIBLY “dry”...

🤓

I don’t do wheels, either..

I’d like to.. someday.

Seriously, though.. if any clay is sticking to your clean, sharp tools... it’s too wet...try it both ways.

🤪
 

sorce

Nonsense Rascal
Messages
32,912
Reaction score
45,593
Location
Berwyn, Il
USDA Zone
6.2
Generally anything shipped should contain @20% water.
That said, clay materials will make a slight difference in "ready" time, but they all should roughly fall into the same "window" of readyness. Where porcelain on the early end may bend a little, and grogged stoneware may be a little dry, which makes more mess when scoring. But everything in this window can be used to make a useable product.

The safest, most consistent, and efficient way to get to this window is simply the material you are working on.

Since Plaster and Drywall both wreak havoc if they contaminate the clay, and they dry too fast, till they contain too much water, then they dry too slow, which leads to frustrating inconsistent....

I use and fully recommend ONLY HardiBacker 1/2 "cement" board.

Don't know if it's available in the UK, but I swear to God I'd pay to have it shipped in, it's that valuable.

Grogged stoneware can be rolled out instantly, porcelain takes a bit longer, but this time also allows the more compression ribbing porcelain appreciates to remain straight.

6-12 strokes straight down, 1/4 turn, repeat till all 4 directions complete, flip, repeat the process.
Grogged stoneware is ready when both sides are complete.
Porcelain after both sides are done twice.

Side note...
It takes some practice, but I've found that holding the (wooden) rib at different angles is also better for each.

Stoneware, / ➡️.
Porcelain, ⬅️/.

Sorce
 
Top Bottom