Pottery making advice please

JeffS73

Shohin
Messages
421
Reaction score
786
Location
South Yorkshire, UK
USDA Zone
8b
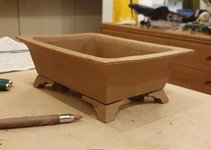
Potters, you're advice please - I started making my first bonsai pot over the Christmas break:

20211231_171504.jpg

I'm still working one the feet, but I noticed the pot is drying out and starting to pull up at the corners:
20220101_181119.jpg

Its the same on all the corners. I'm keeping it rim down on a flat board in a plastic bag overnight, and the main body was quite dry when I started on the rim, like a day or two later. I'd say the pot is at least leather hard, i can smooth it a little with the mudtools but not much more. Is this a difference in drying rates? Can I fix it? It's got its faults, but I'm not making a banana.

Thanks for having a look.
 

Cruiser

Chumono
Messages
664
Reaction score
1,446
Location
Western Washington
USDA Zone
8a
Looks good so far. I’d be proud if that was my first pot.
Unfortunately, I have no experience making these so I can’t answer your question. But I am signed up for a ceramics class later this month and plan to start… so I’m curious to hear answers as well.
 
Last edited:

sorce

Nonsense Rascal
Messages
32,912
Reaction score
45,595
Location
Berwyn, Il
USDA Zone
6.2
I think it has more goods than faults.

I like the "live edge".

I would like to better understand how you got from no rim to rim, to try to understand the thickness around your thumb area, and wether the walls are the same thickness of what that "live edge" shows.

The simple answer is drying.

That is absolutely useless to you without knowing the rest of this information.

What Clay? Do you know what the Clay Body is made up of?

Sorce
 

JeffS73

Shohin
Messages
421
Reaction score
786
Location
South Yorkshire, UK
USDA Zone
8b
I think it has more goods than faults.

I like the "live edge".

I would like to better understand how you got from no rim to rim, to try to understand the thickness around your thumb area, and wether the walls are the same thickness of what that "live edge" shows.

The simple answer is drying.

That is absolutely useless to you without knowing the rest of this information.

What Clay? Do you know what the Clay Body is made up of?

Sorce
It's a shop bought terracotta which can be high fired to 1280c and has low porosity when high fired. I don't know if this is a good idea, I was extrapolating from a UK bonsai potters posts/videos, he high fires a terracotta clay for his unglazed pots. I figured it'd be an OK place to start.

Construction wise, I stuck sides together, base on, turned top down and trimmed the top edge. I put this on a new slab, and cut round with a width for the rim. Slipped this on, then ran a bead of fresh clay round the join and feathered it in with a rib.

First time it ended feathered to the deck, then I realised my mistake, trimmed back and feathered to a 5mm guide to keep a 5mm rim. I don't know how it picked up so much wonk!
 

JeffS73

Shohin
Messages
421
Reaction score
786
Location
South Yorkshire, UK
USDA Zone
8b
Should I have scraped back the inside once the rim was on to maintain a 5mm shell? It's probably thicker in the rim area.
 

sorce

Nonsense Rascal
Messages
32,912
Reaction score
45,595
Location
Berwyn, Il
USDA Zone
6.2
If I'm correct, we have different words and definitions for "Terra Cotta" here and there.
I believe you guys name it such for the color, where what we call Terra Cotta is more for the firing temp, more synonymous with Earthenware, that will melt to puddles way under 1280C, doesn't really shrink enough to warp at any stage, and usually contains enough natural grog to stay stiff.

This would be worth investigating for yourself, to find out what the actual composition of the clay body is. Not that knowing it will have much bearing on what you will do currently, but rather, to be able to compare this and other clay bodies, to narrow down what types of clay work well with your process. It will also help you understand why things actually happen, on a deeper level than "drying". Grog aside, which would have the largest impact, even the mesh size of each of the individual 4-7 components will make a noticable difference on how a body works and dries.
4-7 components and 4-7 mesh sizes in different combinations of any leaves for a near endless amounts of "it depends' ". (That's neurotic level stuff, but it seems you're into it that hard, the tolerances for Tesla axels is greater than that warp!)

I think it's more reasonable to understand just 3, a really groggy clay, a non-grogged stoneware, and porcelain.
This clay seems closest to a non-grogged stoneware which would include low amounts of grog and/or fine grogged clays.

A highly grogged clay and porcelains have the ability to retake on water and distribute it back throughout drier parts more easily. Drying warps with these tend to be uniform as such, and present evenly, as you would expect by gravity, and other external physical forces.
A non-grogged stoneware is more prone to rewet unevenly, the inconcistencies leading to drying warpage because of uneveness, which will present more oddly than external forces.

What I would fear most in your scenario, is cracks running perpendicular to your joiner bead. This can happen because that thicker section will dry last, and if the rest of the pot is already stiff and Max shrunk, the bead section cracks to allow for it's still needed shrink. If the pot itself is too thin to beat the crack, the crack may go through the pot itself.

These things can be lessened and negated with bags and even drying, but I don't play that BS. Plus knowing these things can have you bagging for a reason if you so chose, working to keep this problem from happening in the first place, and maybe testing out some other clays if they work better for your process.

If that rim slab piece was straight and dry before you applied it, the rewetting of it may have caused it to dry curled up, this may be easily lessened with more even drying.

I think it is more likely that the bead and it's application is the actual culprit. This is where the greatest force WILL come from when drying, no matter how slow, so this should be considered the first and largest enemy.

Truth though, that could fall back into perfect position upon firing, I wouldn't worry about it much.

Oh PS! I finally got me some Cornwall Stone for some new glazes! Shout out UK!

Cheers!

Sorce
 

JeffS73

Shohin
Messages
421
Reaction score
786
Location
South Yorkshire, UK
USDA Zone
8b
Thanks Sorce, I really appreciate your thoughts on this. Lots to take on board, that's the attraction of the task, the whole process is absorbing and leads to a deeper respect of the craft and skills required.

I'll watch how this pot pans out. If it cracks, hopefully I'll learn something. I worked it in quite a warm, dry environment, over a few days, so there's a lot of difference in the moisture levels of respective parts. The rim was stuck on top down, then the bead pressed on. It also went into the bag top down.

I'll try making another in one go now I know the process, maybe outside where its cooler and damper, and see if I can dry it slower and more evenly. Perhaps I can make some simple test pieces to see how they change when drying.

I found the tech sheet for the clay (attached), you're right it is fine grogged, but confess I don't understand clay composition yet. Any good books you can recommend? I don't expect it'd be covered in a class.
 

Attachments

  • Ateliermasse Red 4005 - Technical Data Sheet.pdf
    152.2 KB · Views: 2

sorce

Nonsense Rascal
Messages
32,912
Reaction score
45,595
Location
Berwyn, Il
USDA Zone
6.2
Frank Hamer's "A Potter's Dictionary of Materials and Techniques".

I found this about "chammotte".

Not quite a "grog" as we would enjoy it, I think the only reason it works for these sanitaryware pieces is because they are likely formed with hydraulic presses to achieve a level of compression we can't reach with hands. Truth, it's probably added to commercial clays more because the word sounds cool than physical usefulness.

I've found that some clays, usually "buff", have the ability to be fired between cone 6 to 10 and remain vitreous and solid throughout. Seems every company has at least one of these.

Seems this clay doesn't fit into that category. If I'm to believe every company is on the up and up (I most certainly do not!) I would take their numbers at face value. Seems they "say" it can be fired to 1260C, but I read this as "it won't melt". It's worth remembering that there are absolutely NO ceramics that undergo the rigours of a bonsai pot, it is a complete blind spot in the commercial clay industry, which is already only in existence as basically "eating the scraps off the table" of larger more profitable industries, without which, clay producers couldn't even financially exist. So Bonsai Pots are a blind spot in a blind spot, no one gives a shit about us.

That said, these numbers are extremely important.

Read the "firing range" with this in mind. There are many things, mostly indoor art, that can be made within this firing range, so the purpose of including it in the specs, could very well be only to sell more product.
I would stick to the recommended firing temperature of 1100C. (Which doesn't seem to pan out well for your purposes) At that temp, shrink is 9%, but absorption is 7%, which would necessitate a open/closed porosity test to determine frost proofedness. https://digitalfire.com/article/outdoor+weather+resistant+ceramics

But to be honest, I don't think it would be worth the time.

I appreciate the shrink/absorption chart.
If you follow it all the way to 1260C you see a slight drop in shrink from 1220C, which means there is an expansion at those temps, which can only read as "bloating" or a "boil over", introducing air filled pores inside the body. With absorbtion continuing to drop at these temps it means the outside of the clay will have formed a melted glass-like "skin" around this porous expansion, which will certainly be a very brittle, fragile pot, not likely that which can withstand tree roots, certainly not something that can withstand a frost.

Argh ....I went to the Sibelco site to find some useful ones, but of course the "tool" they use doesn't allow a search by absorption. I guess this is just proof of little the industry cares about us!

I would try to find something that reads under 2% absorption, these typically test vitreous and you should have to worry about that lengthier open/closed test.

I'm going to come back with more on drying.

Sorce
 

penumbra

Imperial Masterpiece
Messages
9,451
Reaction score
16,091
Location
Front Royal, VA
USDA Zone
6
Yeah, Sorce understands his clay chemistry well.
That 7% absorption rate is a real problem. My eyes popped out at that. The clay I use for my Stone Age stoneware pots has an absorption rate of less than .25%. I use a variety of clays, non of which is over 2% and those I use for bonsai pots are under 1%.
 

JeffS73

Shohin
Messages
421
Reaction score
786
Location
South Yorkshire, UK
USDA Zone
8b
Argh, ok, thanks for taking so much time explaining it. I took a bit of a punt which is starting to look like a bad Hail Mary. Maybe I'll use the rest for some indoor pots.

I'll start the search for some more suitable clay bodies, I can already see that I'll probably end up taking a walk down your path of creating my own if as you're saying, the needs of a bonsai potter aren't met by shop bought.

My plan at the moment is to make slab built unglazed pots, so if anyone can recommend a suitable clay, please let me know!

Thanks Sorce and Penumbra.
 

Crawforde

Chumono
Messages
670
Reaction score
1,197
Location
Florida
USDA Zone
9b
Sorry guys.
but this thread hasn’t lived up to my expectations.
the questions were good
The answers and the lesson were excellent.
but,
where is the nonsense and humor?
I’ve become spoiled and now expect the whole package!
thanks Sorce!
and Jeff, welcome to the party! Happy 2022.
 

HorseloverFat

Squarepants with Conkers
Messages
11,356
Reaction score
16,223
Location
Northeast Wisconsin
USDA Zone
5a
where is the nonsense and humor?
I’ve become spoiled and now expect the whole package!
I can’t help but feel partially to blame.. for all my “accepted” nonsense! 🤣

I want “in” on this discussion..

I just gotta go grind some stuff.. and light some stuff on fire.. and inhale, concentratedly in one direction...

Should be like 15-20 minutes. 🤓
 

HorseloverFat

Squarepants with Conkers
Messages
11,356
Reaction score
16,223
Location
Northeast Wisconsin
USDA Zone
5a
Your work looks good.

I agree with information given.

I messed around with low-fire stuff for a good chunk of time.. but that’s just because low-fire clay was all I could harvest within like 200 miles.. climbing dune cliffs and wading through “surf” to get to the best veins.. Filtering and mixing in big ol’ rubbermaids... that was fun..Check your Local geographical Surveys to find the types of clay present.

But yes.. if PURCHASING clay... low-fire limits your effectiveness in dealing with “flora” for a scad of reasons. If i am acquiring clays.. the LOWEST fire I will consider is 5.. I just always shoot for 6... alot ofmid-range clays have a nice, sweet, cone 5-7 window.
 

HorseloverFat

Squarepants with Conkers
Messages
11,356
Reaction score
16,223
Location
Northeast Wisconsin
USDA Zone
5a
But having said that..

Clay for me..

Is like Plants...

I LOVE plants. I really enjoy Bonsai... but... my love for plants does NOT hinge or depend on bonsai.

I LOVE clay/working with clay. I really REALLY enjoy Bonsai-geared clay fabrications... but... my love of clay/working with clay.. would NOW exist.. even without bonsai.

Think differently about any low-fired operations.. alter your expectations..

For instance.. my next local clay project will be..... a chess set.

🤓
 

sorce

Nonsense Rascal
Messages
32,912
Reaction score
45,595
Location
Berwyn, Il
USDA Zone
6.2
I didn't want to download this PDF, cuz it's a PDF and I hate downloading PDF, mostly because I had so little space on my device the other day, I couldn't even delete stuff. Yeah, couldn't even delete stuff! Lol


I'd make a list of everything below 2% absorbtion, then dive into those to read their seperate charts like the one you found for this clay, to make sure which are good at the actual recommended temperature.

Drying cont'd....

I don't use clays that need to be bagged, a personal preference, but my argument is it's a waste of anyone's time. In studying process to understand how it aids on not needing to "slow dry" (which should be read as EVEN dry because slow only facilitates even, if even could be done in one second it would work just as well) there are a couple things I came up with.

I think it is important to understand this most, and why I believe you ought'nt dry them upside down.
Because of the natural outward taper when right side up, and the tendency for them to dry from the top down, the larger parts are drying and shrinking to meet the smaller lower part.

Upsidedown, the smaller part dries first, and it shrinks making it even smaller than the larger part below, this backwards size differential introduces more stress.

Rectangle rectangle....because of drying shrink percentages....rectangles are the most difficult shape to get right.
Level 3 Blind spot if you will!

I have begun to attach long sides first as a rule.
This allows the last thing to be wet (in a way, not perfected yet) the shorter sides. That allows time for the longer sides to dry/shrink more first, which balances out the differential, which makes them warp less.

Because the shrink is the same %, the longer the long side, the more distance it shrinks than the short side. This is the differential we should seek to offset.

It's not perfect yet, but every part of my method is utilizing every bit of physics to make for no cracks in or warps. There are so few things to correct for, I find it foolish to bag stuff, or attempt to dry them slow or even, because it just introduces more risk than finding the way to correct the few things that go wrong allowing them to dry in the open. Which can usually be tracked down to just a bit too much water attaching feet or walls.

Once bagged or otherwise "slowed", depending on the water movement through the specific body of course, a wall that was already dry and shrunk, will begin to expand again as it redistributes water through the piece. This is stress akin to bending metal over and over again, every redistribution makes the pot weaker, even if it never shows.

With this pot shape of yours, I think simply setting a piece of wax paper on top or otherwise slowing the rim just a bit, will allow you regular out in the open drying where all physics work in your favor. It should even the dry of the rim and the thickest bead part, then dry down the rest of the way fine.

Sorce
 

HorseloverFat

Squarepants with Conkers
Messages
11,356
Reaction score
16,223
Location
Northeast Wisconsin
USDA Zone
5a
Yeah.. my “drying/gravity WHILE drying” regimen is RIDICULOUS...
With this pot shape of yours, I think simply setting a piece of wax paper on top or otherwise slowing the rim just a bit, will allow you regular out in the open drying where all physics work in your favor. It should even the dry of the rim and the thickest bead part, then dry down the rest of the way fine.
This is fantastic advice...especially until you fire your pieces and find out what’s REALLY going on.
 

sorce

Nonsense Rascal
Messages
32,912
Reaction score
45,595
Location
Berwyn, Il
USDA Zone
6.2
advice...especially until you fire your pieces and find out what’s REALLY going on.

I can't second this enough.

So much information gets conveyed after firing, it near makes absolutely no sense to put much effort into anything before this stage.

"Near", because you don't want to be throwing stuff out for years, but it is imperative to get through a cycle to know how to recycle the cycle to make gains.

I want my information to provide as much insight into this as possible, to reduce the waste, but there is no substitute for completing a cycle.

I'm on year 3? With this gas firing, just getting to an appropriate schedule after around 30 firings.

Don't even get me started on adjusting firings for the ever weakening power of elements in an electric kiln. It makes it so that every first and last firing of one can be chalked up to a complete waste.

Fuck electric basically.

Unless you are working with a modern controller and 3 thermocouples to cover the entirety of the kiln, and ALWAYS use witness cones to ensure a proper firing.

ALWAYS USE WITNESS CONES TO ENSURE A PROPER FIRING!

Having a rock solid understanding of the 3 types of heat transfer, conduction, convection and radiation, is also imperative to properly loading a kiln for "even" heat.

The design of my kiln "DebbieZula" is such that, if I underload the top it can overfire due to radiation, and if I overload the top I can overfire do to conduction.

There is information out there about mass and how it effects the firing, but there is a deeper understanding of how to use mass, in combination with an understanding of what that mass ends up providing via heat transfer, that can answer questions and solve problems more completely.

The bottom of DebbieZula is so far away from Radiation, that large masses never get to the point of providing much convection or conduction heat transfer. So it must be loaded with less mass in order to fire correctly.

Recycle the cycle.

Sorce
 

JeffS73

Shohin
Messages
421
Reaction score
786
Location
South Yorkshire, UK
USDA Zone
8b
I would double like that drying advice if I could. These physical processes make sense when explained.

Kilns - my plan was to build gas fired, but now I'm doubting that and think electric might be a good idea because if I've got to experiment with making clays, it would be so much easier to iterate with an electric and programmer.

I'm in bit of an overthunk funk about it!

At least I can experiment with the clay, thinking about sprig moulds and cloud feet...
 
Top Bottom