Powerful Japanese Zelkova

BobbyLane

Imperial Masterpiece
Messages
6,062
Reaction score
17,708
Location
London, England
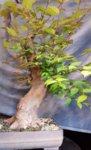
This is a new addition. the tree was grown from seed in the UK for 32 years, 15 in the ground and the rest in a container. the trunk had movement wired in very early.
great movement and the nebari under the soil is outstanding. very raw material, so ive documented the first steps.....

20190202_200532 by Bobby Lane, on Flickr
20190203_160857 by Bobby Lane, on Flickr
20190203_160828 by Bobby Lane, on Flickr

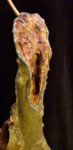
i first thought about chopping below the ugly knuckle. but it would be a shame to waste that apical branch, why set the tree back, when i can just as well move it forward?!
if i had chopped it, i'd then have to wait and hope new buds pop in the right places, then chop again and grow up a new leader....

so i decided to start reducing the large ugly knuckle and introducing taper, yep you guessed it, through carving!:cool:

EEK!
20190203_160814 by Bobby Lane, on Flickr
20190203_160745 by Bobby Lane, on Flickr
20190203_160730 by Bobby Lane, on Flickr

thats as far as i went, big improvement going forward
20190203_170533 by Bobby Lane, on Flickr

i like this as a front, but the tree has a few good angles, due to the carving carried out
20190203_170507 by Bobby Lane, on Flickr

based on existing branches/nodes i see this type of shape forming
20190203_170507 by Bobby Lane, on Flickr
 

BobbyLane

Imperial Masterpiece
Messages
6,062
Reaction score
17,708
Location
London, England
20190203_175429.gif

i can see that im going to have to do a little minor work on that circular hollow, its obvious there was a saw chop made there....
zelkova wood is very pithy, not nice to carve at all. ive already went about treating the dead areas with wood preserver and tomorrow im going to apply some gorilla glue as a second layer.....this will solidify the dead wood in the apex long term.

this stuff
https://www.amazon.co.uk/Gorilla-Or...6874&sr=1-1-spons&keywords=gorilla+glue&psc=1

Now i can begin building branch structure, with everything in the right place...

Update later
 
Last edited:

BobbyLane

Imperial Masterpiece
Messages
6,062
Reaction score
17,708
Location
London, England
Hey Bobby, does the wood hardener and gorilla glue dry to a matte finish?

Here you go Wilson, some views of the deadwood...
this is the kaizen deadwood preserver which also doubles up as a dark tan.its almost a similar colour to the rotting wood in the hollows, 20190203_184000.jpg

after ive applied the gorilla glue ill show you how it looks. ive not used it before, but it also leaves a tan colouration according to description. 100% water proof
i wouldnt say matt, it might have a slight shine, which is fine.
 

Attachments

  • 20190203_184026.jpg
    20190203_184026.jpg
    106 KB · Views: 50
  • 20190203_171454.jpg
    20190203_171454.jpg
    126.5 KB · Views: 57

Wilson

Masterpiece
Messages
2,355
Reaction score
4,388
Location
Eastern townships, Quebec
USDA Zone
4
Here you go Wilson, some views of the deadwood...
this is the kaizen deadwood preserver which also doubles up as a dark tan.its almost a similar colour to the rotting wood in the hollows, View attachment 225705

after ive applied the gorilla glue ill show you how it looks. ive not used it before, but it also leaves a tan colouration according to description. 100% water proof
i wouldnt say matt, it might have a slight shine, which is fine.

Looks great!
 

Cattwooduk

Shohin
Messages
496
Reaction score
694
Location
Bristol, UK
Gorilla glue cures to a yellowy-amber kind of colour and looks a bit like solid amber/honey when it's gone off hard. I would get it on as thin as physically possible because it expands quite a lot as it cures and you see bubbles in it. It's brilliant stuff but having used it loads for various fixes I'd say use sparingly and carefully because it makes a mess real easily!
 

Lars Grimm

Chumono
Messages
837
Reaction score
1,606
Location
Durham, North Carolina
USDA Zone
7
Great material and work as always. I will admit that I don't like the proposed front without carving. The movement and taper is nice, but if feels schizophrenic to have a clean unblemished front and then a heavily carved back. Have you considered adding some carving on the 'clean' front, maybe contiguous with the back side. That way when you view it from the side it has a more consistent appearance?
 

BobbyLane

Imperial Masterpiece
Messages
6,062
Reaction score
17,708
Location
London, England
Gorilla glue cures to a yellowy-amber kind of colour and looks a bit like solid amber/honey when it's gone off hard. I would get it on as thin as physically possible because it expands quite a lot as it cures and you see bubbles in it. It's brilliant stuff but having used it loads for various fixes I'd say use sparingly and carefully because it makes a mess real easily!

thanks Cattwood, ill bear that in mind. maybe ill just dab it in the crevices of the hollows to start with, using small brush. once its dry it can be stained, according to description.
 

BobbyLane

Imperial Masterpiece
Messages
6,062
Reaction score
17,708
Location
London, England
Great material and work as always. I will admit that I don't like the proposed front without carving. The movement and taper is nice, but if feels schizophrenic to have a clean unblemished front and then a heavily carved back. Have you considered adding some carving on the 'clean' front, maybe contiguous with the back side. That way when you view it from the side it has a more consistent appearance?

cheers mate, appreciate your feedback. thats a little strange you see it that way. deadwood is not always consistent throughout a tree. for this material i dont think its necessary to have deadwood on the clean side.
zelkova wood isnt really good for deadwood features. if i could of, i would have avoided it in the top, but was essential to get taper and natural looking movement.
 

Cattwooduk

Shohin
Messages
496
Reaction score
694
Location
Bristol, UK
thanks Cattwood, ill bear that in mind. maybe ill just dab it in the crevices of the hollows to start with, using small brush. once its dry it can be stained, according to description.

Stick a few blobs and smears on a throw away piece of wood some time before you use it on your tree , just to get a good idea of what happens. It caught me out the first couple of times I used it!
 

BobbyLane

Imperial Masterpiece
Messages
6,062
Reaction score
17,708
Location
London, England
@dirk hoorelbeke hello mate, i had to google it, looks pretty legit and dries clear

anyway, so i have a applied some of the gorilla glue, its pretty strong stuff, its like a thick honey in texture, best applied in drops on a paint brush or it will bubble up a LOT if applied from the bottle!

its a little shiny but i think it will dull down in a few months, similar to the way ronseal wet rot wood hardener does
2019-02-05_09-37-59 by Bobby Lane, on Flickr

here its dried, you can wipe away bubbles with a cloth, it feels almost like a thin coat of plastic
20190205_212714 by Bobby Lane, on Flickr
2019-02-05_09-40-58 by Bobby Lane, on Flickr


i did a little on this hollow , bit more convincing i think, rather than a round chop
20190204_204659 by Bobby Lane, on Flic

20190205_161943 by Bobby Lane, on Flickr

nebari close up
20190205_164520 by Bobby Lane, on Flickr
20190205_164656 by Bobby Lane, on Flickr
 

TN_Jim

Omono
Messages
1,972
Reaction score
2,443
Location
Richmond VA
USDA Zone
7a
The shifting image in #2 is kinda...disturbing :oops:;)
 

BobbyLane

Imperial Masterpiece
Messages
6,062
Reaction score
17,708
Location
London, England
update..
this one has grew strongly, im currently in the process of growing out the left side, so for the past few weeks the tree has been positioned so that side gets all the sun....

the plastic pot was too wobbly n flexible, so was tranferred to this rectangle of a similar size n shape, it will remain in this pot for a long time...

eventually, as the tree seems to be moving right....i want the canopy to enhance that feeling, so the branches on the right could be a little longer than those on the left...the right branches will be styled to dip n cascade over edge of pot and left branches ascending upwards....

this would be a tree i would like to exibit one day..
20190509_101648.jpg
 

Attachments

  • 20190509_101748.jpg
    20190509_101748.jpg
    134.3 KB · Views: 45
  • 20190509_101756.jpg
    20190509_101756.jpg
    98.4 KB · Views: 32
  • 20190509_101954.jpg
    20190509_101954.jpg
    157 KB · Views: 31
  • 20190509_101900.jpg
    20190509_101900.jpg
    186.6 KB · Views: 41
  • 20190509_101514.jpg
    20190509_101514.jpg
    154.6 KB · Views: 100

BobbyLane

Imperial Masterpiece
Messages
6,062
Reaction score
17,708
Location
London, England
hi mate, no plans to do any thinning or bud selection, normally i would of already done bud n branch selection. im going with the hedging method on this and a few other trees. this wont be hacked back until mid to end of june...

insert is a cutting taken from the old lump of wood at the start,
 

Attachments

  • 20190509_141812.jpg
    20190509_141812.jpg
    360 KB · Views: 109

Colorado

Masterpiece
Messages
3,134
Reaction score
8,316
Location
Golden, Colorado
USDA Zone
5b
Your carving skills are very impressive!

Can you recommend a few essential tools that you use? I’m sure you have a bunch but what are the most important tools that I should acquire to start practicing carving?

Thanks!
 

BobbyLane

Imperial Masterpiece
Messages
6,062
Reaction score
17,708
Location
London, England
@Colorado hi mate, my go to tools are a terrier, termite saw, rotary wire brush, proteus, grout removal bit....if you go on the kaizen bonsai website you could read more about these tools.
 

BobbyLane

Imperial Masterpiece
Messages
6,062
Reaction score
17,708
Location
London, England
so the right hand side had become so strong, i decided to do a balanced cut back. i havnt touched the left side much apart from a couple shoots in the crown.
the two thick primary branches on the right were cut back to shoots near the trunk, these are thick enough so i can randomly clip them back to allow weak areas to gain vigour.

you can already see how the low right branch enhances the trunk movement, its coming from the rear primary, it also gives the tree great depth. this will be allowed to thicken, its been wired for movement, each bend is made at a leaf joint for angular movement, the terminal bud wired up towards the light.
this branch will become a major feature of the tree and give it asymmetry
20190529_152727.jpg
 

Attachments

  • 20190529_152050.jpg
    20190529_152050.jpg
    85.8 KB · Views: 78
  • 20190529_152315.jpg
    20190529_152315.jpg
    164 KB · Views: 40
  • 20190529_152244.jpg
    20190529_152244.jpg
    136.1 KB · Views: 37
  • 20190529_152613.jpg
    20190529_152613.jpg
    232.7 KB · Views: 34
  • 20190529_152016.jpg
    20190529_152016.jpg
    121.3 KB · Views: 38
Top Bottom