Stand up

Velodog2

Chumono
Messages
950
Reaction score
2,066
Location
Central Maryland
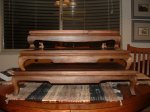
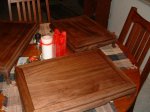
Here is a small stand I'm making from some walnut from a tree struck by lightning in our front yard a few years ago. It's a simple design with dimensions approx. 9 x 13 x 1.5 and biscuit joinery for strength. I've done cabinetry work before but this is my first bonsai stand and while the quality is not perfect I think it's quite good.
IMG_4220.JPG
IMG_4221.JPG
It's sanded to 320 grit but I'm not certain of the best way to finish it. The two wood finishes I typically use are a hand-rubbed clear laquer and a tung oil. Both give a satin surface but the lacquer is going to be thicker and smoother while the tung oil will be thinner and will allow pores to still be seen. Opinions are appreciated! Also up for debate is the option of staining it darker. The varnish will darken it quite a bit but it may still not be as dark as many stands typically used.

I would like to eventually make stands for sale and am excited to improve my skills and try new techniques and designs.
 

Random User

Guest
Messages
1,313
Reaction score
1,168
I've always been a fan of using linseed oil cut with varsol or paint thinner... easy to re-apply at any time, but the draw back is that it WILL yellow a bit over time. For me the yellowing is not an issue.

Because it's really cheap and easy to apply, I'd recommend anyone to try it on a couple of sticks of wood species that they like to work with. I re-placed the slats in an old park bench with maple, and painted the rot iron fire engine red... looks fantastic, but I have to re-apply the linseed oil every year... eventually, the wood will age and the linseed oil will thicken and harden to a point where it won't have to be done as often... but that will be long after I'm dead.

Looks good though, nice work!
 

TomB

Omono
Messages
1,143
Reaction score
6,928
Location
S.E. UK
I think it looks really good.
Darker stands are more usable, but I'd want to make sure the patterning on the wood isn't obscured.
 

Tieball

Masterpiece
Messages
3,137
Reaction score
3,213
Location
Michigan. 6a
USDA Zone
6a
Very nice work. I use a hand rubbed poly mix from Minwax. I apply several layers.

Stands people have built would make an interesting thread. Your work is excellent.
 

Dav4

Drop Branch Murphy
Messages
13,099
Reaction score
30,144
Location
SE MI- Bonsai'd for 12 years both MA and N GA
USDA Zone
6a
Looks great. I'm in Maryland too, and may buy one from you in the future if you end up making them larger. I've displayed trees in the 4th and 5th US National Bonsai Exhibition. I could use a new stand if I exhibit in the 6th USNBE depending on the tree.
What he said. Clean and simple lines... I like it a lot.
 

LanceMac10

Imperial Masterpiece
Messages
6,798
Reaction score
17,176
Location
Nashua, NH U.S.A.
USDA Zone
5
Looks like a great, simple little stand. Well assembled. I agree with @sorce, a dark stain would look great. I tend to the more traditional, though, as I have not a lot of experience.

And I certainly couldn't make something this clean!!:D:D:D:D:D
 

Random User

Guest
Messages
1,313
Reaction score
1,168
A stand?... I don't know why you wouldn't just use the annual telephone book... has anyone opened one in the last 20 years?... most times I find mine under the front step after the third or fourth rain. :p

Harleys don't leak like they used to, and we don't need them in the outhouse anymore... what use are they?
 

Velodog2

Chumono
Messages
950
Reaction score
2,066
Location
Central Maryland
Thanks everyone - great feedback as usual! I've wanted to do this literally for years and am really excited to have finally gotten this far. It's a start ...

Thanks for the input on finishes. I tend to be a traditionalist and understand darker colored stands without a lot of grain pattern are preferred for displays so as to not distract from the tree, so I favor that direction. I will need to experiment. We got a custom made bed last summer from Vermont that is cherry with walnut caps on the head and footboard that is finished with linseed oil and the walnut is a beautiful chocolate brown. I may try to contact the maker to see what stain or technique he used. Was hoping to hear from @Smoke about how he finishes his stands ...

I'm going to begin planing wood for my next one today. Probably something very similar but maybe a little bigger if the wood accommodates - maybe 11 x 16. This was my first attempt using a scroll saw for the curves and getting a smooth and even cut was not a trivial exercise! Even clamping it up when gluing was tricky. I'm pretty happy with the result but I need practice. @Nomiyama if you have an idea of what size and sort of stand you want I would be happy to attempt something at some point. As I mentioned I want to improve my skills and expand the repertoire of techniques. I can do biscuit and dowel joining, and make picture frame style tops. I would like to accomplish the triple miter joint eventually but may need better tools. Well, plenty of time to learn hopefully.

@SKBonsaiGuy - did you need coffee? Or were you channeling Andy Rooney?
 

Random User

Guest
Messages
1,313
Reaction score
1,168
I think I needed coffee... :p

FWIW, when I apply linseed oil, I don't much worry about how much thinner I use (10-20% thinner as a guess). The thinner only assists in the application and drying time, and multiple coats are required. The trick with it is, to wipe it on with a lintless rag and let it soak in as you go... but, do not let it allow to dry before wiping the excess off (with a dry lintless rag)... then allow time for it to dry before applying another coat.

I used it on Elm seats that I used to make Windsor type chairs out of (the entire chair in actuality), and it would take close to a year to fully yellow. So, if you do try it on a stick, remember that the yellowing that you are seeing at that point is not the final product. Between the yellowing and not being water proof, this limits the applications for linseed oil as a finish, but since I build a lot of my own stuff, I know that I can always refinish them should anything go wrong (like water stains). The manufacturer of your bed MIGHT have a different technique, but I doubt it.

Another trick that I used was to apply multiple coats, then give the wood a light rub down with Steel Wool 000... the Steel wool fibres will get rubbed into the pours of the wood and when you apply the next coat, the fibres will discolour or rust, however you want to look at it. It "seemed" to provide less yellowing but depending on the amount of wool fibres, it will darken the finish considerably... DO NOT try this on anything that you've made until you see the results first hand! I tripped across this technique when finishing the ash legs for the chairs. I used to make them on a pole lathe, then let them dry. The legs would then dry to an oval shape (not round of course because the wood was wet when I turned them)... in order to quickly sand them before assembly, I'd re-mount them on the pole lathe and rub them down with the Steel wool 000, then turn the tenon. It makes the pours much darker than would otherwise be and makes for a stark contrast to the lighter coloured wood.

I'd get some samples of the different woods you are likely to use, then do some tests with each... even though this is an easy finish, you may not like it.

Another draw back with it, is that when used on a chair seat, it gets highly polished by wear... and a kid will shoot off of a chair seat, as if they went down a 100 ft water slide! But, one slide out of a Windsor chair and they quickly learn to sit still.
 

Velodog2

Chumono
Messages
950
Reaction score
2,066
Location
Central Maryland
Well that steel wool trick sounds fascinating! I love tricks like that especially if they are discovered accidentally. I have to admit I was put off a bit when the bed arrived with instructions for additional linseed oil applications - not what I usually expect when buying furniture. But the finish is so beautiful and minimal. It's the most beautiful cherry I've ever seen. I don't think I want to include those instructions with my stands however.

I'm leaning toward tung oil. Trying it on a sample gave a similar color to the wood on the bed. The application technique will be the same as you describe. I used it on my maple floors I put down a few years ago although in thicker coats without wiping off and it's been durable and waterproof. The floors yellowed but don't know if it is the finish or the wood itself. Probably both. The effect on walnut should just be additional darkening.
 

Velodog2

Chumono
Messages
950
Reaction score
2,066
Location
Central Maryland
Nice woodwork,hard n exspensive to get walnut

Thank you and yes it cost me an entire twelve pack to get my buddy w the sawmill to slice up those logs I dragged to him :)

No hurry Smoke - wring yourself out first.
 

Smoke

Ignore-Amus
Messages
11,668
Reaction score
20,726
Location
Fresno, CA
USDA Zone
9
Tung oil is the way to go.

There is a reason it is used on custom guitars and high quality gun stocks and it doesn't yellow and is water proof after it dries.
 

Smoke

Ignore-Amus
Messages
11,668
Reaction score
20,726
Location
Fresno, CA
USDA Zone
9
In 2005 I made five black walnut stands. Three I made for myself. All with Tung oil.

007.JPG 008.JPG 009.JPG

One was an anniversary present commissioned by the wife of Old Mister Crow, (Carl Bergstrom) in Seattle Washington.
fig_u.jpg

The other was a commission for Will Heath, in Michigan.
Tree by Vance Wood.
fig_v.jpg
 

Smoke

Ignore-Amus
Messages
11,668
Reaction score
20,726
Location
Fresno, CA
USDA Zone
9
I think the stand you have made is wonderful. Looks good from the pictures you posted. It will look even better after its finished. If you use tung oil make sure to wipe on the first couple coats. Let it tack up and the wipe it off, sanding between. May take two days for that. Then apply a few more coats by applying wet and rubbing it in with 0000 steel wool. Then wipe off and let dry. Do that for about 6 coats and it will be unbelievable finish. This is six coats of tung oil on Paduak wood from Africa on my Beretta 92fs

DSC_00051.JPG DSC_00061.JPG
 
Last edited:
Top Bottom