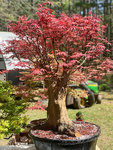
Suburban Yamadori - Unique Extraction

FoldedFrog

Mame
Messages
158
Reaction score
343
Location
Central Georgia
USDA Zone
7b
I was fortunate enough to have a nice big Japanese Maple that grew to block my wife's view from one of the family room windows. One day she casually mentioned that she wished that tree weren't in the way and I instantly went to work!

The tree was originally between 20 and 25 feet tall so I promptly did a trunk chop in the early spring of 2015 (I think). I then performed a Dan Robinson removal by first trenching around one side of the tree in 2018 and refilling with some nice bonsai soil. In 2019 I trenched around the other side finishing it up in the same manner.

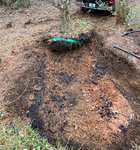
Two weeks ago I took on the task of removing the tree from the ground. Now, this tree's nebari is about 18 across and the trunk is around 8" in diameter. Needless to say I wasn't keen on the idea of digging under this root ball - I don't like digging at all, regardless of the size of the hole. Fortunately, the tree was on a hill with a steep side to it. I had the idea of removing the aforementioned fill soil and running a cable, looped around the bottom-most depth of the original trenches, and cutting the root ball free with one mighty tug from my Dodge (I call the Black Billy Goat). After two trips to the HD, I finally purchased a cable thick enough to do the trick and the tree was cut cleanly from the ground! I can't even imagine how much time I saved.

At any rate, I was left with a massive hole six feet in diameter and spent a full day working the root ball down to a manageable size. I worked it into a 24" livestock watering bowl I acquired from Tractor Supply and, needless to say, modified it for drainage. Below are a few photos commemorating the operation. The latest photos were taken today. I figure another 5 to 10 years of refinement and it should turn out pretty well.

.Hole.jpg
Size Truck.jpg

Position 1.jpg

Position 2.jpg

Position 3.jpg

Nebari.jpg
 

Shibui

Imperial Masterpiece
Messages
7,649
Reaction score
15,438
Location
Yackandandah, Australia
USDA Zone
9?
I note that the surface roots have been sawed off to stumps. What purpose do you believe the 2 years of trenching served?
In my experience people using this trenching method invariably trench way too far out from the trunk so any new roots that do form are eventually removed when the tree is transferred into a pot.
If the tree is expected to survive with all the roots sawed off (and nearly all of my deciduous collections do) then why waste those years trenching and growing?

You should now cover those exposed root ends. They will not produce new roots in the air. If you need to, add a temporary fence around the pot to hold some soil to cover them at least 1/2 "
 

River's Edge

Masterpiece
Messages
4,749
Reaction score
12,763
Location
Vancouver Island, British Columbia
USDA Zone
8b
I was fortunate enough to have a nice big Japanese Maple that grew to block my wife's view from one of the family room windows. One day she casually mentioned that she wished that tree weren't in the way and I instantly went to work!

The tree was originally between 20 and 25 feet tall so I promptly did a trunk chop in the early spring of 2015 (I think). I then performed a Dan Robinson removal by first trenching around one side of the tree in 2018 and refilling with some nice bonsai soil. In 2019 I trenched around the other side finishing it up in the same manner.

Two weeks ago I took on the task of removing the tree from the ground. Now, this tree's nebari is about 18 across and the trunk is around 8" in diameter. Needless to say I wasn't keen on the idea of digging under this root ball - I don't like digging at all, regardless of the size of the hole. Fortunately, the tree was on a hill with a steep side to it. I had the idea of removing the aforementioned fill soil and running a cable, looped around the bottom-most depth of the original trenches, and cutting the root ball free with one mighty tug from my Dodge (I call the Black Billy Goat). After two trips to the HD, I finally purchased a cable thick enough to do the trick and the tree was cut cleanly from the ground! I can't even imagine how much time I saved.

At any rate, I was left with a massive hole six feet in diameter and spent a full day working the root ball down to a manageable size. I worked it into a 24" livestock watering bowl I acquired from Tractor Supply and, needless to say, modified it for drainage. Below are a few photos commemorating the operation. The latest photos were taken today. I figure another 5 to 10 years of refinement and it should turn out pretty well.

.View attachment 291611

View attachment 291612

View attachment 291613

View attachment 291614

View attachment 291615

View attachment 291616
Nicely done! Although the pictures do not show it, I assume the trenching created finer feeder roots below the main nebari, which were then reduced to fit into the container. This is what allowed you to saw off the major surface roots. The tree will respond very well I suspect.
 

FoldedFrog

Mame
Messages
158
Reaction score
343
Location
Central Georgia
USDA Zone
7b
I note that the surface roots have been sawed off to stumps. What purpose do you believe the 2 years of trenching served?
In my experience people using this trenching method invariably trench way too far out from the trunk so any new roots that do form are eventually removed when the tree is transferred into a pot.
If the tree is expected to survive with all the roots sawed off (and nearly all of my deciduous collections do) then why waste those years trenching and growing?

You should now cover those exposed root ends. They will not produce new roots in the air. If you need to, add a temporary fence around the pot to hold some soil to cover them at least 1/2 "

The ones that you see that are sawed off were already cut during the trenching process and had no viable feeder roots (to speak of) at their particular end. Once I removed the tree and worked the soil from the root ball, I was able to easily see what could be cut further back, to no harm or real sacrifice of newly formed feeder roots in order to compact the spread of the nebari. Those roots actually had quite a few off shoots along their underside and so I was able to saw further and keep the main root viable. Your point is still valid though. My intent was to seal the exposed cuts instead of burying the nebari deeper and hope for some good healing over with good attention as new roots extending from those points would begin to grow further out. Point well taken though.
 

FoldedFrog

Mame
Messages
158
Reaction score
343
Location
Central Georgia
USDA Zone
7b
Nicely done! Although the pictures do not show it, I assume the trenching created finer feeder roots below the main nebari, which were then reduced to fit into the container. This is what allowed you to saw off the major surface roots. The tree will respond very well I suspect.
Yes, I was quite happy (and a bit surprised) that the tree reacted with lots of finer roots underneath the terminated main roots so I found I could cut them back further once I worked the soil away. I was also surprised that there were no deep roots to this tree. The cable that cut beneath the root ball went through almost 100% soil. There was a solid layer of Georgia red clay about 18" down and I suppose that's was why the roots spread so much over the years instead of going deeper down. It may have also helped because it was on an embankment which may have prohibited a deeper water reserve.
 
Messages
141
Reaction score
158
Woah 😳 Thats great work 👍🏻

looks very presentable already and only going to get better

how do you pick it up?!
 

FoldedFrog

Mame
Messages
158
Reaction score
343
Location
Central Georgia
USDA Zone
7b
Woah 😳 Thats great work 👍🏻

looks very presentable already and only going to get better

how do you pick it up?!

Thank you! I removed the root ball with the original soil by wrapping it with a nylon strap to get it from the hole. I then manually worked it onto a heavy tarp which I dragged (with my truck). to an open area to work the bulk of the soil out of the roots. At this point I was able to lift it into the container on the back of my truck and add the rest of the bonsai soil with it there. I have actually built several worktables with wheels that were intentionally built to match the height of my truck tailgate. My display benches are all the same height. That way whenever I want to move a heavy tree or one of my sculpted rock plantings, all I have to do is slide from one to another without lifting.
 

FoldedFrog

Mame
Messages
158
Reaction score
343
Location
Central Georgia
USDA Zone
7b
Thanks! I haven't done very much. Just a bit of trimming to keep a basic shape. I did do a few thread grafts from some long whips that emerged the summer after the chop. They took very easily. I'm kind of thinking about the Walter Pall hedge method just as an experiment. I do want to develop limbs further down. I do know I will need to do some carving to refine the taper where I chopped it. Any suggestions would be welcome.
 

FoldedFrog

Mame
Messages
158
Reaction score
343
Location
Central Georgia
USDA Zone
7b
Would love to see an update on this tree. Such potential.
Recovering well. Next spring I plan to slip into a serious pot and start styling in earnest. I moved it under my pergola roof (which is transparent) because I honestly don’t care for the deep red leaves and they are greening up pretty well. Plus, this tree really sunburns quickly in the Georgia heat and bright sun. Have to water pretty much every day even as big as the pot is. Took a quick photo. Sorry for the less than optimal composition. 143896B4-86AD-41B6-A443-B6CB1F3D85F3.jpeg
 
Top Bottom