The Continuing Story of My UR2

0soyoung

Imperial Masterpiece
Messages
7,500
Reaction score
12,872
Location
Anacortes, WA (AHS heat zone 1)
USDA Zone
8b
This (UR2) is the acer palmatum air layer clone that I used for the thread Regarding Wound Healing. In the end of my postings to that thread, I showed a slanted cut chop that eliminated one of the two apical branches. I made that choice because I decided that this view, in which the chop is on the backside, had to be the front. I took this photo shortly after leaf fall 2015

full


and used a Photoshop-like program (Paint.net) to make virtual images to decide what to do with it (my abilities to sketch are quite sketchy). I came up with these three ideas:

1 2
3

In all of them, l eliminated that branch on the left side of the third node – I don’t like that bar (branching) in any circumstance. There is one other feature of this tree that I don’t deal with in those virtuals and it is that there is no branch anywhere in back.

The third idea is the one I decided to pursue. I think it is an interesting hybrid of the other two, more conventional, design ideas. Moreover, I think it is safest choice in the sense that either of the other two options is always possible by simply lopping off branches at any future date. At least it effectively will be with my ‘solution’ for the no-branches-in-back problem.

Referring to the first pic (above), the apical shoot going out the top of the photo is a 3+foot long forked whip that I noted could be used for grafting, so l bent it around and tied it to the trunk into a position near the third internode last December. My (hopeful) solution is to approach graft one fork on the right-rear side of the third internode that runs backward and to the left (instead of sideways to the left as shown in idea#2). After this season, I can decide about whether to steer this branch to be directly behind the trunk or into a position more akin to idea#2.

I think the branch coming almost directly forward from the second node needs to be thickened considerably, as well as steered hard to the right. I decided to approach graft the other fork of the whip to be that next right-going leg, thinking that it might save a season’s time over pruning and praying for a bud to pop in the right place next year.

So, snip, snip, saw, cut, (%##%&^*), twist, zip, etc.,

Voila!


0soyoung

Imperial Masterpiece
Messages
7,500
Reaction score
12,872
Location
Anacortes, WA (AHS heat zone 1)
USDA Zone
8b
Both of these thread graft attempts failed. My basic mistake (aside from trying to make them across the phloem flow lines) was not making the slot deep enough. I removed the bark on the inside of both 'scions', but this did not seem to have any positive effect (maybe it would have if the slot had been deeper). In the end, this led to the classic damage response with the xylem getting plugged and the growth tip desiccating to death.

Now, at the end of 2017, a year has been lost; it is set up for making a thread graft to affect the lower right branch in 2018. I've decided to abandon an added back branch as the upper right branch may also affect this depth element of the design. I pruned back the heavy left branch or second trunk and the result was :confused:, so establishing a basic structure atop it is my 2018 focus (I'm expecting that I will amaze myself :)).

2017-12-06 12.59.33.jpg
 

Adair M

Pinus Envy
Messages
14,402
Reaction score
34,885
Location
NEGeorgia
USDA Zone
7a
Both of these thread graft attempts failed. My basic mistake (aside from trying to make them across the phloem flow lines) was not making the slot deep enough. I removed the bark on the inside of both 'scions', but this did not seem to have any positive effect (maybe it would have if the slot had been deeper). In the end, this led to the classic damage response with the xylem getting plugged and the growth tip desiccating to death.

Now, at the end of 2017, a year has been lost; it is set up for making a thread graft to affect the lower right branch in 2018. I've decided to abandon an added back branch as the upper right branch may also affect this depth element of the design. I pruned back the heavy left branch or second trunk and the result was :confused:, so establishing a basic structure atop it is my 2018 focus (I'm expecting that I will amaze myself :)).

View attachment 172592
Oso, I can’t really tell if this is another approach graft, or a true “thread” graft. I think you would have more success with a true thread graft, where a hole is drilled thru the trunk or branch and the scion poked through. Yes, the hole does have to be rather big so the buds can pass through unharmed.

Clean the drilled hole up, (run the drill at a slow speed to prevent burning), poke the scion thru, and position it such that there is a bud on the scion just outside the hole. You may (optional) choose to scrape (scrape, not cut) the bottom of the scion where it exits the hole. Use a tooth pick (or 2 or 3) to fill the space above the scion in the hole, so that good contact is made on the bottom of the scion.

It’s a good idea to apply wire to the “back end” of the feeder branch to keep it from wiggling!

Remove leaf buds from the back end of the feeder branch.

Seal both ends of the drilled hole with the soft putty cut paste. Be careful not to get putty between the contact point of the scion and branch where it exits the hole.

Let it grow. Remove any leaves on the “feeder” side. Let the scion grow unchecked.

You’ll know it’s working when the scion end that exits the hole is fatter than it is where it enters the hole. When that happens, apply a turnicate of wire around the back end. Let it grow a month. If the scion continues to thicken, cut a chunk out of the back end. Wait a month. If the scion is still strong and growing, it’s safe to sever the back end!

Now that it has taken, you may choose to use what is growing from the buds you positioned right at the exit instead of the body of the branch if there’s no taper.
 

0soyoung

Imperial Masterpiece
Messages
7,500
Reaction score
12,872
Location
Anacortes, WA (AHS heat zone 1)
USDA Zone
8b
Thanks, @Adair M. In parallel with these and many other approach graft and several thread graft attempts on other trees I have --> learned my lesson. I deeply regret having not done these as thread grafts as this mistake has delayed this tree's development back 2 years from what it could have been, had I thread grafted instead. Right now I just have the 'scion' wired into position for actually affecting the thread graft in Feb/Mar 2018.

Thinking back, I started out an air layering maniac - I wish I would have been a grafting maniac back then too.

Ah, well ... :oops:
 

0soyoung

Imperial Masterpiece
Messages
7,500
Reaction score
12,872
Location
Anacortes, WA (AHS heat zone 1)
USDA Zone
8b
When I tried to place the thread graft in 2018 (that I had prepared in fall 2017), I broke it trying to get just a bit more through the hole. I then tried to put a rooted cutting in its place. I had to bend this cutting in threading it and a few weeks later it clearly died as a consequence of the bending. I similarly nurtured a long shoot and finally succeeded in affecting the thread graft in 2019 (geeze 😂 ).

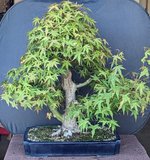
So, here it is today in its new pot.

IMG_20200311_143453158.jpg

It still has lots of problems, not the least of which is the 'residuals' of the chop that is now partially covered with a NEEM-doped putty, testing the lore that a putty covered lip will grow faster than an uncovered one.

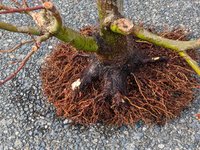
For completeness, here's a pic of the roots/nebari before potting up today. It has never been screwed to a board, nor is it now. BTW, that is the thread grafted branch is also featured (with some Elmer's glue on the truncated 'stock').

IMG_20200311_123917348_HDR (1).jpg

I am aiming for some branch development this year.
 

0soyoung

Imperial Masterpiece
Messages
7,500
Reaction score
12,872
Location
Anacortes, WA (AHS heat zone 1)
USDA Zone
8b
Before repotting today

PXL_20220406_221603338.jpg

"Chop" wounds on the backside. Some of the wood exposed in the original "chop" went punky. It was dug out and grey-black epoxy was out back in its place last year.

PXL_20220406_220839980.jpg

Lower down, the scar from the failed approach graft can be seen tombs grown over. The edges of this wound are still visible but may disappear when mature/aged grey-white bark appears (of course it is of little consequence since it on the backside, but I just like to find things out while I'm at it). Also a surprise bud appeared last year, producing the depth element that was lost with the failure of the approach graft (serendipity is a wonderful thing!).

PXL_20220406_220857846.jpg

And the nebari after combing and trimming the roots today

PXL_20220406_233919012.jpg
 
Top Bottom