TRIPLE LAYER?!? No he didn't!!!

Kodama16

Shohin
Messages
452
Reaction score
243
Location
Louisiana, Baton Rouge
USDA Zone
9
Hey guys! Reading M. Frary post (http://bonsainut.com/forums/showthread.php?15202-Lets-go-airlayer-my-Japanese-Maple!) about air layering his maple got me into the mood to work on some trees.
Problem is most my trees are done for this time. I did some cuttings yesterday but didn't document them. SOOOOO........ I found a junk tree to cut on!

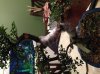
So this is a Chinese elm I got for cheap. I think 20-30 dollars. Looks like a mall tree, and I've never worked with it just keep it trimmed. Plan was always to layer it. So I did today! And made some cuttings.
So first I don't recommend a layer like this unless you've done layers before and know how a air layer works. And how the sap/water flow works in layers. Plus don't do it if you love your tree it is risky.

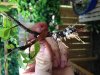
First I took all the limbs in the way off with concave cutter and made them into cutting. Ill show that for later.
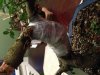
So first I used a sharp knife and made my first cut. I did not scrape the cambrium away and ill explain why later. Then I applied a rooting gel.

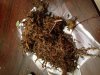
So to wrap the cut I use a zip lock bag cut in halve filled with moss. Then I wrap it with paraffin tape. After I wrap it tight with the wax paraffin tape. Leave some moss sticking out the top. I repeat the step with the second cut. But when I wrap this one I wrap it on top of the first cut.
 

Attachments

  • image.jpg
    image.jpg
    182.3 KB · Views: 122
  • image.jpg
    image.jpg
    194.4 KB · Views: 121
  • image.jpg
    image.jpg
    183.6 KB · Views: 125
  • image.jpg
    image.jpg
    188.6 KB · Views: 128

Kodama16

Shohin
Messages
452
Reaction score
243
Location
Louisiana, Baton Rouge
USDA Zone
9
Third cut I repeat the same with that i did with the second one. When don't all three cuts are taped together and the moss is inter linking. This helps make sure the moss stays wet. I leave the cambrium also intact to help bring moisture up. The rooting gel will seal the top cut and normally won't let the cambrium reheal together with the bottom halve. After everything is done I wrap in foil to protect from sun and heat.
In the end we have a awesome TV antennae. : )

Next I will show all the cutting I made. So I turn this tree into 4 trees if all 3 layers take. Plus I took about 20 cuttings. Ill keep ya posted.
 

Attachments

  • image.jpg
    image.jpg
    186.5 KB · Views: 67
  • image.jpg
    image.jpg
    193.4 KB · Views: 60
  • image.jpg
    image.jpg
    188.6 KB · Views: 69

Eric Group

Masterpiece
Messages
4,554
Reaction score
4,855
Location
Columbia, SC
3-4 layers on one tree might be possible when doing them on different branches on the same tree.. Unfortunately, it looks like your layers are mostly located on the same main trunk line, so the likely hood of all of them taking is well... Let's just say it is NOT likely... Think about it like this- the inner layers of the sap wood are the highways to move nutrients up to the leaves from the roots while the outer cambium cells you remove when doing a layer ( the green stuff just behind the bark) is transporting nutrients collected from photosynthesis back down to the roots.. So, when you create a disconnect there, and give the area above the disconnect a rooting medium- those nutrients that were moving down the cambium to grow roots are now collected at the site of your layer, and hopefully they make roots there, creating a new plant! Over simplification? Yeah probably but I ain't writing a text book here... That said... If you try to make more than one layer on the same stem line of the same tree... How will the layers below the top one get any nutrients/ hormones necessary to produce new roots? Basically they cannot get much..

I like this little diagram if you want all the details in an easy to understand article-
http://www.arborday.org/trees/treeGuide/anatomy.cfm

Hard to tell from your pics if this is the case with your layers, but it appears to be. Now, if you had simply moved your layers a couple inches out on those side branches instead of ringing the trunk, you might have a better shot. Perhaps if there is a branch between each layer, you might get some roots in each, though I suspect the bottom ones will develop much slower than the top ones if at all.

I would not have done the paper towel wrap with the rooting hormone either. It just seems to be creating a barrier that newly developing roots will have to break through to grow, and new roots are not real strong... They may not be able to break through that tight ring of paper towel at all, basically meaning you might not get roots at all or, if they do develop, they would have to squeeze underneath the paper towel and out the bottom- creating no root spread. I generally just wipe some hormone around the bark just above the ring that was removed and/ or coat the sphagnum moss with the rooting hormone.... This encourages the roots to grow straight out into the moss instead of straight down- hopefully, creating a nice start to a spreading nebari.

One more pointer- more is better with the rooting medium. You don't have a whole lot for roots to grow in there, so- again- if roots do get out into the moss, they will grow a very short distance, hit the plastic barrier and start growing down... Not the ideal direction for roots!

Not trying to be a downer, or a know it all... But I have done a bunch of layers and had to figure it all out myself... Basically this just means I probably know as much (MORE) about what will NOT work as I know about what will work.

Good luck! I could be all wrong- hard to tell exactly what you did here from some of the pics, and if it doesn't take right away, you can keep trying with most layers... Doesn't normally lead to the parent tree dying off... So, if you can at least get the top one to take this season, leave the bottom ones on there, you might get roots the next season...

Elms generally propagate from root cutting easier than from regular cuttings... Not impossible to get cuttings to root, just a lot easier to start with some roots, leave the top Poking up out of the ground and hope they pop a new leaf bud... Sometimes you will see new leaves starting to grow from an exposed root on a larger tree- if you remove that root and plant it in it's own container you have a new tree with almost no problem and they will grow much MUCH faster because they are growing on an already developed root system.
 

Kodama16

Shohin
Messages
452
Reaction score
243
Location
Louisiana, Baton Rouge
USDA Zone
9
Hey sorry just getting to this. I was at Brussels for the weekend. I agree it needs food from the leaves basicly to product roots. That's why each has its own set of leavs to produce food for the new root growth.
I did cut the main trunk. I've done2-3 layers on elms like this before. I just never posted it that why I decided to document it this time.
I didn't use a paper towl wrapped around the trunk... I applied the hormone with a towl but I didn't leave a towl there.

And everything i cut off I planted into perlite in my cutting box: )

Ill take pictures in a few weeks when I pull them out to check on them.

But I do see your concern. If I didn't do this way before I'd also be concerned honestly.
 

Kodama16

Shohin
Messages
452
Reaction score
243
Location
Louisiana, Baton Rouge
USDA Zone
9
Check the cuttings today. They all have roots. I let them get a bit to dry so there not as far along as I was hoping. But it should do.
My cutting of my maples and cork bark elms I took form Brussels also all have roots. About same size.
And the air layers all have roots. Ill probably cut them off in about 3-4 weeks. Idk why but I didn't take a picture of the other stuff. Just the elm cutting.
 

Attachments

  • image.jpg
    image.jpg
    185.1 KB · Views: 59

Kodama16

Shohin
Messages
452
Reaction score
243
Location
Louisiana, Baton Rouge
USDA Zone
9
So almost six weeks into this project an I decided tonight the night to remove the layers. The roots on the top one was growing through the top paraffin. So I removed the three layers and a extra peace of trunk that also had roots growing and planted them all. Now time to let them grow.
 

Attachments

  • image.jpg
    image.jpg
    195 KB · Views: 44
  • image.jpg
    image.jpg
    183.8 KB · Views: 44
  • image.jpg
    image.jpg
    198.7 KB · Views: 40
  • image.jpg
    image.jpg
    195.6 KB · Views: 44
Top Bottom