Update on my big JBP project

Adair M

Pinus Envy
Messages
14,402
Reaction score
34,885
Location
NEGeorgia
USDA Zone
7a
I'm sure I've posted photos of this tree before, but I couldn't find the old thread.

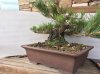
Anyway, I've pulled needles, thinned out excess shoots from the decandling, chased back a few branches, completely removed one sacrifice branch, and cut back on another.

There are still some untrained branches I've let run that I will probably remove after decandling next summer. I've kept these on in case I think I need to approach graft on a new branch somewhere. The tree back buds well, so I don't think I'll need to.

The apex sacrifice has done its job, and will be cut off once I'm satisfied the little buds on the lowest part are strong enough.

The main branch that is being grafted on is taking, and I'm weakening the supply line by shaving the bark off the top and bottom as well as a copper wire tourniquette. Hopefully, I'll be able to cut it loose soon.
 

Attachments

  • image.jpg
    image.jpg
    197.7 KB · Views: 275

davetree

Omono
Messages
1,556
Reaction score
848
Location
St. Paul Minnesota
USDA Zone
4
Is it necessary to weaken the supply line to the grafted branch ?
 

Adair M

Pinus Envy
Messages
14,402
Reaction score
34,885
Location
NEGeorgia
USDA Zone
7a
Yes, to make draw off the graft Union rather than its old sap line. Somewhat like weaning a baby.

The graft has been in place for a year and a half.
 

cmeg1

Imperial Masterpiece
Messages
5,354
Reaction score
8,267
Location
Southeast Pennsylvania USA
USDA Zone
7a
That is a serious tree.Glad to see such a project.Thanks for the thread.
 

Adair M

Pinus Envy
Messages
14,402
Reaction score
34,885
Location
NEGeorgia
USDA Zone
7a
This winter I'll repot it into a shallower oval pot. It's currently potted a little deep. There's more trunk hiding under the soil. The nebari is 13 inches wide.
 

JudyB

Queen of the Nuts
Messages
13,785
Reaction score
23,331
Location
South East of Cols. OH
USDA Zone
6a
overall, what are you looking for as a finished size for this? Just wondering how many more sections you'll need to build on that base. Must be pretty large base in scale, how big is the pot?
 

Adair M

Pinus Envy
Messages
14,402
Reaction score
34,885
Location
NEGeorgia
USDA Zone
7a
Judy,

Here is a picture of the tree when I first got it. The big branch on the left is now the "back" branch. The new front is about 1/4 turn to the right. The current first branch, the one being approach grafted, is one of the long branches near the apex.

As it stands now, I expect this tree to be about 12 inches tall when finished. The current pot measures 15x19 inches outside lip to outside lip. The new pot (actually, it's an old pot) is an oval 14x18, but is considerably less tall. And, being rounded not rectangular, it doesn't look so heavy.
 

Attachments

  • image.jpg
    image.jpg
    107.2 KB · Views: 217

Adair M

Pinus Envy
Messages
14,402
Reaction score
34,885
Location
NEGeorgia
USDA Zone
7a
Turning the tree to the right did two things: it put the huge scar more to the back, showed the best nebari, and made made the tree an informal upright rather than a slant. Ok, that's three thing! LOL!!

The nebari was wider on the right side.

It was Boon who changed the front. I had always seen it with the old front, because I kept using the big branch as the first branch. Boon preferred the nebari on the right side, and solved the main branch issue with the graft.

This was an epiphany for me.

Now, knowing how to graft, I look at material entirely differently.

I bought this tree just before I went to my first Intensive. I potted it up after my second. It just so happened that Boon was the judge for our local show a couple months later, and that's when he changed the front, in a workshop.

But, that moment, when he and I were sitting there turning the tree around on the turntable, and he said, "this is the front", based upon the nebari and trunk movement, and I was about to object with, "but there's no main branch...", he anticipated my thought, and said, "we'll have to graft on a new main branch". He said it so casually like it was no big deal. And for him, it isn't.

Later during the workshop, when we did the graft, everyone stopped working on their tree and came over to watch.

Anyway, that moment changed my perspective on bonsai. My mindset changed completely. Thinking back on it, it's kind of like I stepped through a doorway into a vastly larger room. Possibilities opened up.

Anyway, I feel the tree is progressing, and a lot of things I've been working on are beginning to come together for this tree.
 

Giga

Masterpiece
Messages
3,813
Reaction score
4,722
Location
Virginia beach, VA
USDA Zone
7-8
thats gonna be a amazing tree once finished-more then it is already!
 

JudyB

Queen of the Nuts
Messages
13,785
Reaction score
23,331
Location
South East of Cols. OH
USDA Zone
6a
I could almost hear your world expanding with that description. You've also been generous to expand knowledge by passing it on. Thanks for that.
That's a lot of tree for only 12" tall, damn.
 

coh

Imperial Masterpiece
Messages
5,782
Reaction score
6,824
Location
Rochester, NY
USDA Zone
6
Nice tree!

Any chance you can mark the branch being grafted, maybe show a close up of the graft area? I'm having a hard time picturing where it is being done.

Chris
 

Adair M

Pinus Envy
Messages
14,402
Reaction score
34,885
Location
NEGeorgia
USDA Zone
7a
Coh, Dav4 posted pictures of the graft in process back when it was done. Here is a picture taken a couple months ago.

We used the callous of the scar of where the trunk was chopped years ago as the place we wanted the new branch to start. First step was to determine where to carve out a groove in it. Old callouses are useful because it's "healing tissue" so they take grafts well. Once the groove was cut and cleaned up, Boon positioned the branch. He nailed it in place with the green push pin! That's actually in the dead area of the scar, it was used to take the pressure of the bending down.

Next step, scrape the sides of the scion to fit the groove.

He then used the little staples. He just got them started, tapping them in place with a tack hammer. Then, he placed a piece of rubber on top of the scion, then placed piece of bamboo chopstick on top of that. The rubber and chipstick were slipped under the two staples. Finally, the staples were hammered down tight. Once done, the whole thing was covered with the gray clay-like cut paste to keep water out.

I removed the clay a year later, and tightened up the staples.

The graft was placed in May. The following December, I was able to put a little wire on it and give the branch some movement.

The following March, we began to weaken the connection to the mother branch by scraping the bark off the top and bottom of the mother branch. In August, I added the copper tourniquette. I also decandled the branch in July.

Since this picture was taken, I've scraped the bark back again, as it had healed.

This is the first branch on the left in the picture on the first post.
 

Attachments

  • image.jpg
    image.jpg
    208 KB · Views: 175

Brian Van Fleet

Pretty Fly for a Bonsai Guy
Messages
13,994
Reaction score
46,147
Location
B’ham, AL
USDA Zone
8A
Good bones, and a better choice of front for sure. The second section of trunk is still bothersome; the new front shortens it some, and it probably won't be as obvious in the final analysis, with a little more time and foliage. Who grew this one?
 

Adair M

Pinus Envy
Messages
14,402
Reaction score
34,885
Location
NEGeorgia
USDA Zone
7a
It's from Telperion Farms in Oregon.
 

coh

Imperial Masterpiece
Messages
5,782
Reaction score
6,824
Location
Rochester, NY
USDA Zone
6
Thanks Adair, now I see exactly what you've done (and where).

Chris
 

Q-Bonsai

Mame
Messages
176
Reaction score
15
Location
Houston, TX
Coh, Dav4 posted pictures of the graft in process back when it was done. Here is a picture taken a couple months ago.

We used the callous of the scar of where the trunk was chopped years ago as the place we wanted the new branch to start. First step was to determine where to carve out a groove in it. Old callouses are useful because it's "healing tissue" so they take grafts well. Once the groove was cut and cleaned up, Boon positioned the branch. He nailed it in place with the green push pin! That's actually in the dead area of the scar, it was used to take the pressure of the bending down.

Next step, scrape the sides of the scion to fit the groove.

He then used the little staples. He just got them started, tapping them in place with a tack hammer. Then, he placed a piece of rubber on top of the scion, then placed piece of bamboo chopstick on top of that. The rubber and chipstick were slipped under the two staples. Finally, the staples were hammered down tight. Once done, the whole thing was covered with the gray clay-like cut paste to keep water out.

I removed the clay a year later, and tightened up the staples.

The graft was placed in May. The following December, I was able to put a little wire on it and give the branch some movement.

The following March, we began to weaken the connection to the mother branch by scraping the bark off the top and bottom of the mother branch. In August, I added the copper tourniquette. I also decandled the branch in July.

Since this picture was taken, I've scraped the bark back again, as it had healed.

This is the first branch on the left in the picture on the first post.

Boon will be at my house to do some grafting in February :) What supplies should I have on hand? I wouldn't want him to get there and be completely unprepared.
 

Adair M

Pinus Envy
Messages
14,402
Reaction score
34,885
Location
NEGeorgia
USDA Zone
7a
Boon will likely travel with a complete set of tools.

You should be prepared with wire and turntable of some sort. He likes to have some way to adjust the height of the stand as he works on it.

For wire, if you need copper, get it from Jim Gremel. I suggest getting a spool of every gauge between 6 and 20.

If you plan to do any potting, have "Boon Mix" soil, or Akoi or Clay King. Aluminum wire is acceptable for tying trees in pots. Have mesh screening for pots.

Also, have lots of trees to work on. Boon works fast!
 
Top Bottom