A Random User
Guest
- Messages
- 3,554
- Reaction score
- 4,269
Was asked to start up a thread dealing with "V" notching, a technique which
really is one of the best and easiest ways to change the angle of a large branch.
I can't tell you how many times I have used this technique, it is very simple to do.
For me, I think the term "V" notching is incorrect, and it really should be referred to
as something else, because if one is actually cutting a "V", or pie shape out of a branch
you really are removing way too much and putting undue stress on the branch and risking
the life of the branch all together !
Instead, one would be better off, doing multiple cuts / bends along the trunk, rather than
one really big bend. I will discuss this later.
So, here goes, easy peesy...
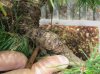
First off, and most important, set your guy wire !!! Run your wire, up and over the branch,
and down and around where you are anchoring to, then back up to meet the other end and
twist the wires together, do not tighten yet. Doing this now, removes any accidental
bumping, careless pulling, etc. on the branch after it has been cut.

Now, time to cut... Use a "Pull Saw" !!! A pull saw, is designed where the teeth only cut in
one direction. This prevents undue stress on tree, and branch, by not constantly jarring them
back and forth while cutting. Next, cut always goes on the underside !!! Reason being, that if
the branch is accidently pulled down at any time in the future, even after it has healed, it will
pull down against itself and will prevent the branch from being broken off. With that said, I do
have to cover my bases and say that yes, occasionally a cut on the side could be used, but one
does risk a better chance of being broken. Absolutely no cuts on top.
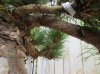
Now I usually cut perpendicular to the trunk, and I cut about 3/4 of the way through. Any less
one risks the chance of the top being torn apart during bend. Don't talk to your friends while
doing, or allow yourself to get distracted, and make sure you pay attention to how far
up the cut is on the other side of the branch, the part you can't see, so you don't cut through
the branch !!! I do one cut, that's it... straight up and down, the width of the saw blade, which
should be quite thin, about a 32nd of an inch.

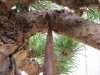
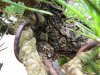
Now take your pliers, and twist the ends of the wire, while slightly pulling, this will corkscrew
the wire tightening it up... do this while slowly pushing down on the branch with the other hand,
until the gap you have created with the saw is closed tight.

Not enough bend, or want more... repeat, run the saw blade again through the exact same
cut, opening it up again, make sure again to not cut through branch.

Then repeat the pulling down process as described above until tight again. Doing this process
repeatedly like this better insures that the cut lines up, that bark matches bark and that the
cambium layers line up to help with the healing process. You don't end up with any big gaps
and you can easily watch to see how the top of the branch reacts to the bend, and if there is
any ripping.

really is one of the best and easiest ways to change the angle of a large branch.
I can't tell you how many times I have used this technique, it is very simple to do.
For me, I think the term "V" notching is incorrect, and it really should be referred to
as something else, because if one is actually cutting a "V", or pie shape out of a branch
you really are removing way too much and putting undue stress on the branch and risking
the life of the branch all together !
Instead, one would be better off, doing multiple cuts / bends along the trunk, rather than
one really big bend. I will discuss this later.
So, here goes, easy peesy...
First off, and most important, set your guy wire !!! Run your wire, up and over the branch,
and down and around where you are anchoring to, then back up to meet the other end and
twist the wires together, do not tighten yet. Doing this now, removes any accidental
bumping, careless pulling, etc. on the branch after it has been cut.
Now, time to cut... Use a "Pull Saw" !!! A pull saw, is designed where the teeth only cut in
one direction. This prevents undue stress on tree, and branch, by not constantly jarring them
back and forth while cutting. Next, cut always goes on the underside !!! Reason being, that if
the branch is accidently pulled down at any time in the future, even after it has healed, it will
pull down against itself and will prevent the branch from being broken off. With that said, I do
have to cover my bases and say that yes, occasionally a cut on the side could be used, but one
does risk a better chance of being broken. Absolutely no cuts on top.
Now I usually cut perpendicular to the trunk, and I cut about 3/4 of the way through. Any less
one risks the chance of the top being torn apart during bend. Don't talk to your friends while
doing, or allow yourself to get distracted, and make sure you pay attention to how far
up the cut is on the other side of the branch, the part you can't see, so you don't cut through
the branch !!! I do one cut, that's it... straight up and down, the width of the saw blade, which
should be quite thin, about a 32nd of an inch.
Now take your pliers, and twist the ends of the wire, while slightly pulling, this will corkscrew
the wire tightening it up... do this while slowly pushing down on the branch with the other hand,
until the gap you have created with the saw is closed tight.
Not enough bend, or want more... repeat, run the saw blade again through the exact same
cut, opening it up again, make sure again to not cut through branch.
Then repeat the pulling down process as described above until tight again. Doing this process
repeatedly like this better insures that the cut lines up, that bark matches bark and that the
cambium layers line up to help with the healing process. You don't end up with any big gaps
and you can easily watch to see how the top of the branch reacts to the bend, and if there is
any ripping.

")