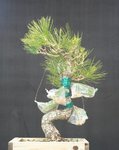
What goes on behind the scenes with JBP from Bonsai Nursery

River's Edge

Masterpiece
Messages
4,754
Reaction score
12,774
Location
Vancouver Island, British Columbia
USDA Zone
8b
So I thought it might be interesting for some to see a snapshot of development stages. No pretence that this is the right way or even well done. Just a glimpse behind the scenes of possibilities. This was a JBP I purchased from Telperion that posed an unusual shape and challenge. Others would likely have gone a different way or even bypassed the tree entirely! The pictures show progression from nursery can to present. The tree is far from finished. Tree acquired in 2014, last picture 2019.Apical leader thickening trunk.jpegReduction of Leader.jpegfirst grafts.jpegMore grafts.jpegBending trunk.jpeg
 

MrWunderful

Omono
Messages
1,457
Reaction score
1,953
Location
SF Bay area
USDA Zone
10b
Nice it looks like your grafts took. What is your plan for the apex? Just let it run for the time being?
 

River's Edge

Masterpiece
Messages
4,754
Reaction score
12,774
Location
Vancouver Island, British Columbia
USDA Zone
8b
Nice it looks like your grafts took. What is your plan for the apex? Just let it run for the time being?
I have not fully decided which graft will become the apex. Most of the top growth is simply the engine that allows me to develop the grafts quickly and keep the tree in optimum health. The overall goal with this one will see a short tree with lots of movement in a fairly substantial base. The final graft will be placed on what will become the first branch. Grafting lower down on older wood is trickier. I have more success when I can establish an upper branch and work my way down over time!
 

Adair M

Pinus Envy
Messages
14,402
Reaction score
34,898
Location
NEGeorgia
USDA Zone
7a
I’m good with the grafts. I’m not real sure I understand what’s going on with the the rebar rig.

from the raffia, it would appear that you’re trying to crunch the curves?

I think I would have run the rebar up along the straight trunk section, and leveraged it down, rather thanapply all that wire pressure down low. Maybe a screw into the top of the chop to use to guy it down?

anyway,it looks like you’re having fun with it!
 

River's Edge

Masterpiece
Messages
4,754
Reaction score
12,774
Location
Vancouver Island, British Columbia
USDA Zone
8b
I’m good with the grafts. I’m not real sure I understand what’s going on with the the rebar rig.

from the raffia, it would appear that you’re trying to crunch the curves?

I think I would have run the rebar up along the straight trunk section, and leveraged it down, rather than apply all that wire pressure down low. Maybe a screw into the top of the chop to use to guy it down?

anyway,it looks like you’re having fun with it!
Hi Adair
I should have mentioned that for some of the grafts I used double scions to increase my options for design. So if looking carefully the branching may not make sense yet.

I can see the rebar rig looks complicated and it would appear that a simpler version would be better. I too prefer the simplest approach. The rebar rig allowed me to move the two parts sideways when crunching the curve! I tried the rebar on the straight section and it did not accomplish what I was after. Not to say you may not have been able to make that work if you just wanted to crunch the curve flat. I was after a twisted flattening. If that wording makes sense.

The wire pressure was not an issue because I used a small jack to create the position and tightened the wire after i acquired each position. By each position I mean each half down and a bit to the side, done separately.
Also the fulcrum point of the upper rebar was important to put the stress in the correct position for the bend. Not possible to position if attached to the straight portion.
 

Adair M

Pinus Envy
Messages
14,402
Reaction score
34,898
Location
NEGeorgia
USDA Zone
7a
Hi Adair
I should have mentioned that for some of the grafts I used double scions to increase my options for design. So if looking carefully the branching may not make sense yet.

I can see the rebar rig looks complicated and it would appear that a simpler version would be better. I too prefer the simplest approach. The rebar rig allowed me to move the two parts sideways when crunching the curve! I tried the rebar on the straight section and it did not accomplish what I was after. Not to say you may not have been able to make that work if you just wanted to crunch the curve flat. I was after a twisted flattening. If that wording makes sense.

The wire pressure was not an issue because I used a small jack to create the position and tightened the wire after i acquired each position. By each position I mean each half down and a bit to the side, done separately.
Also the fulcrum point of the upper rebar was important to put the stress in the correct position for the bend. Not possible to position if attached to the straight portion.
I figured there’s more going on than I could figure out from one image.
 
Top Bottom