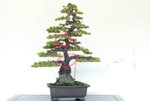
White Pine Styled

justBonsai

Omono
Messages
1,442
Reaction score
2,595
Location
Arcadia, CA
Hello Nutters,

I love the bnut site but its been hard to post. First because of school, and now because of my apprenticeship in Japan. I recently finished styling a white pine and I'm relatively happy how it turned out. Things are beginning to become more intuitive and the quality of my work is showing improvement. I'm grateful that I am able to learn and strive to do each project better than the last. I hope to keep a record over the years to share my improvement and knowledge with others. Oyakata is leveling up the quality of my trees so hopefully in the coming months I'll have some real cool stuff to show!

white pine.jpg20181207_130138.jpg20181012_083547.jpg

white pine.jpg

20181207_130138.jpg

20181012_083547.jpg
 

0soyoung

Imperial Masterpiece
Messages
7,500
Reaction score
12,874
Location
Anacortes, WA (AHS heat zone 1)
USDA Zone
8b
Nice work, but ...

I am used to seeing foliage sitting above the branch. The foliage on the lower branches of your tree appears to all be hanging below the branches as though the branches are on upside down. I see this isn't really what is happening when I look closer, but ...

It looks like you are having fun 'til you drop - every day!! :cool:
 

Adair M

Pinus Envy
Messages
14,402
Reaction score
34,898
Location
NEGeorgia
USDA Zone
7a
The other styling comment I would make is it looks like a spruce now instead of a JWP. It’s too pointed.

Danny Coffey styled a JWP in a similiar manner, and I said the same thing about it.

But, I think you’ll get the hang of it. You’ve got great material to work with!

I gave the JBP I bought from you a good thinning, and an initial rough styling:

5A314297-20FA-40D5-8C41-74DC406A02E9.jpeg

Before I did that, it was just a solid mass of needles!

Say “Hey” to Kaya for me!
 

Adair M

Pinus Envy
Messages
14,402
Reaction score
34,898
Location
NEGeorgia
USDA Zone
7a
And here’s one of my JWP:

552DDC8D-8FDF-44EB-A664-31AC941F4335.jpeg

It also has a rather pointed apex, but a little softer than yours. Both yours and mine will soften up more when the spring growth comes in.
 

Potawatomi13

Imperial Masterpiece
Messages
6,173
Reaction score
4,404
Location
Eugene, OR
USDA Zone
8
The other styling comment I would make is it looks like a spruce now instead of a JWP. It’s too pointed.

Agreed.

Also seems 2 low Rt branches angles wrong. Lower needs to be lower, upper not so low. Left low branch seems unneeded. Apologies for criticism after all hard work;).

Who is master/teacher?
 

Adair M

Pinus Envy
Messages
14,402
Reaction score
34,898
Location
NEGeorgia
USDA Zone
7a
Agreed.

Also seems 2 low Rt branches angles wrong. Lower needs to be lower, upper not so low. Left low branch seems unneeded. Apologies for criticism after all hard work;).

Who is master/teacher?
He’s in Japan, at the same place Bjorn was for 8 years.

It will be interesting to see how he learns to style trees. Bjorn came out putting really straight, flat, level bottoms on all his pads. I always figured that’s how the Master wanted it done.

Personally, I like clean bottoms to the pads, but a softer, slightly curved (undulating, perhaps) bottom line. But that’s just personal taste. It takes a lot of skill to do either, and once someone has that degree of skill, they can apply it however they see fit.

This apprenticeship is a great opportunity for Julian, and I’m glad to see he’s surviving!
 

Adair M

Pinus Envy
Messages
14,402
Reaction score
34,898
Location
NEGeorgia
USDA Zone
7a
Ok,

Some wiring help:

(Does he teach you wiring? Or does he just say, “no good. Do again”?)

The bottom red circle. Where you wired the two bottom limbs together. The wire on the limb on the right comes up from under (that’s good!) but is too loose. Next time bring it up more snug to the bottom of the crotch, and when you make your first wrap over the top, try to have the wire closer to the trunk instead about an inch out. It will be much stronger, and hold better. I would have used a larger gauge wire.

The lower left limb starts by having the wire come from behind, but it starts over the top. This makes for a very weak anchor. It should have started from underneath. Much stronger.

The upper circle marks a place where there is far too much wire. At most, there can be three parallel loops of wire.

753E236E-ABD7-40D5-BE21-7D7FA1501A2C.jpeg

Here are a couple diagrams that you may find helpful:

41F955C4-52CC-4B75-933A-DBEFEFCB8012.jpeg

Look at Fig. 4. See how the wire comes up from under? Much stronger that way. It shows the wire passing across the front of the trunk, but it could pass around the back as you did and still be just as strong. Try not to do Fig. 7. Very weak anchor.

E4CF5EF6-D994-4AA4-8A9F-3C4337C4295F.jpeg

Fig. 15 shows how to do detail wiring of a branch without having to use triple parallel wires. Master Fig 15, and you’ve pretty much mastered wiring.

Here is a branch Kimura wired using different colors of wire so you can see how he does it:

2D795AF5-2A81-41E9-A1B2-AF90F6C568C5.jpeg
 

DirkvanDreven

Shohin
Messages
463
Reaction score
1,055
Location
Wageningen, The Netherlands
USDA Zone
8b
@Adair M : There is an Apple App called 'Scannable'. With this app you take a photograph and the software turns it into a document, adjust marges etc. Makes the info you share even more valuable (and collectable).
 
Top Bottom