Soliciting Help with Collected CA Juniper

carobone

Mame
Messages
126
Reaction score
10
Location
Orange County, CA
USDA Zone
10b
Greetings,

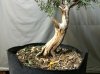
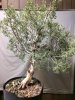
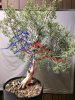
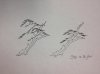
This is a well established collected CA juniper so I though I'd perform an initial styling followed by a repot next spring. However, after looking at the tree off and on for a couple of days, I draw a blank. The issue here is there's not a ton of foliage close to the trunk to pull off a decent design. One idea I have was to repot in spring and then graft with Shimpaku and let it sit for a few years, but I'd like to hear what you would do thus this thread. Si, I know you are out there :) I can use a virtual from your talented hands, or anyone.

Thanks, Vince
 

Attachments

  • 2014-12-29 18.24.37.jpg
    2014-12-29 18.24.37.jpg
    190.1 KB · Views: 98
  • 2014-12-29 18.24.16.jpg
    2014-12-29 18.24.16.jpg
    209.5 KB · Views: 120
With that much shari on the trunk its a wonder it will live at all. I would have to ask where are you planning on grafting, you would need a living part naturally for the graft to take and most the bottom part is dead as it is. I take it that after you removed the bark you decided to graft or was it because you removed that much bark you decided to graft?


ed
 
Last edited:
Here's my take Carobone.

I'd cut the top off at the red line regardless.

Graft to the base of the first 2 branches if you have to. Maybe one lower too.

2014-12-30_02.59.41.jpg

Using its foilage. Tilted as in the black pot, with horizontal plane extended for angle.
Using only the first right branch, the white arrow branch your semi cascade apex.

The story of the jins that saw great boulders in times passed. The roots that tore out more with each slide of snow and rock. Until they finally gave way.
Gave way to allow the cascading portion a space to hide, outside of the trajectory, flourishing.

It works for me! Nice material !

Sorce
 
I've been working on some junipers lately as well. My M.O. for the work has included:

1. Highlight the best features...here, it's the Shari you created.
2. Use foliage to frame those features...you'll have to prune and chase it down or graft it lower.
3. Compact the design. This tree has good detail carving, then a big canopy up high.
4. Taper and movement in every shoot. When you accomplish #2, and as you're working on #3.
5. Plenty of space as you look around the tree. As you wire, ensure each tuft of foliage gets sun.

fwiw, I will walk around a tree for a couple months, sometimes years before it "speaks" to me. Give yourself and the tree as much time as it takes. I've had a shohin Itoigawa on the docket since October, and literally on and off the turntable since November. I finally got started on it yesterday.
 
Hi Carobone, this is a tough one. It may not be good enough for a grafting candidate. But it could be a useful subject for styling exercises. This may have to be a bunjin.

In general, start with examining the tree in this order:
1. Nebari (pick the best possible fronts based on this first. Remove the top soil if you need to because the best curves maybe below ground)
2. Trunk line (create the most interesting trunk line based on the healthiest branches. Remove dead or dying branches to clear up your vision. The trunk line will include the existing trunk that you could not bend and the biggest healthiest branch that you could wire and bend)
3. Location of apex (after the best possible trunkline is achieved, wire and position the top in order to balance out the movements of trunk line. For example, if the trunk line have to lean backward, then bend the top forward)
4. Branching
5. Foliage ( including grafting)

Looking at your yellow marker, I think you may have to pick another front. The big live root is pointing straight out at the viewer which is not nice. There must be better possible fronts for this tree. If your tee is at the 6 o'clock position, then may be the 5 and 7 o'clock positions could be better. Please submit more pictures from all around the tree, so we can get a better feel of it in the 3-dimension.
 
Last edited:
You could sell or trade it to me;)
PM me if interested.
 
I agree a bunjin or literati style tree. I would pull the branches down as far as I could safely.
 
Thanks for everyone's reply. I will study your responses more and also stare at the tree until something reveals itself

I've thought of bunjin style myself, but as you can see, the upper half portion of the tree is rather straight, and wasn't sure it would make a convincing bunjin, but I have not totally decided against it. Will try to keep an open mind here.

I agree with Si that the chosen front might not be best, and will look at other possibilities

Thanks again, everyone. I will update this thread when there's more development to this tree

Happy New Year, everyone!

-Vince
 
I'm not much good at photo editing but I'd go with the first branch on the right and the small branch on the left and jin the top something like this;
juniper.jpg
 
OK, here's what I would recommend:
1. Pick a slightly different front. May be around the 4 o'clock position (your yellow tee is at 6 o'clock).
2. Lean the tree a little to the right and backward (compressing the visual height of the bonsai).
3. Wire and bend the 2 main branches forward, upward and to the left.
4. Wire the apex forward.

It will be a very sparse looking bonsai because of the thin foliage. But I like that look for these thin Cali junipers. Maybe aim for a coastal Monterrey cypress look.
Good luck!
 

Attachments

  • Carobone Cali juniper.jpg
    Carobone Cali juniper.jpg
    189.3 KB · Views: 41
Here are 2 options for this.
Good luck!
 

Attachments

  • image.jpg
    image.jpg
    181.1 KB · Views: 54
1. Pick a slightly different front. May be around the 4 o'clock position (your yellow tee is at 6 )

Si, thanks for the recommendations and the drawings. I will consider them and will let you know what comes up. FWIW, if I choose 4 o'clock as the front, the live root will be placed directly at the front.

One of my ideas, which is kind of similar to what you suggested, is to lean the tree to the right, at about three o'clock, and bring the useable branches back and "drape" over the trunk.

Thanks again, everyone. Be safe

-Vince
 
I am not as experienced as the other members giving their visions of the tree so please keep that in mind but this is the tree I see. It's not perfect by any stretch but it may give you some ideas.
 

Attachments

  • forumjuni2.jpg
    forumjuni2.jpg
    107.6 KB · Views: 24
Back
Top Bottom