Spruce styling

Ugo

Shohin
Messages
353
Reaction score
619
Location
Qc, Canada
USDA Zone
5A
Hi!

Hope everyone is doing well.

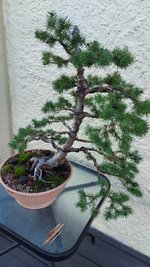
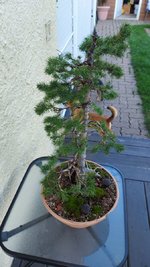
I would like to have your opinion for the styling of my spruce.

This is a tree I got from his previous owner last year.
It was neglected with basicly no foliage, a broken pot (still there!), wires marks and so on.
I decided to give it a try and bring this tree back to an acceptable level with my limited experience.

I had good advises on the forum, I guess I also did the right things at the right time and now the tree seems in good health with new buds everywhere, even on old wood.

I did try to style the tree a little bit, following the basics of what I learned here and mostly youtube!
I followed the old wire marks on the bark as I didnt want to get problems if the wires bites again.

My goal with the wiring was to style the tree but keep as much foliage possible, not damage any buds on old wood and give space to the branches.
The real prunning work will probably happen in August next year.

I plan to add Jin here and there on the tree one day as the tree doesnt have a branche on top.

I would also like to change the pot one day.
So far so good I didnt lose perfcolation and the substrate drain well so repotting might be for style reason only.
If you have suggestion fir the next pot you are welcome!

20210910_182614.jpg
20210910_182543.jpg
20210910_182520.jpg
20210910_182511.jpg20210910_182532.jpg
20210910_182657.jpg
 

Attachments

  • 20210910_182647.jpg
    20210910_182647.jpg
    256 KB · Views: 21

Deep Sea Diver

Masterpiece
Messages
4,412
Reaction score
9,121
Location
Bothell, WA
USDA Zone
8b
Good effort!

Yet none of the photos do your design justice. It’s really hard to see the depth of the design on these images, which make the branches look like rungs on a primitive ladder, which I believe isn’t reality. That said, you’ve got a tree that looks healthy at this point, sound and gaining strength.

My thought is that you need to grow out the tree more to gain more momentum…. and here’s the interesting part… you need to do this while forcing the energy down the tree so the lower branches get much stronger and thicker.

So it’s a bit of a tight rope to follow from here on.

You’ll have to prune on top to divert energy downward to grow out those lower branches, but keep the top branches growing strong enough to stay healthy while doing so. … AND manage the energy on each separate branch individually as you travel upwards so each branch grows out to be smaller in diameter then the one below. This will take quite some time.

To help, I’d slip pot this tree in a two times larger (wider and slightly deeper pot so the roots have room to grow out and strong. As the roots grow stronger, they will provide more energy to push the branch growth and trunk growth (which could use more taper.). You could do this by stages, using an intermediate size pot first then the largest pot in the next year

Finally one technique hint… there are more details to this but this is the gist… you can check a reference for the rest: When wiring branches one wants to avoid wiring branches opposite of each other… wiring this way allows the opposing branches to “seesaw” and doesn’t allow one maximum bending strength. Instead, when wiring branches off the trunk one wants to wire a lower branch to an upper branch with 1.5 - 2.5 wraps on the trunk between branches . These wraps will give one the maximum amount of anchoring strength for bending each branch, assuming one uses the proper wire gauge.

Finally at some point down the line you may want to, by stages over a year or two, remove that top overlapping root cluster by slowly cutting into the root more and more. This will allow the other roots to take up the slack until, finally, you’ll sever the root cluster completely.

Looking forward to seeing your future progress!

Cheers
DSD sends
 
Last edited:

Ugo

Shohin
Messages
353
Reaction score
619
Location
Qc, Canada
USDA Zone
5A
Good effort!

Yet none of the photos do your design justice. It’s really hard to see the depth of the design on these images, which make the branches look like rungs on a primitive ladder, which I believe isn’t reality. That said, you’ve got a tree that looks healthy at this point, sound and gaining strength.

My thought is that you need to grow out the tree more to gain more momentum…. and here’s the interesting part… you need to do this while forcing the energy down the tree so the lower branches get much stronger and thicker.

So it’s a bit of a tight rope to follow from here on.

You’ll have to prune on top to divert energy downward to grow out those lower branches, but keep the top branches growing strong enough to stay healthy while doing so. … AND manage the energy on each separate branch individually as you travel upwards so each branch grows out to be smaller in diameter then the one below. This will take quite some time.

To help, I’d slip pot this tree in a two times larger (wider and slightly deeper pot so the roots have room to grow out and strong. As the roots grow stronger, they will provide more energy to push the branch growth and trunk growth (which could use more taper.). You could do this by stages, using an intermediate size pot first then the largest pot in the next year

Finally one technique hint… there are more details to this but this is the gist… you can check a reference for the rest: When wiring branches one wants to avoid wiring branches opposite of each other… wiring this way allows the opposing branches to “seesaw” and doesn’t allow one maximum bending strength. Instead, when wiring branches off the trunk one wants to wire a lower branch to an upper branch with 1.5 - 2.5 wraps on the trunk between branches . These wraps will give one the maximum amount of anchoring strength for bending each branch, assuming one uses the proper wire gauge.

Finally at some point down the line you may want to, by stages over a year or two, remove that top overlapping root cluster by slowly cutting into the root more and more. This will allow the other roots to take up the slack until, finally, you’ll sever the root cluster completely.

Looking forward to seeing your future progress!

Cheers
DSD sends

Hi!

Thanks for your time and advises.

Looking again at the pictures, you're right, they do not give the tree justice.
It looks a bit better in person!

I understand the technique you mention about diverting energy and hope Ill be able to use it correctly.
Next year I will start to control the growth on top branches. There is two branches growing strong and I think I will be able to use pinching technique to manage the growth on part of theses branches.

To give you a better idea of the health of the tree this picture show what it look like when I got it last March:
20210327_143334.jpg
20210327_143219.jpg

The tree was weaker with basicly no foliage and no back buds.
After a bit of care, new buds started showing pretty much everywhere.

I still do have a question or 2 about repoting.
You suggest to slip pot in a bigger container and it totally make sense.
But I would like to have more informations on how to reduce the root mass after the tree is well established in a bigger pot.
I read that Spruce doesnt like to have their roots reduced so Im wondering if after the tree is well established in a larger pot is it possible to reduce the root mass slightly and repot the tree in a smaller pot until the desired pot size is reached or there is no possibility of reducing the roots and the final pot should be chosen accordingly?

On a side note I understand exactly what you mean about wiring...
I must admit its one of my first hands on experience and I still have a lot to learn!
But Ive seen the technique and I think I will be able to apply it on my future wiring work.

What you mention about the top overlapping root is interresting!
I didnt think about doing anything to it just yet as I was impressed at first and found it almost "exceptional".
The root is not visually appealing but its the first time in my short experience that I see a spruce with "aerial roots".
Theses trees grows everywhere here in Zone 5b and its not something you see often in nature.
Im still unsure of what I will do with it!

Thanks again for you help!
 
Last edited:

Deep Sea Diver

Masterpiece
Messages
4,412
Reaction score
9,121
Location
Bothell, WA
USDA Zone
8b
Very nicely done. Looks like your spruce horticultural technique is solid. The foliage mass is accelerating, so the roots are gaining strength.

The answer on reducing the roots is it depends… on what condition the roots actually are in, how much root mass there is after combing or washing the roots out, the condition of your foliage mass, on how viable your media is.…etc…

Rather then going on and on about the different situations, it might be fruitful for you to do a bit of guided research to get you going so you might appreciate some of the nuances involved that you haven’t encountered and to “meet” some of the really knowledgeable folks on site and pros doing actual work on spruces.

Here’s a thread with some of our experienced members discussing Spruce repotting

…and another thread

Bonsai Miral Sculptural Spruce repotting.

If you haven’t viewed this Bonsai Mirai video on energy management, pruning and creating spruce pads.

Also Bonsai Empire - Designing spruce bonsai

Repotting on a slab by Walter Pall

cheers
DSD sends
 

berzerkules

Shohin
Messages
321
Reaction score
738
Location
Alaska
USDA Zone
2
Very nicely done. Looks like your spruce horticultural technique is solid. The foliage mass is accelerating, so the roots are gaining strength.

The answer on reducing the roots is it depends… on what condition the roots actually are in, how much root mass there is after combing or washing the roots out, the condition of your foliage mass, on how viable your media is.…etc…

Rather then going on and on about the different situations, it might be fruitful for you to do a bit of guided research to get you going so you might appreciate some of the nuances involved that you haven’t encountered and to “meet” some of the really knowledgeable folks on site and pros doing actual work on spruces.

Here’s a thread with some of our experienced members discussing Spruce repotting

…and another thread

Bonsai Miral Sculptural Spruce repotting.

If you haven’t viewed this Bonsai Mirai video on energy management, pruning and creating spruce pads.

Also Bonsai Empire - Designing spruce bonsai

Repotting on a slab by Walter Pall

cheers
DSD sends
There is some good info in those links thanks.

You reminded me I need to go digging through the forums looking for anything spruce.
 

Ugo

Shohin
Messages
353
Reaction score
619
Location
Qc, Canada
USDA Zone
5A
Very nicely done. Looks like your spruce horticultural technique is solid. The foliage mass is accelerating, so the roots are gaining strength.

The answer on reducing the roots is it depends… on what condition the roots actually are in, how much root mass there is after combing or washing the roots out, the condition of your foliage mass, on how viable your media is.…etc…

Rather then going on and on about the different situations, it might be fruitful for you to do a bit of guided research to get you going so you might appreciate some of the nuances involved that you haven’t encountered and to “meet” some of the really knowledgeable folks on site and pros doing actual work on spruces.

Here’s a thread with some of our experienced members discussing Spruce repotting

…and another thread

Bonsai Miral Sculptural Spruce repotting.

If you haven’t viewed this Bonsai Mirai video on energy management, pruning and creating spruce pads.

Also Bonsai Empire - Designing spruce bonsai

Repotting on a slab by Walter Pall

cheers
DSD sends

Hi!

As berzerkules mention it, very good infos and wake-up call on the research function!
There is treasures of knowledge on this site, knowledge from others is invaluable and allow beginners like me to acquire notions way faster.
No magic here, my spruce got better because I got precise advises from another experienced member here, I got the easy work as I just had to apply and understand the reasons behind the suggestions.
Thanks for sharing!

On a side note I really like bonsai Mirai videos , Ryan Neil explain things in a way I can easily understand.
Another member suggested that I should get a membership but I didnt see the point at that time, now I think Im ready to pay myself a gift.

For now Im hoping my trees will be alright during winter as I absolutely want to see the future of this little spruce.
Its my first winter with bonsai so winterizing was a big part of my reading.
Winter shelter is ready, temperatures are getting colder so this will be a good test for me.
During this waiting time I will make sure Im ready for next spring.

Thanks again
Ugo
 

Deep Sea Diver

Masterpiece
Messages
4,412
Reaction score
9,121
Location
Bothell, WA
USDA Zone
8b
Good luck on your first winter over. It can be worrisome the first time. It was a bit for me. Yet Spruce are pretty hardy trees and a cold frame in zone 5A wouldn’t hurt. One might open it when the weather is above freezing and shut when below to keep good circulation.

I’m in zone 8b so I simply bury all my conifers outside under the trees out of the wind to just below the pot rim, with sifted bark nuggets added below the pot for drainage and 2” more spread around the on top and sides. Haven't lost a tree due to weather yet when treated this way.

best of luck!
DSD sends
 
  • Like
Reactions: Ugo

Ugo

Shohin
Messages
353
Reaction score
619
Location
Qc, Canada
USDA Zone
5A
Hi everyone!

Just a little update after 10 months of this tree life!
In the end it did survive winter without any issues and I repoted this tree last April in a bigger container as @Deep Sea Diver suggest.
The repot was fairly simple, the roots were in great conditions with alot of mycorrhizal.
I did prune the exterior of the root ball lightly, worked the surface and the sheen.

Im also getting better at wiring!
After watching carefully the videos @Adair M suggested I practiced and the result was better wiring work on my other trees, I will attempt styling this tree in August 23' as the tree will be left untouched this years.

This is the tree today
20220630_104515.jpg
20220630_104520.jpg
20220630_104526.jpg
20220630_104533.jpg

This is hard to see but in that picture there is 2 more buds opening!!
Is this can be considered as a second flush of growth?
I didnt know Spruce could have a second flush if that's the case.
20220630_104540.jpg
 

August44

Omono
Messages
1,877
Reaction score
1,334
Location
NE Oregon
USDA Zone
5-6
Hi everyone!

Just a little update after 10 months of this tree life!
In the end it did survive winter without any issues and I repoted this tree last April in a bigger container as @Deep Sea Diver suggest.
The repot was fairly simple, the roots were in great conditions with alot of mycorrhizal.
I did prune the exterior of the root ball lightly, worked the surface and the sheen.

Im also getting better at wiring!
After watching carefully the videos @Adair M suggested I practiced and the result was better wiring work on my other trees, I will attempt styling this tree in August 23' as the tree will be left untouched this years.

This is the tree today
View attachment 444640
View attachment 444641
View attachment 444642
View attachment 444643

This is hard to see but in that picture there is 2 more buds opening!!
Is this can be considered as a second flush of growth?
I didnt know Spruce could have a second flush if that's the case.
View attachment 444644
Good job!
 
  • Like
Reactions: Ugo

Deep Sea Diver

Masterpiece
Messages
4,412
Reaction score
9,121
Location
Bothell, WA
USDA Zone
8b
Well Done! Looks like the tree responded really well.

In the meantime….when you have some time, take a good look at those first three side view photos and see if you notice where the major foliage distribution is…..

cheers
DSD sends
 
  • Like
Reactions: Ugo

Ugo

Shohin
Messages
353
Reaction score
619
Location
Qc, Canada
USDA Zone
5A
That turned out beautifully.
Thank you!

Next year more serious work will be done on the tree.
I have to wedge a few branches, prune especially on the strongest part of the tree to promote better energy distribution and re-work the apex toward that "old conifer" design.
Ive let it grow for almost 2yrs now, did a repot that was needed so next year will be the perfect time for the work.
 

Deep Sea Diver

Masterpiece
Messages
4,412
Reaction score
9,121
Location
Bothell, WA
USDA Zone
8b
It might be wise to push some of the upper growth inward if there are inner branchlets or buds to cut back to. (jic: Spruce do not back bud on bare wood.)

This pruning can be done anytime the tree is responding positively and will help redistribute energy to the lower branches this season.

Cheers
DSD sends
 

Ugo

Shohin
Messages
353
Reaction score
619
Location
Qc, Canada
USDA Zone
5A
It might be wise to push some of the upper growth inward if there are inner branchlets or buds to cut back to. (jic: Spruce do not back bud on bare wood.)

This pruning can be done anytime the tree is responding positively and will help redistribute energy to the lower branches this season.

Cheers
DSD sends

Hi!

Yes thank you for the advise.
As I repoted this tree back in April I didnt want to do anymore work even if the foliar mass is not balanced but it didnt skip a beat and responded really well so I might concider reducing the most vigourous section to interior growth.
As for a time to do the work I was thinking at the end of August so the tree will have plenty of time to accumulate the energy lost this growing season, will have enough time to heal before first frost ect..
Either that or stick to the plan and work on this issue next Spring before buds break?
Worse come to worse stronger will get stronger and weaker is gonna get weaker right?
I dont want to push the limits of this little guy until it is well set in its new pot but health wise I dont have visual indications that I should'nt do minimal work.
 
Last edited:

Deep Sea Diver

Masterpiece
Messages
4,412
Reaction score
9,121
Location
Bothell, WA
USDA Zone
8b
Hi!

Yes thank you for the advise.
As I repoted this tree back in April I didnt want to do anymore work even if the foliar mass is not balanced but it didnt skip a beat and responded really well so I might concider reducing the most vigourous section to interior growth.
As for a time to do the work I was thinking at the end of August so the tree will have plenty of time to accumulate the energy lost this growing season, will have enough time to heal before first frost ect..
This is a good project tree and, under your care, it has responded well.

Actually, please hold that pruning thought while taking a step back to look at the big picture. It looks like you may want to alternately spend some time conceptualizing where on the bonsai spectrum you want the tree to be… from an old growth naturalistic tree to or a more traditional Bonsai model. This decision guide will drive your immediate pruning and styling

The trunk is pretty thick all the way up…so I took the liberty of checking around for a possible starter example and technique to help you think through an old growth model. It’s by Michael Hagedorn, who is very practiced with the naturalistic style. (please pardon me if you’ve already done this.

This example is about a White Pine, yet the styling concepts are similar

cheers
DSD sends
 

Ugo

Shohin
Messages
353
Reaction score
619
Location
Qc, Canada
USDA Zone
5A
This is a good project tree and, under your care, it has responded well.

Actually, please hold that pruning thought while taking a step back to look at the big picture. It looks like you may want to alternately spend some time conceptualizing where on the bonsai spectrum you want the tree to be… from an old growth naturalistic tree to or a more traditional Bonsai model. This decision guide will drive your immediate pruning and styling

The trunk is pretty thick all the way up…so I took the liberty of checking around for a possible starter example and technique to help you think through an old growth model. It’s by Michael Hagedorn, who is very practiced with the naturalistic style. (please pardon me if you’ve already done this.

This example is about a White Pine, yet the styling concepts are similar

cheers
DSD sends

Hi!

Thanks again!
The example you provide in the link is what I had in mind design wise.
Beautifull example I must said!
When I had this tree there was no apex...
Branches were removed for an unknown reason.
But a conifer without an apex mean ancient if im not mistaken.

Im not looking at more elongation of the first branches, again for the same reason, old mountain trees will have "shorter" bottom branches to counter snow accumulation.
In nature longer branches will break under the weight.
I kept all the growth for obvious health reason and my plan after the repot done on the tree last April is to focus on keeping good care of this tree, let it grow "wild" until I feel its time for a proper structural pruning.
I really have to get more information on the "wedge" technique as the angle of pretty much all the main branches will have to be corrected.
Energy distribution will start the year after!

Thanks again
Ugo
 

Ugo

Shohin
Messages
353
Reaction score
619
Location
Qc, Canada
USDA Zone
5A
Little follow-up on this tree!

Repot was done in April 21' and by the beginning of Autum 22' I could see water accumulation on top of the soil surface.
Nothing to raise a red flag but I focused on the tree until I found a layer of mycorrhizae that formed about 1/8 under the surface of the soil and under the pot covering the drainage holes.

I started by cleaning the drainage holes and took care of watering properly while tilting the pot at an angle to make sure the water will get to the sheen of the tree and drain more easily.

That was until yesterday! I re-worked the top of the soil, taking out big chucks of fungal mass while making sure the roots were combed to the outside.
The work was very minimal but I see a difference in water penetration.

Rework was not expected especially only after a year after repotting... but Im amazed by how fast the roots occupied this pot.

Before:
1.jpg

During work:
2.jpg

Examples of fungal mass that were removed during the work.
I kept it all and I will try to propagate this mycorrhizae strain in a separate pot.
3.jpg20230328_194957.jpg

Work complete
4.jpg


As you can see I have to do something with the strength of the higher branches.
Having in mind I just slightly reworked the top of the soil, do you think I still can stick to the plan and clean-up the top part of the tree before bud swells?
Again nothing ¨major¨ : cleaning crutches, creating space for light and air, get rid of the weaker shoots the ultimate goal is to focus on energy distribution to the lower branches.

20230328_194358.jpg20230328_194506.jpg


Thanks alot
Ugo
 

August44

Omono
Messages
1,877
Reaction score
1,334
Location
NE Oregon
USDA Zone
5-6
Ugo. Your tree looks to be very healthy for sure. What in the world is all of that stuff that was all over your soil and you removed. Is that the same as in your hand?

Do the needles on this tree get pokey and sharp feeling at times. Are you sure that is a spruce?
 

Eckhoffw

Masterpiece
Messages
2,934
Reaction score
4,743
Location
St. Paul Mn.
USDA Zone
4b
Great looking tree. And nice work so far!

Have you toyed with the idea of wiring the branches at the right, -outside of the trunk curve- down a bit?
As of now, the are coming out at about 90 degrees from the trunk, making them flare upwards.
I think it might look more natural with them brought down closer to horizontal.
 
Top Bottom