Chinese elm roots mess

Messages
823
Reaction score
1,146
Location
Salt Lake City, UT, USA
USDA Zone
7a
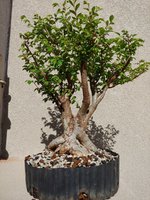
I picked this elm up recently on FB. I was excited to see an elm that isn't in a typical import "broom" style. But I knew from the get-go that the roots would be a challenge. Not sure how they got this way, but it's a mess. Big fat tuber on one side, a smaller tuber swooping around the other side, and then this twist of fused roots in the middle that wouldn't be that bad on their own, but cutting off the other two would leave me with big scars and nasty inverse taper.

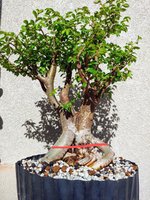
What I am thinking I will do is plant the tree deeper and grow a new and (hopefully) improved root base. There are two ways I could do this: (1) cut a girdle all the way around and use a deeper pot to ground-layer right now; or (2) grow it hard this growing season, then cut it off at the red line next spring and plant it as a big cutting. Advice?
0510210918~2.jpg

Other side:

0510210919.jpg
 
It is not uncommon for Chinese elms to develop thick roots like this when mass produced with infrequent root pruning. It is far too late to remove the offending higher roots and even if you could the ones lower may not be much better.

There's nothing for scale in the pics so hard to estimate the size of this trunk. based on the leaves it is probably a couple of inches thick.
Chinese elm are relatively easy to strike as cuttings but a cutting that size and age would be touch and go so unless you have lots of experience and excellent conditions for cuttings I would go with layering. You can also start layering now and have good roots started well before next spring. you can either transfer it to a deeper pot or just add a 'fence' round the edge of the pot to hold more potting soil to cover the layered area. A cut down plastic plant pot makes a great ring to raise potting soil level for ground layering like this.
 
I think "other side" has some value to layer at that red, but the difficulties in both the roots and trunks makes me think the faster path to more and better material is with a couple seperate airlayers.

I'd "mother plant" it for layers and cuttings until it shows signs of falling into a better design.

Sorce
 
The other side looks like you could plant it just a tad deeper and wound the roots to encourage them to close together and move forward with your development. .02
 
I would follow a ground layer process. Raise the walls of this pot up higher with a similar type plastic pot. Or, make a square wooden box that will just be enough to hold this pot and have the wood walls higher than this pot by several inches. I would suggest a layer where I placed the blue line. I think that if you layer below that you’ll have a bigger mess with the tree doing it’s best to use the backs of those bigger thick roots, or grow roots from the very center and abandon trying to grow from the thick root ends, and it would not fully add a new desirable root layer. It would be very spotty.

It's an interesting tree trunk at the base. It looks like two trees were banded/placed tightly together to get them to melt together. Like a trunk grafting at the base. It could just be my imagination though.
C250FC42-0749-4B72-B46F-4B787DC06458.jpeg
 
Thanks everybody for the responses. Amazing how I can feel so much smarter (well, at least how I choose to look at it ;) ) after opening up things like this to others' input here. The answer now seems so obvious.

I am going to start the ground layer probably this weekend. I have some pumice/lava/bark mix that is about half the size of what the tree is currently in that I will use to back-fill. I may try and find some sphagnum moss locally that I can chop up and mix in to hold moisture around the girdle. Then, assuming I have enough roots next spring, I can saw it off flat and place it on a board/tile to discourage the new roots doing the same thing as the old.
 
Yeah cool tree, can certain take advantage of the width of the roots, to make a great base. You could have a really good wide rounded base on this in a few years.
I don't like pancake nebari but you could also have that in some years to come.

Also, although perfectly doable with your substrate mix, I would always advertise Sphag Moss for root growth. Time and time again, its the most common thing I've seen given and works for me. Just be aware of keeping it moist and not too wet.
 
Thanks everybody for the responses. Amazing how I can feel so much smarter (well, at least how I choose to look at it ;) ) after opening up things like this to others' input here. The answer now seems so obvious.

I am going to start the ground layer probably this weekend. I have some pumice/lava/bark mix that is about half the size of what the tree is currently in that I will use to back-fill. I may try and find some sphagnum moss locally that I can chop up and mix in to hold moisture around the girdle. Then, assuming I have enough roots next spring, I can saw it off flat and place it on a board/tile to discourage the new roots doing the same thing as the old.
I’m with @ConorDash on this one. If you can find some sphagnum moss I would use it around the cut site and use your substrate to weigh down the sphag. It’s an interesting tree for sure and should make something cool if you can get those roots to cooperate!
 
If you can find some sphagnum moss

Picked up a small bale at Home Depot last night, enabling me to get this project done this weekend. The concern I have about using pure moss around the cut is that I have heard a lot about sphagnum not producing hardy roots, and/or becoming entangled in the roots that are produced. This might be mitigated by still chopping it up before applying.

Thank you for the kind remarks!
 
Back
Top Bottom