joepa82
Sapling
I was wondering what methods were used to create taper in a formal upright tree. The only method I have found is by "jinning" the top. Trunk chops would seem to create a bit of movement which is not ideal. Any suggestions?
") (also depends on how brittle/flexible the plant is)
(also depends on how brittle/flexible the plant is)Depending on the species and health of the tree. Cutting back to one or two branches, then wiring that branch up for a new leader works well. Basically, you are growing a whole new upper portion of the tree from this wired up branch. Eventually, that branch thickens and the site of the cut will start to look more natural as that branch thickens up. It may take awhile, but it can produce good results. Also, depending on the view of the tree. The chop could be made so that it is in the back. You would not even see the chop.
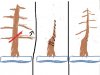
Here is a virt.
I did this very thing on my Wintergreen Juniper in this progression thread.
I left a temporary stub from the original trunk to wire the branch to. Make sure there is no kink in the trunk line. Since the trunk/branch area was fairly thick, I used a thick rubber pad under the copper wire used to draw the two halves together. I tightened the wire slowly throughout the day to bring the branch up to a straight line.
Did you do anything to the exposed wood you brought together, or anything to seal off the area once they were joined?
Trunk chops would seem to create a bit of movement which is not ideal. Any suggestions?

It's time to lop off that sacrifice leader on your formal upright.
Eric,
It's time to lop off that sacrifice leader on your formal upright. Not only are formal uprights supposed to have straight trunks, they are not supposed to have huge scars! Yeah, I know, impossible. But that sacrifice has done it's job.
 styling of each tree?
That forest was created by John Naka.
I took workshops with John.
My copy of "Bonsai Techniques I" was personally signed by John, and reads:
To Adair,
I hope this will assist you into a beautiful world of miniatures. John Yoshio Naka, Feb 15, 1987".