HGs Ceramics

harshadg

Yamadori
Messages
88
Reaction score
189
Location
Connecticut
USDA Zone
7a
I’ve been working since last winter at two community studios to learn to make ceramics and I’m sharing some work here with the primary intention of getting feedback.

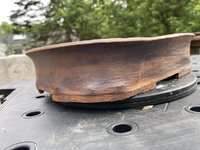
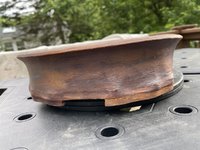
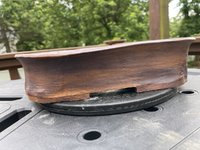
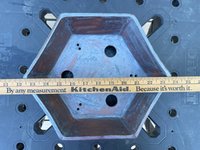
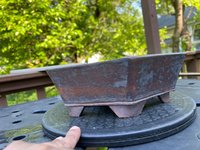
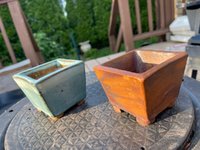
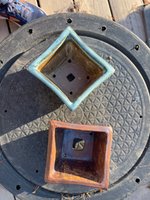
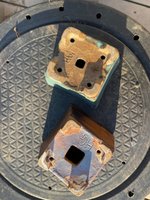
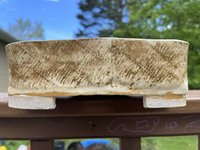
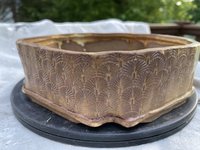
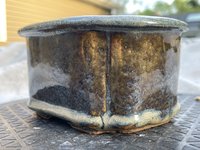
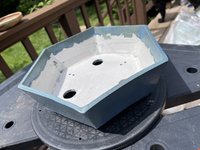
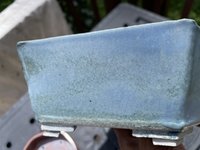
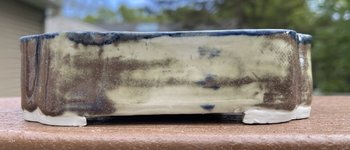
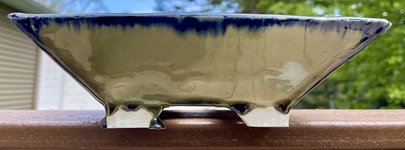
I’ve now worked with laguna brown stoneware, white stoneware, bmix and porcelain. Im primarily hand building from rolled out slabs. I’ve been experimenting with custom designs and am getting a sense of what I like, what I can build and what actually makes it through the kilns without warping.

A big challenge has been in finding matt glazes that work. However I’m making some progress combining oxides with glazes or by themselves.

Anyway, I’d appreciate any constructive feedback on my work.
 

Attachments

  • IMG_4711.jpeg
    IMG_4711.jpeg
    325.8 KB · Views: 211
  • IMG_4607.jpeg
    IMG_4607.jpeg
    97.5 KB · Views: 174
  • IMG_4608.jpeg
    IMG_4608.jpeg
    156.9 KB · Views: 158
  • IMG_4609.jpeg
    IMG_4609.jpeg
    201.9 KB · Views: 148
  • IMG_4647.jpeg
    IMG_4647.jpeg
    187 KB · Views: 150
  • IMG_4643.jpeg
    IMG_4643.jpeg
    162.9 KB · Views: 147
  • IMG_4649.jpeg
    IMG_4649.jpeg
    211.4 KB · Views: 146
  • IMG_4650.jpeg
    IMG_4650.jpeg
    195.2 KB · Views: 146
  • IMG_4654.jpeg
    IMG_4654.jpeg
    269.7 KB · Views: 142
  • IMG_4651.jpeg
    IMG_4651.jpeg
    217.3 KB · Views: 145
  • IMG_4693.jpeg
    IMG_4693.jpeg
    149 KB · Views: 142
  • IMG_4702.jpeg
    IMG_4702.jpeg
    145.4 KB · Views: 139
  • IMG_4700.jpeg
    IMG_4700.jpeg
    170.1 KB · Views: 144
  • IMG_4706.jpeg
    IMG_4706.jpeg
    194.6 KB · Views: 144
  • IMG_4703.jpeg
    IMG_4703.jpeg
    271.4 KB · Views: 139
Some more here
 

Attachments

  • IMG_4604.jpeg
    IMG_4604.jpeg
    125.3 KB · Views: 129
  • IMG_4602.jpeg
    IMG_4602.jpeg
    114.1 KB · Views: 131
  • IMG_4601.jpeg
    IMG_4601.jpeg
    94.9 KB · Views: 127
  • IMG_4600.jpeg
    IMG_4600.jpeg
    109 KB · Views: 125
  • IMG_4603.jpeg
    IMG_4603.jpeg
    166.9 KB · Views: 116
  • IMG_4599.jpeg
    IMG_4599.jpeg
    98.2 KB · Views: 121
  • IMG_4598.jpeg
    IMG_4598.jpeg
    154.5 KB · Views: 121
  • IMG_4597.jpeg
    IMG_4597.jpeg
    90.6 KB · Views: 118
  • IMG_4596.jpeg
    IMG_4596.jpeg
    88 KB · Views: 121
  • IMG_4516.jpeg
    IMG_4516.jpeg
    162.6 KB · Views: 126
  • IMG_4515.jpeg
    IMG_4515.jpeg
    129.7 KB · Views: 127
  • IMG_4506.jpeg
    IMG_4506.jpeg
    125.9 KB · Views: 126
  • IMG_4505.jpeg
    IMG_4505.jpeg
    111.4 KB · Views: 128
  • IMG_4502.jpeg
    IMG_4502.jpeg
    106.9 KB · Views: 147
Hi there! Good looking pots 🙂 I am a beginner potter myself, so take my constructive feedback with a grain of salt.

I really like your textures and glazes!

You may want to consider the proportions of the feet - some of them seem a bit large for my opinion.

You may find it helpful to add a lip to the pots to help it not warp as much.

Looks like you are doing really great to be honest! I’ve found that the best way to get better at making pots is to make more pots :)
 
Thanks for the encouragement. The feet are now a bit tall for two reasons:

1. I found that the slabs will sometimes sag and warp during the high fire. The last pot I show here has that problem. To get around this I moved from 4-5 mm tall feet to 10-15 mm feet.
2. Practically I like to be able to pick up a pot by sliding my fingers underneath. The additional height helps,

Regarding adding a rim: I’m with you. I’m testing this idea myself. Especially for the larger pots I find that the angle of the wall (slightly outward over straight up) helps a lot with warping. I’ve been experimenting with adding visual weight to the top by using an oxide.
 
I don't know enough about ceramics to suggest a way to fix the sagging and warping, but sometimes an off-kilter pot is just what a tree needs.

I also like those glazes. They are colorful, but they still appear to be subtle enough that they won't overpower a good tree.
 
A third reason is that some glazes like oribe run a lot! For now I work in a community studio so I don’t have control over the glazes and the timing of the firing. My pieces often take weeks to dry and then they’re waiting on the shelves for a few more weeks…
 
Good looking pots. There are a lot of Pro's to working in a community studio, from seeing everyone else's work and learning from what others are doing, to being able to have access to all the equipment without the huge investment. One of the down sides is you do not have as much control over the firing. When you make your feet, I generally make extra, that I do not attach. (keep it with the pots) then you can ask the studio tech to place them below your pot before the high fire (they should also be bisque fired). Then when the pot bottom sags a little it will land on the "extra" feet and lay nice and flat. At least thats what I do.

I like your use of texture and your forms are nice-- as you mentioned trying to work against the clay wanting to shrink in is a challenge. My only critique is very minimal, but I would clean the canvas texture on more of the work and in general the feet. Some of your feet look great others look like they could benefit from a quick swipe of a rib tool to give it just a little nicer presentation. As a whole, great job and keep it up!!
 
Thank you for the kind words. The suggestion to make and place additional feet is brilliant! I will check with the studios here. Fingers crossed!

Agreed on the canvas texture - that’s easy to get rid of. In general, I need to be cleaner with the glazes too so the pots look neat when they come out.
 
Here’s a hand built porcelain pot from with celadon, fresh out of the kiln. No warping of the bottom but the sides do show some warping. Getting porcelain to survive cone10 without warping is quite challenging!

I like how the glaze turned out - it’s quite bright for celadon, and I also like how the pattern shows through.

The other option here was to go with a blue glaze (think delft blue) to fill the pattern and a clear on top but I thought that might be quite overwhelming.

Constructive feedback always welcome.
 

Attachments

  • IMG_4735.jpeg
    IMG_4735.jpeg
    107.2 KB · Views: 106
  • IMG_4734.jpeg
    IMG_4734.jpeg
    121.4 KB · Views: 100
  • IMG_4733.jpeg
    IMG_4733.jpeg
    160.5 KB · Views: 99
  • IMG_4732.jpeg
    IMG_4732.jpeg
    164.2 KB · Views: 99
  • IMG_4731.jpeg
    IMG_4731.jpeg
    170 KB · Views: 94
  • IMG_4730.jpeg
    IMG_4730.jpeg
    167.9 KB · Views: 91
  • IMG_4729.jpeg
    IMG_4729.jpeg
    168.9 KB · Views: 98
Here’s a hand built brown stoneware pot. Cone10 firing. No glaze but only iron oxide. Applied then sponged off. Absolutely love how it came out. I’ve been looking for a matt brown glaze for a while and it’s clear that iron oxide is the way to go.

The cracking that can be seen is not a structural flaw as much as it is the paper clay that seems to dry at a different rate than the clay body. I will fill it with epoxy prior to use so that water doesn’t get in there and cause issues over the winter.
 

Attachments

  • IMG_4742.jpeg
    IMG_4742.jpeg
    216.7 KB · Views: 108
  • IMG_4743.jpeg
    IMG_4743.jpeg
    296.1 KB · Views: 98
  • IMG_4741.jpeg
    IMG_4741.jpeg
    197.7 KB · Views: 95
  • IMG_4740.jpeg
    IMG_4740.jpeg
    197.6 KB · Views: 92
  • IMG_4739.jpeg
    IMG_4739.jpeg
    203.4 KB · Views: 88
  • IMG_4738.jpeg
    IMG_4738.jpeg
    207.2 KB · Views: 84
  • IMG_4737.jpeg
    IMG_4737.jpeg
    197.8 KB · Views: 83
  • IMG_4736.jpeg
    IMG_4736.jpeg
    211.9 KB · Views: 90
Agreed. I’ve settled on a different hexagon form now. This and the blue one are the same form, and I’m pretty happy with the process so far.
 

Attachments

  • IMG_5378.jpeg
    IMG_5378.jpeg
    265.5 KB · Views: 85
  • IMG_5377.jpeg
    IMG_5377.jpeg
    361.3 KB · Views: 79
  • IMG_5376.jpeg
    IMG_5376.jpeg
    339.8 KB · Views: 83
  • IMG_5373.jpeg
    IMG_5373.jpeg
    349.6 KB · Views: 81
  • IMG_5374.jpeg
    IMG_5374.jpeg
    367.7 KB · Views: 83
  • IMG_5370.jpeg
    IMG_5370.jpeg
    360 KB · Views: 80
  • IMG_5371.jpeg
    IMG_5371.jpeg
    366.7 KB · Views: 79
  • IMG_5372.jpeg
    IMG_5372.jpeg
    352.4 KB · Views: 81
  • IMG_5369.jpeg
    IMG_5369.jpeg
    333 KB · Views: 92
I think so too. It’s a simple application of iron oxide under reducing conditions. The other brown glazes I have access to are glossy, and don’t quite work.
 
Slate blue oval hand built cone 10. Brown stoneware. This one is about 7”x5.5”x0.75” deep.
 

Attachments

  • IMG_5482.jpeg
    IMG_5482.jpeg
    186.3 KB · Views: 84
  • IMG_5484.jpeg
    IMG_5484.jpeg
    209.3 KB · Views: 76
  • IMG_5485.jpeg
    IMG_5485.jpeg
    256.5 KB · Views: 74
  • IMG_5486.jpeg
    IMG_5486.jpeg
    239.1 KB · Views: 75
  • IMG_5487.jpeg
    IMG_5487.jpeg
    209.3 KB · Views: 76
  • IMG_5488.jpeg
    IMG_5488.jpeg
    460.4 KB · Views: 77
  • IMG_5489.jpeg
    IMG_5489.jpeg
    431.2 KB · Views: 86
Slate blue oval hand built cone 10. Brown stoneware. This one is about 7”x5.5”x0.75” deep.
Nice hand built.

Curious, have you ever used anything that is cone 6 that you used in areas where it freezes? Standard Clay has a couple varieties that have an absorption rate under 1%...one in particular is .25% at cone 6. It's their sculpture clay - 547 red sculpture clay. Once I'm out of my 182, I'll get a box of that and make some oval bonsai pots. Just curious if yours are frost proof. I know you cone 10 in your posts I've seen.
 
Thanks!

I haven’t tried cone6 yet. My pots are all cone 10 so these are frost proof. I’m limited to what clay I can use since I work out of community studios.
 
Nice hand built.

Curious, have you ever used anything that is cone 6 that you used in areas where it freezes? Standard Clay has a couple varieties that have an absorption rate under 1%...one in particular is .25% at cone 6. It's their sculpture clay - 547 red sculpture clay. Once I'm out of my 182, I'll get a box of that and make some oval bonsai pots. Just curious if yours are frost proof. I know you cone 10 in your posts I've seen.

Lots of potters use cone 6 clay for bonsai pots. It is freeze safe just like cone 10 clay. I use cone 6 myself (been doing pottery about 3 years now) and it gets pretty cold here in Colorado in the winters 😉
 
Kiln openings are always fun. Have a few more to share. Still trialling different glazes and forms but getting closer to what I want. As always feedback welcome.

Here are two square pots. Cone 10 brown stoneware.
 

Attachments

  • IMG_5514.jpeg
    IMG_5514.jpeg
    348.9 KB · Views: 67
  • IMG_5515.jpeg
    IMG_5515.jpeg
    309.4 KB · Views: 68
  • IMG_5516.jpeg
    IMG_5516.jpeg
    328.7 KB · Views: 64
  • IMG_5517.jpeg
    IMG_5517.jpeg
    313.8 KB · Views: 64
  • IMG_5518.jpeg
    IMG_5518.jpeg
    402.6 KB · Views: 62
  • IMG_5519.jpeg
    IMG_5519.jpeg
    398.6 KB · Views: 93
Back
Top Bottom